August 8 2025
Dear Partners,
Thanks for your continued support of Norming solutions. Norming Resource Manager 2025 PU1 is released with one new module and a number of new features.
Below please find the details.
New Module
Multi-Entity Approval
Purpose of the module
Providing a single and unified interface for approvers to approve requests from multiple companies, approvers no longer need to log into different companies for approval, thus to improve work efficiency.
How to enable the module
Go to Admin Portal > Administrative Services > License Information to activate license for this module.
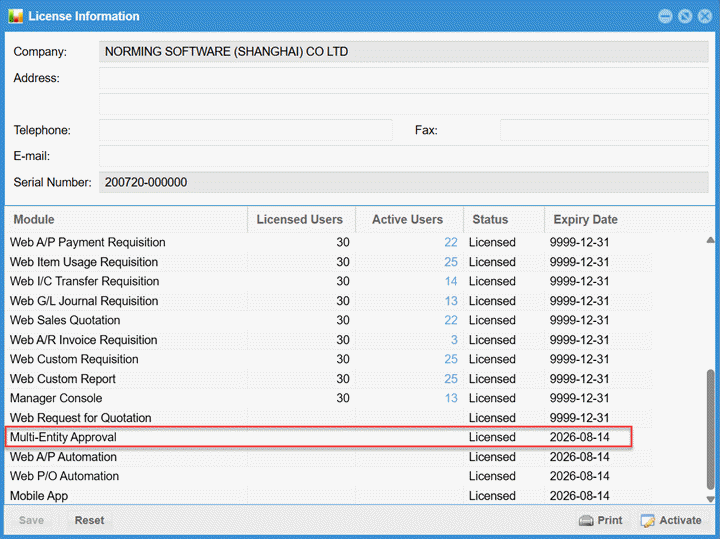
Once license is activated, approvers are able to view and approve requests from different companies in one single interface.
How to use the module
If Multi-entity Approval module is activated and there are pending requests to approve in more than one company, the ‘To Approve List’ list is organized in three layers, Awaiting Approval > Companies > Transactions. Otherwise, there are only two layers for the ‘To Approve List’, Awaiting Approval > Transactions.
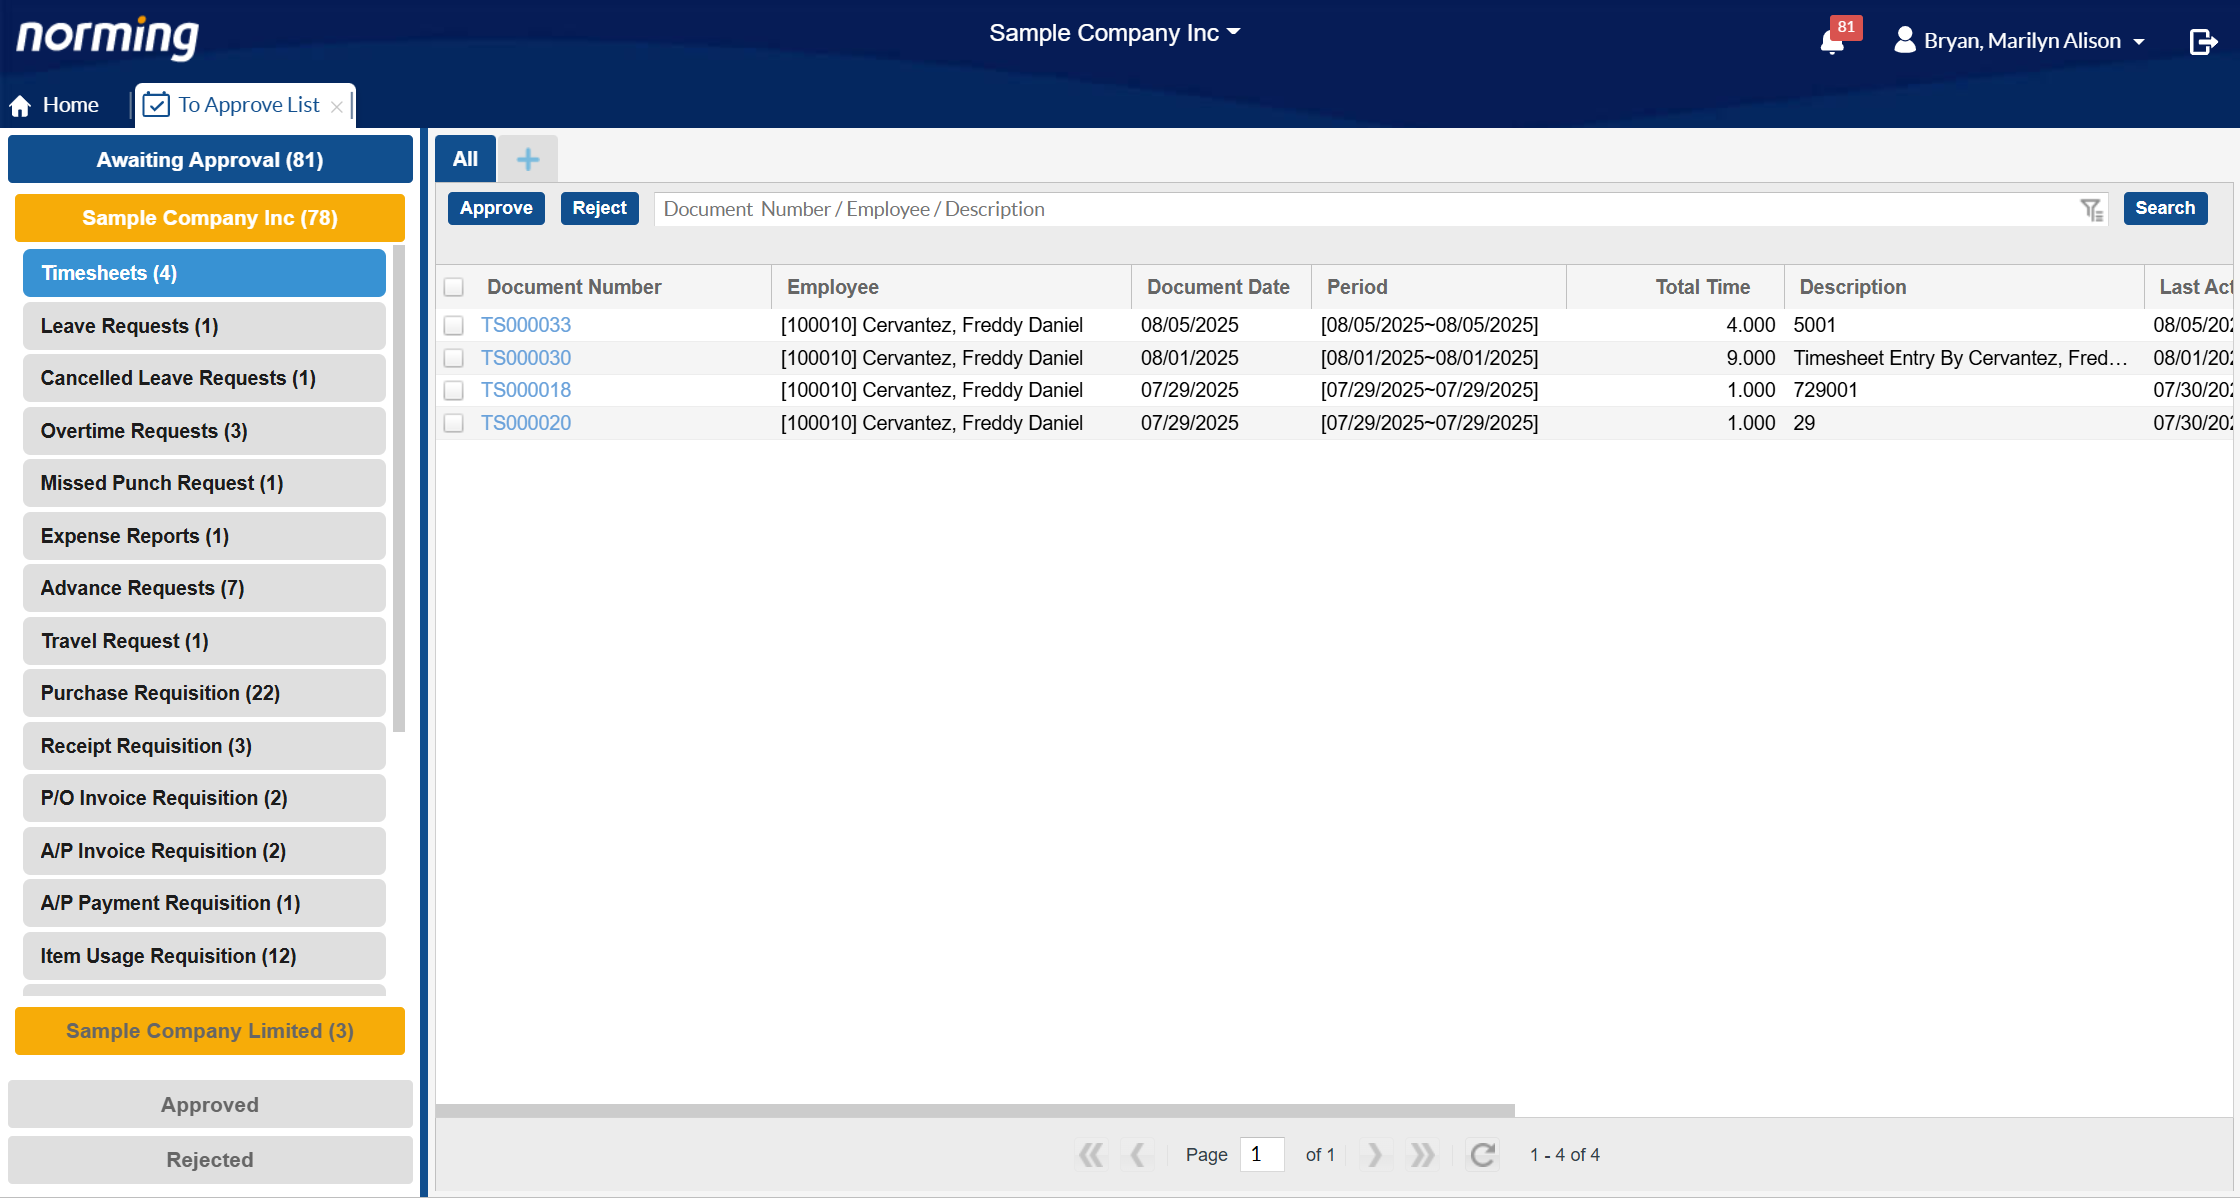
Companies are highlighted in a different color to make it easy to locate a different company to make approval.
New Features
Purchase Requisition
Five enhancements are added to the Purchase Requisition module in this release:
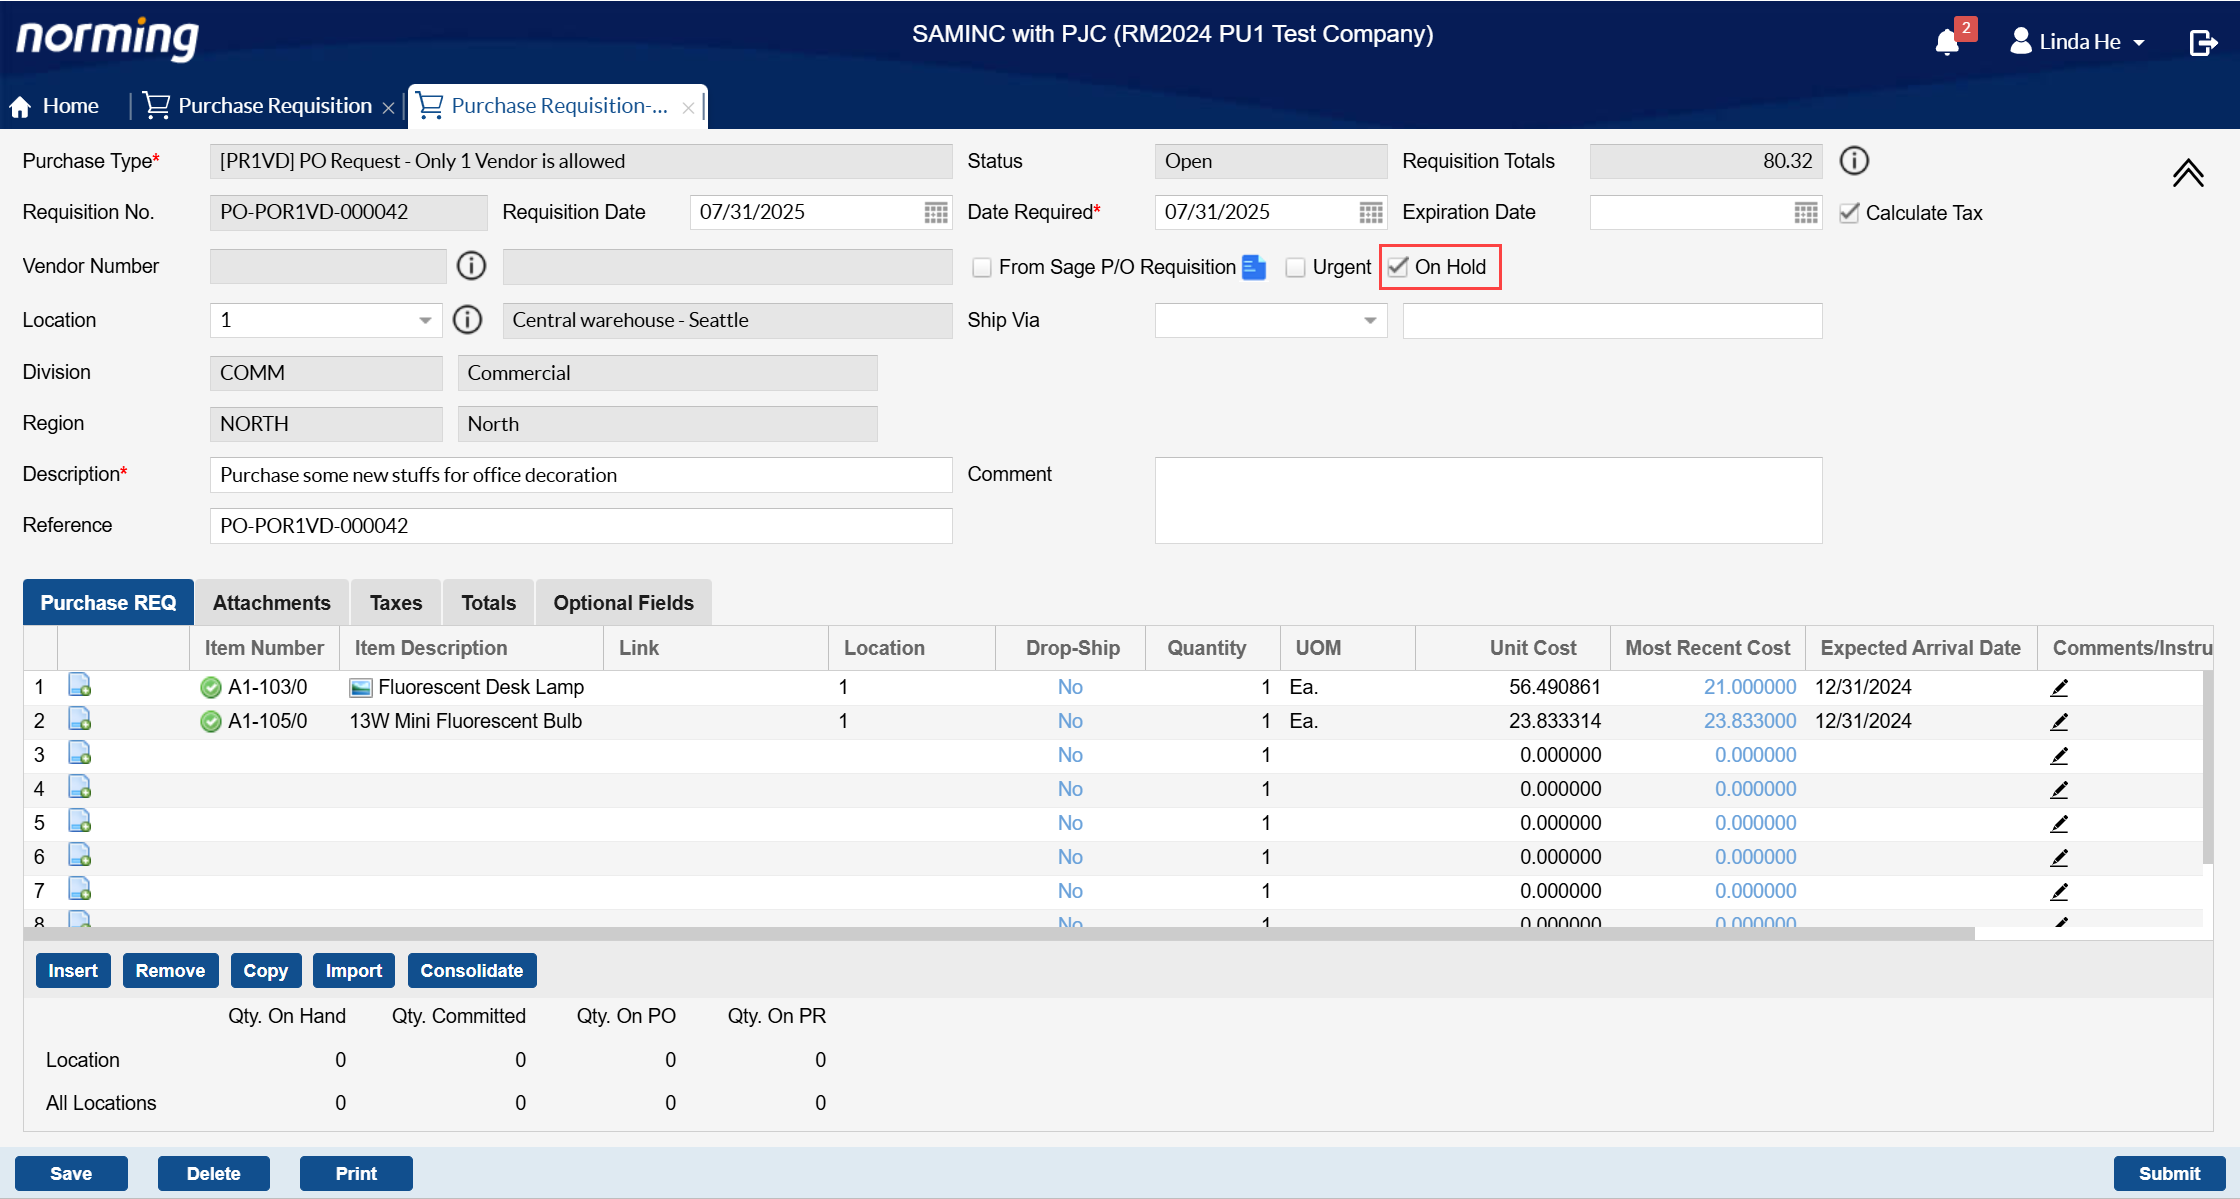
1. Provide the 'On Hold' flag for R/M purchase requisitions.
The value of this flag can be copied to the Sage 300 P/O requisition entry or P/O purchase order that generated by R/M purchase requisition.
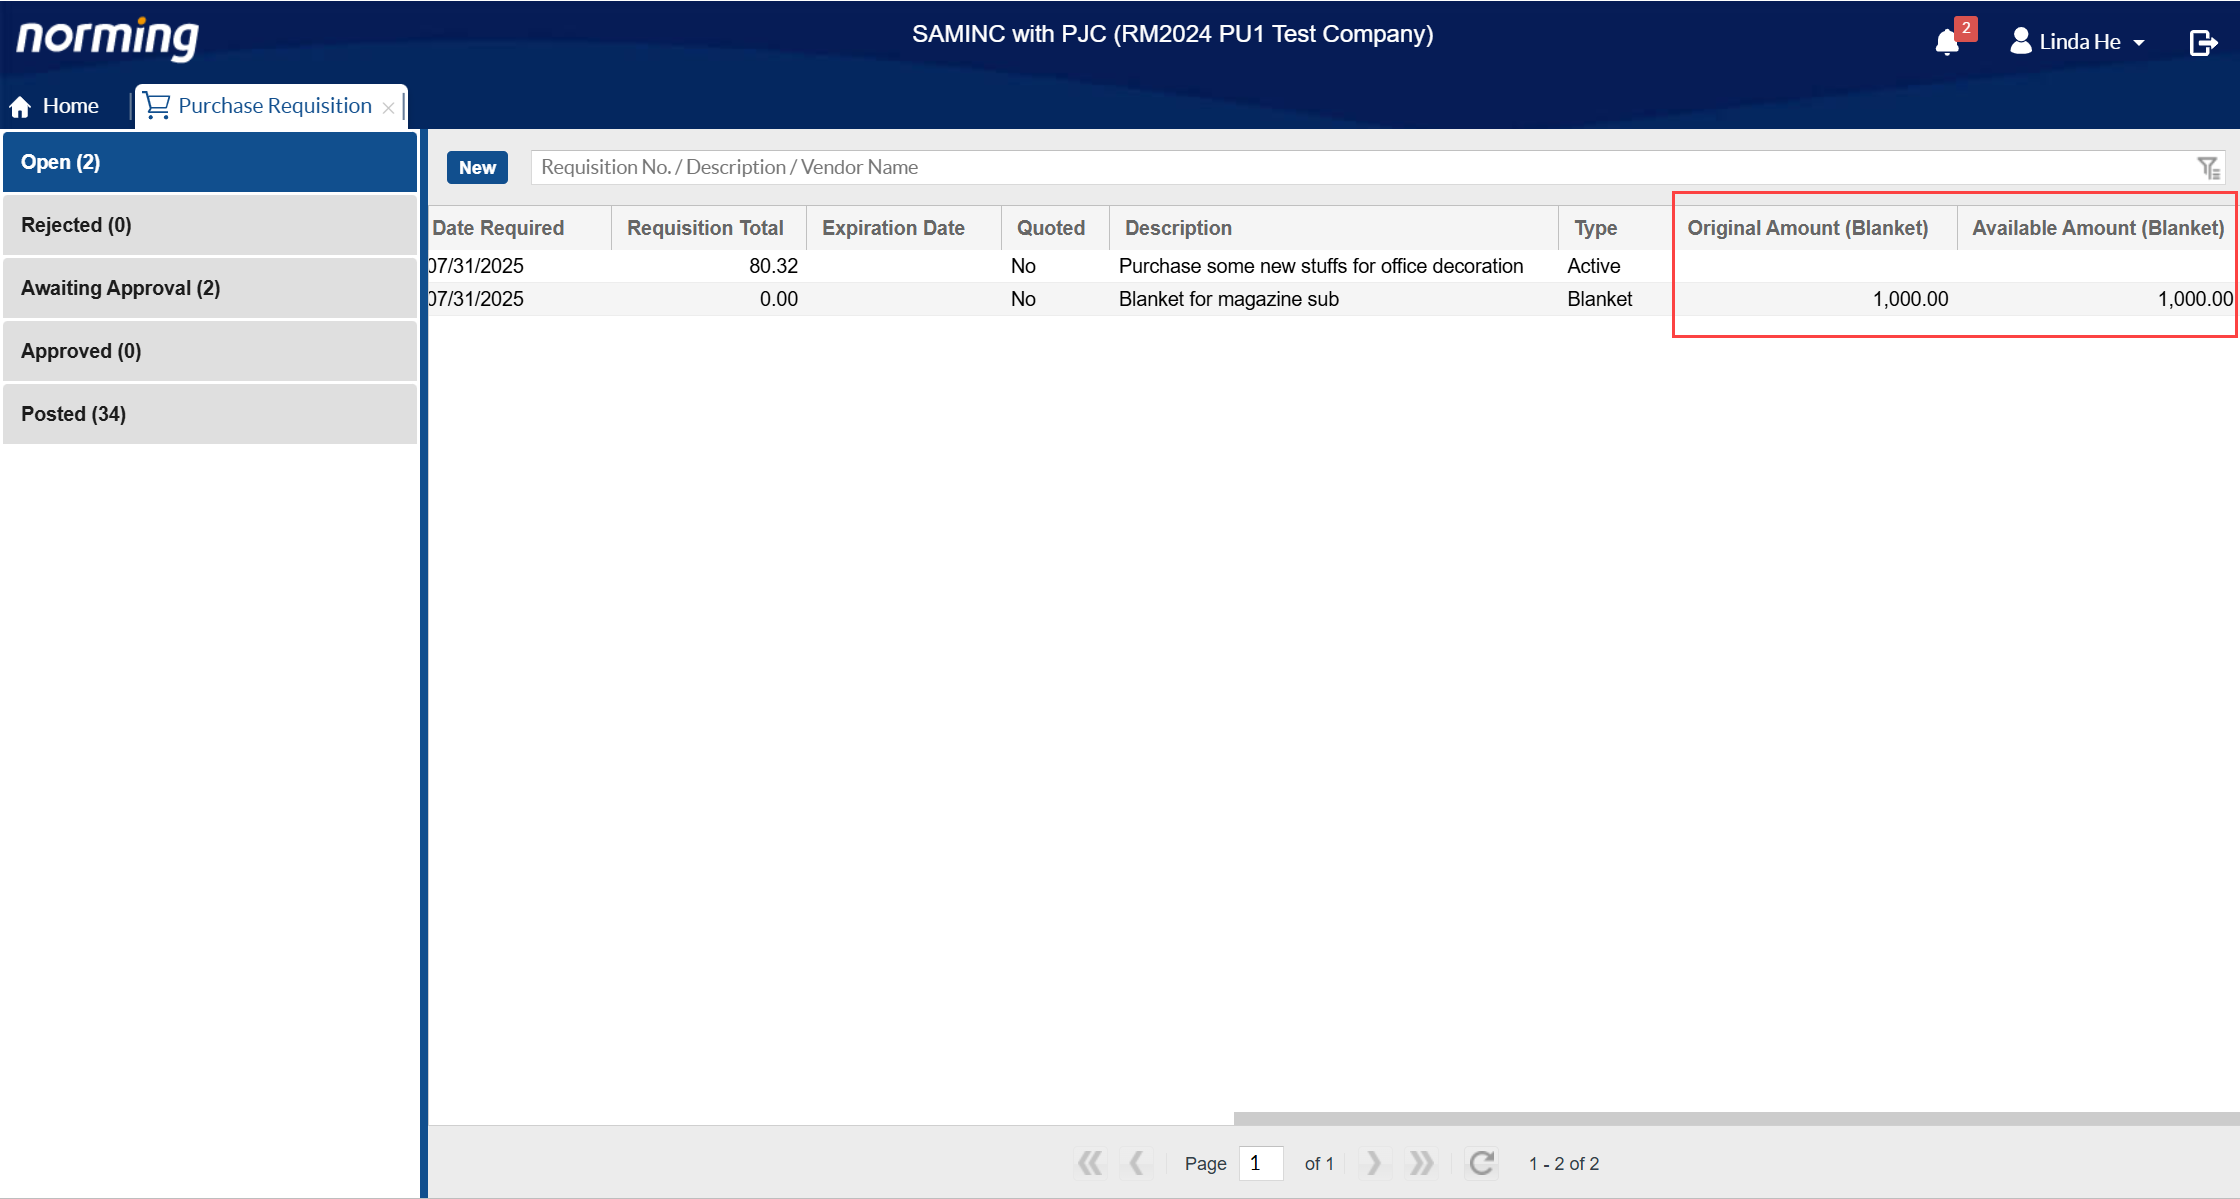
2. Add two more columns to Purchase Requisition List, Original Amount and Available Amount.
Note: these two columns are for 'Blanket' type of purchase requisitions only, so there is no value for other types of purchase requisitions.
3. Improve the 'Converting Sage 300 P/O Requisition Entries to R/M PO Requests' function.
Previously, the values of Division/Region/Department/Cost Center/Job at detail level are always copied from the ones at the header level when generating a R/M Purchase Requisition by converting Sage 300 P/O Requisition entries.
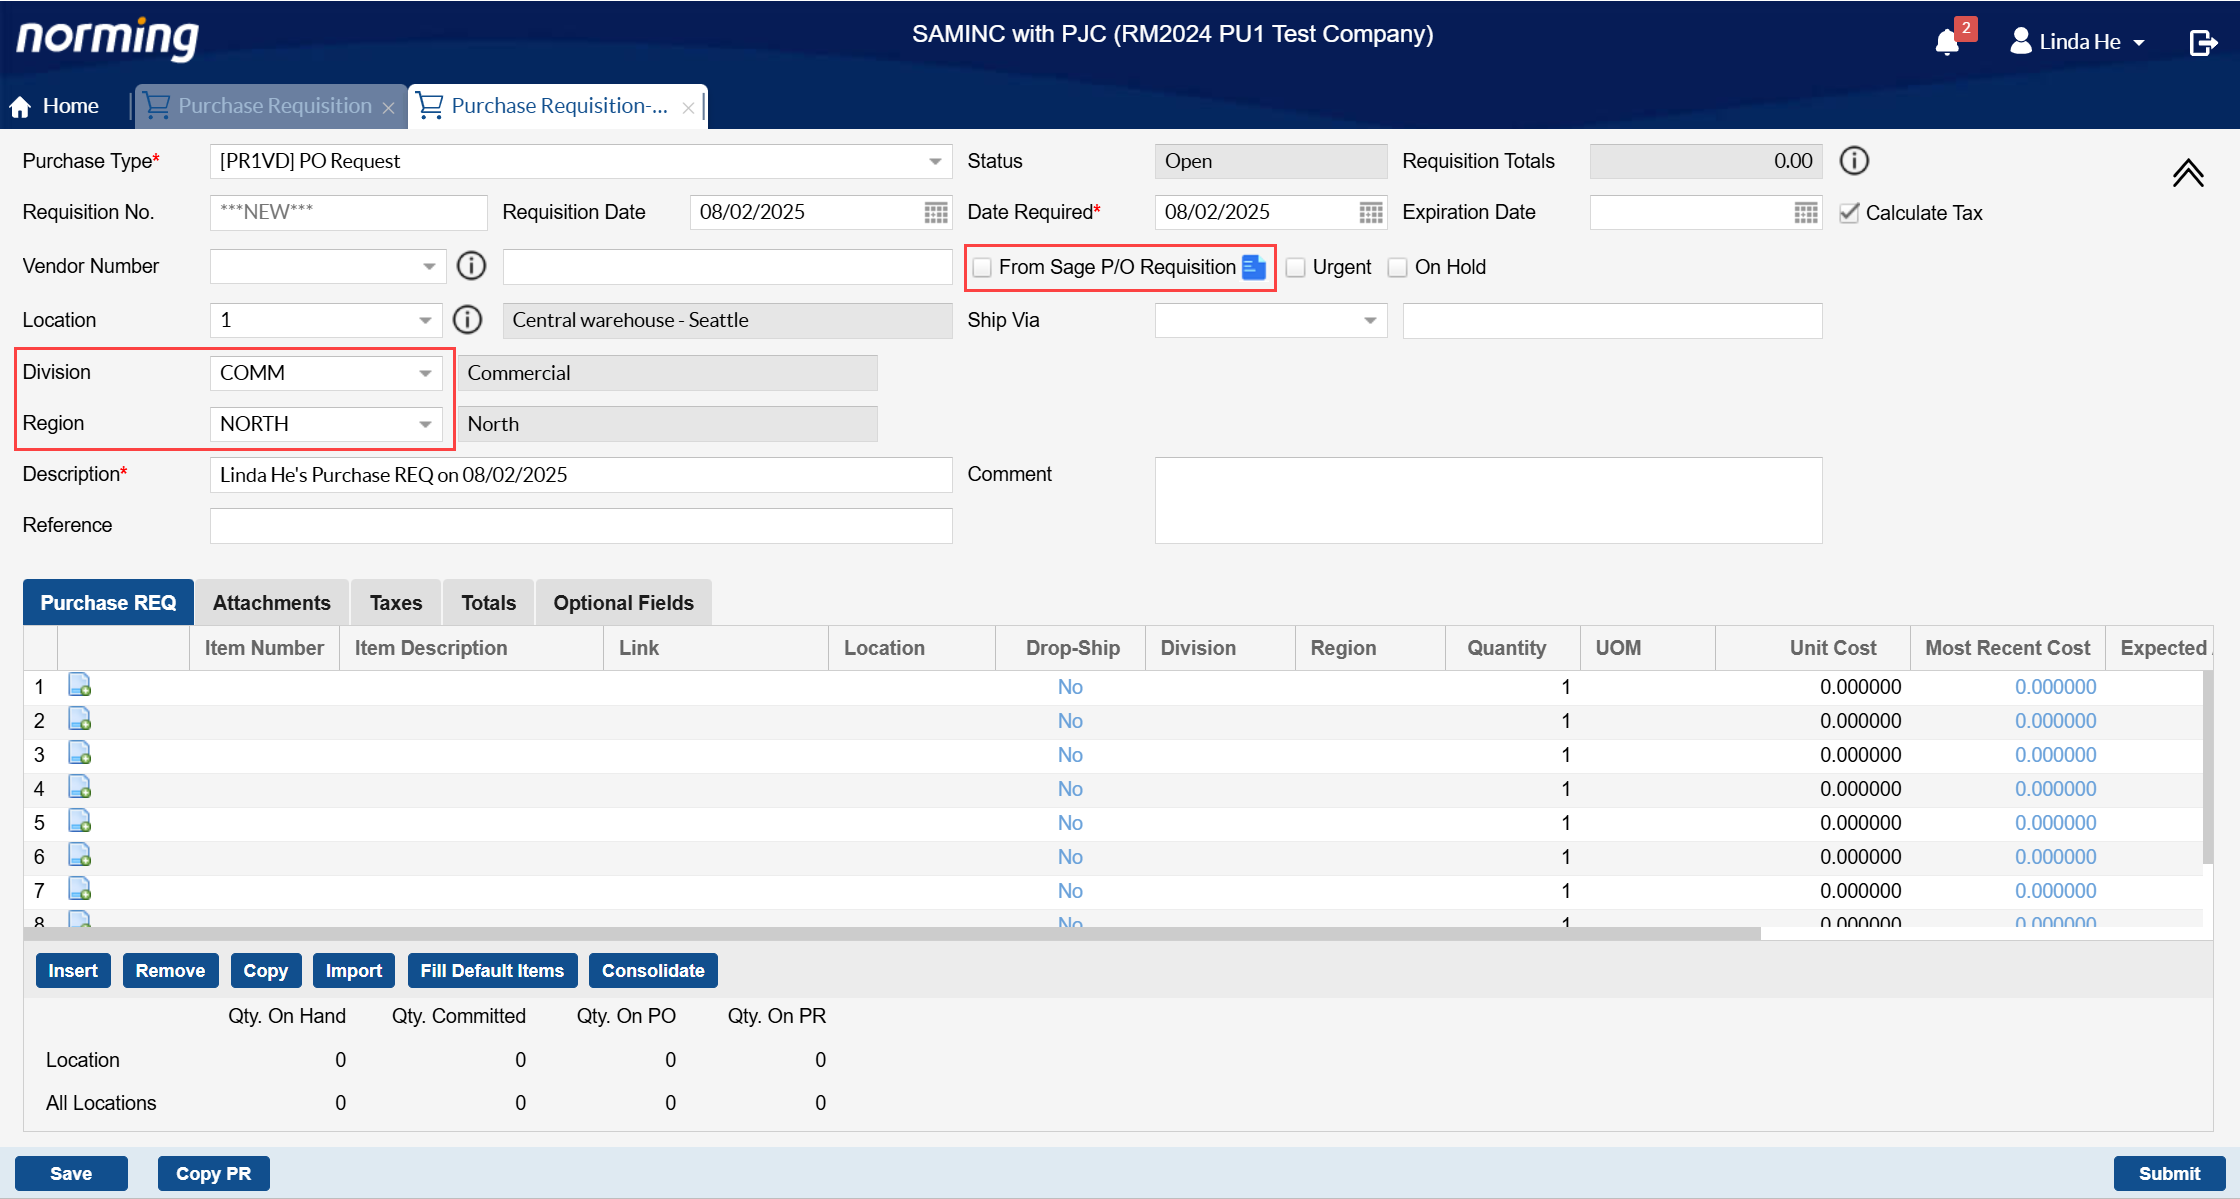
With this improvement applied, the values of Division/Region/Department/Cost Center/Job at detail level can be copied from Sage 300 P/O Requisition Entries, if those Sage 300 P/O Requisition Entries are created from R/M Purchase Requisitions.
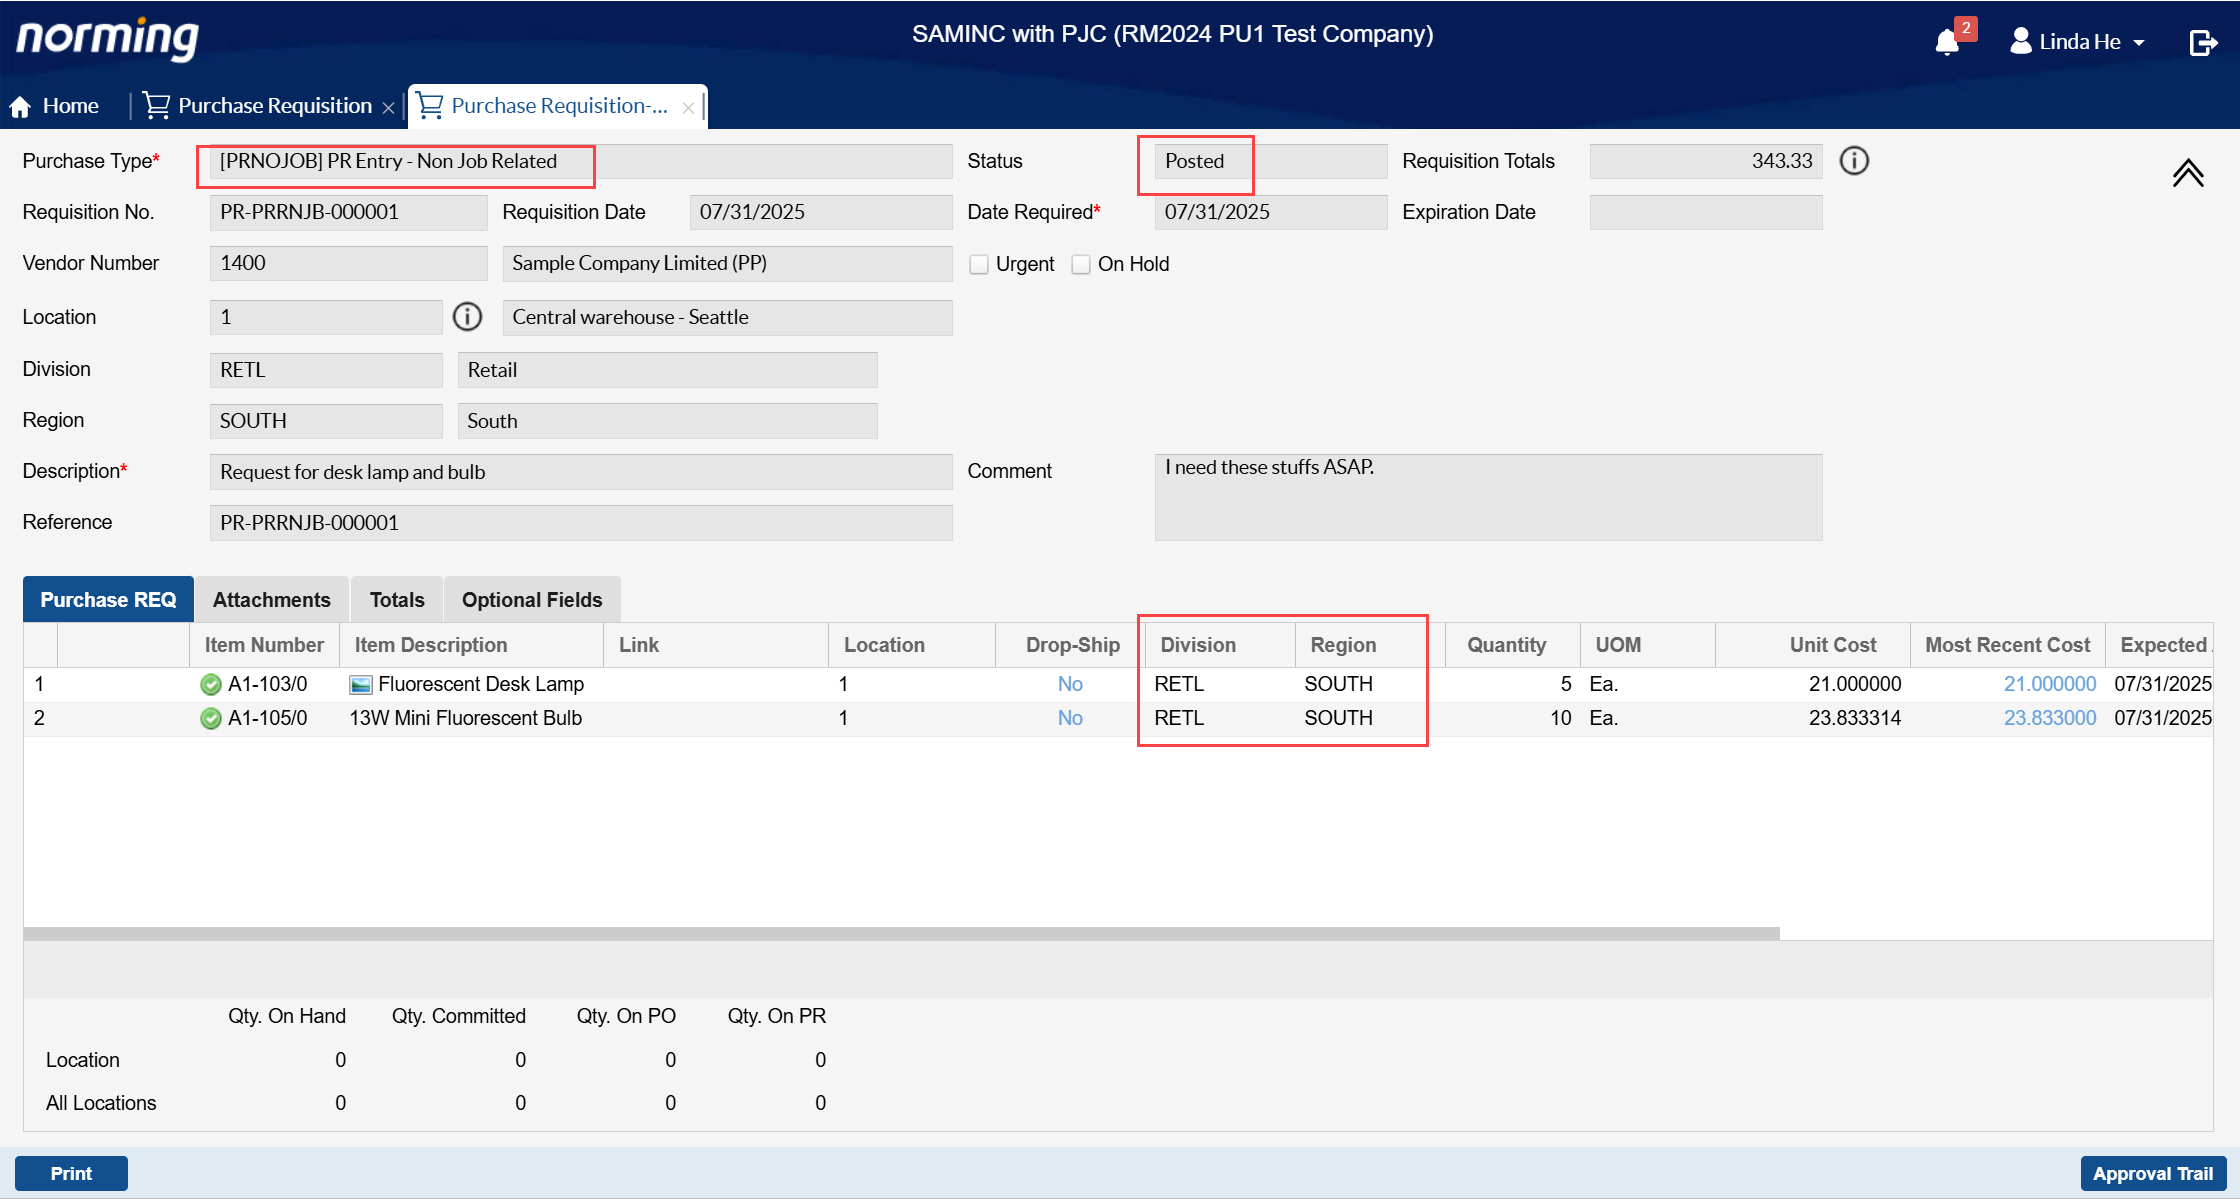
Below is a R/M Purchase Requisition which has been posted to Sage 300 P/O Requisition Entry, whose Division and Region at detail level respectively are ‘RETL’ and ‘SOUTH’.
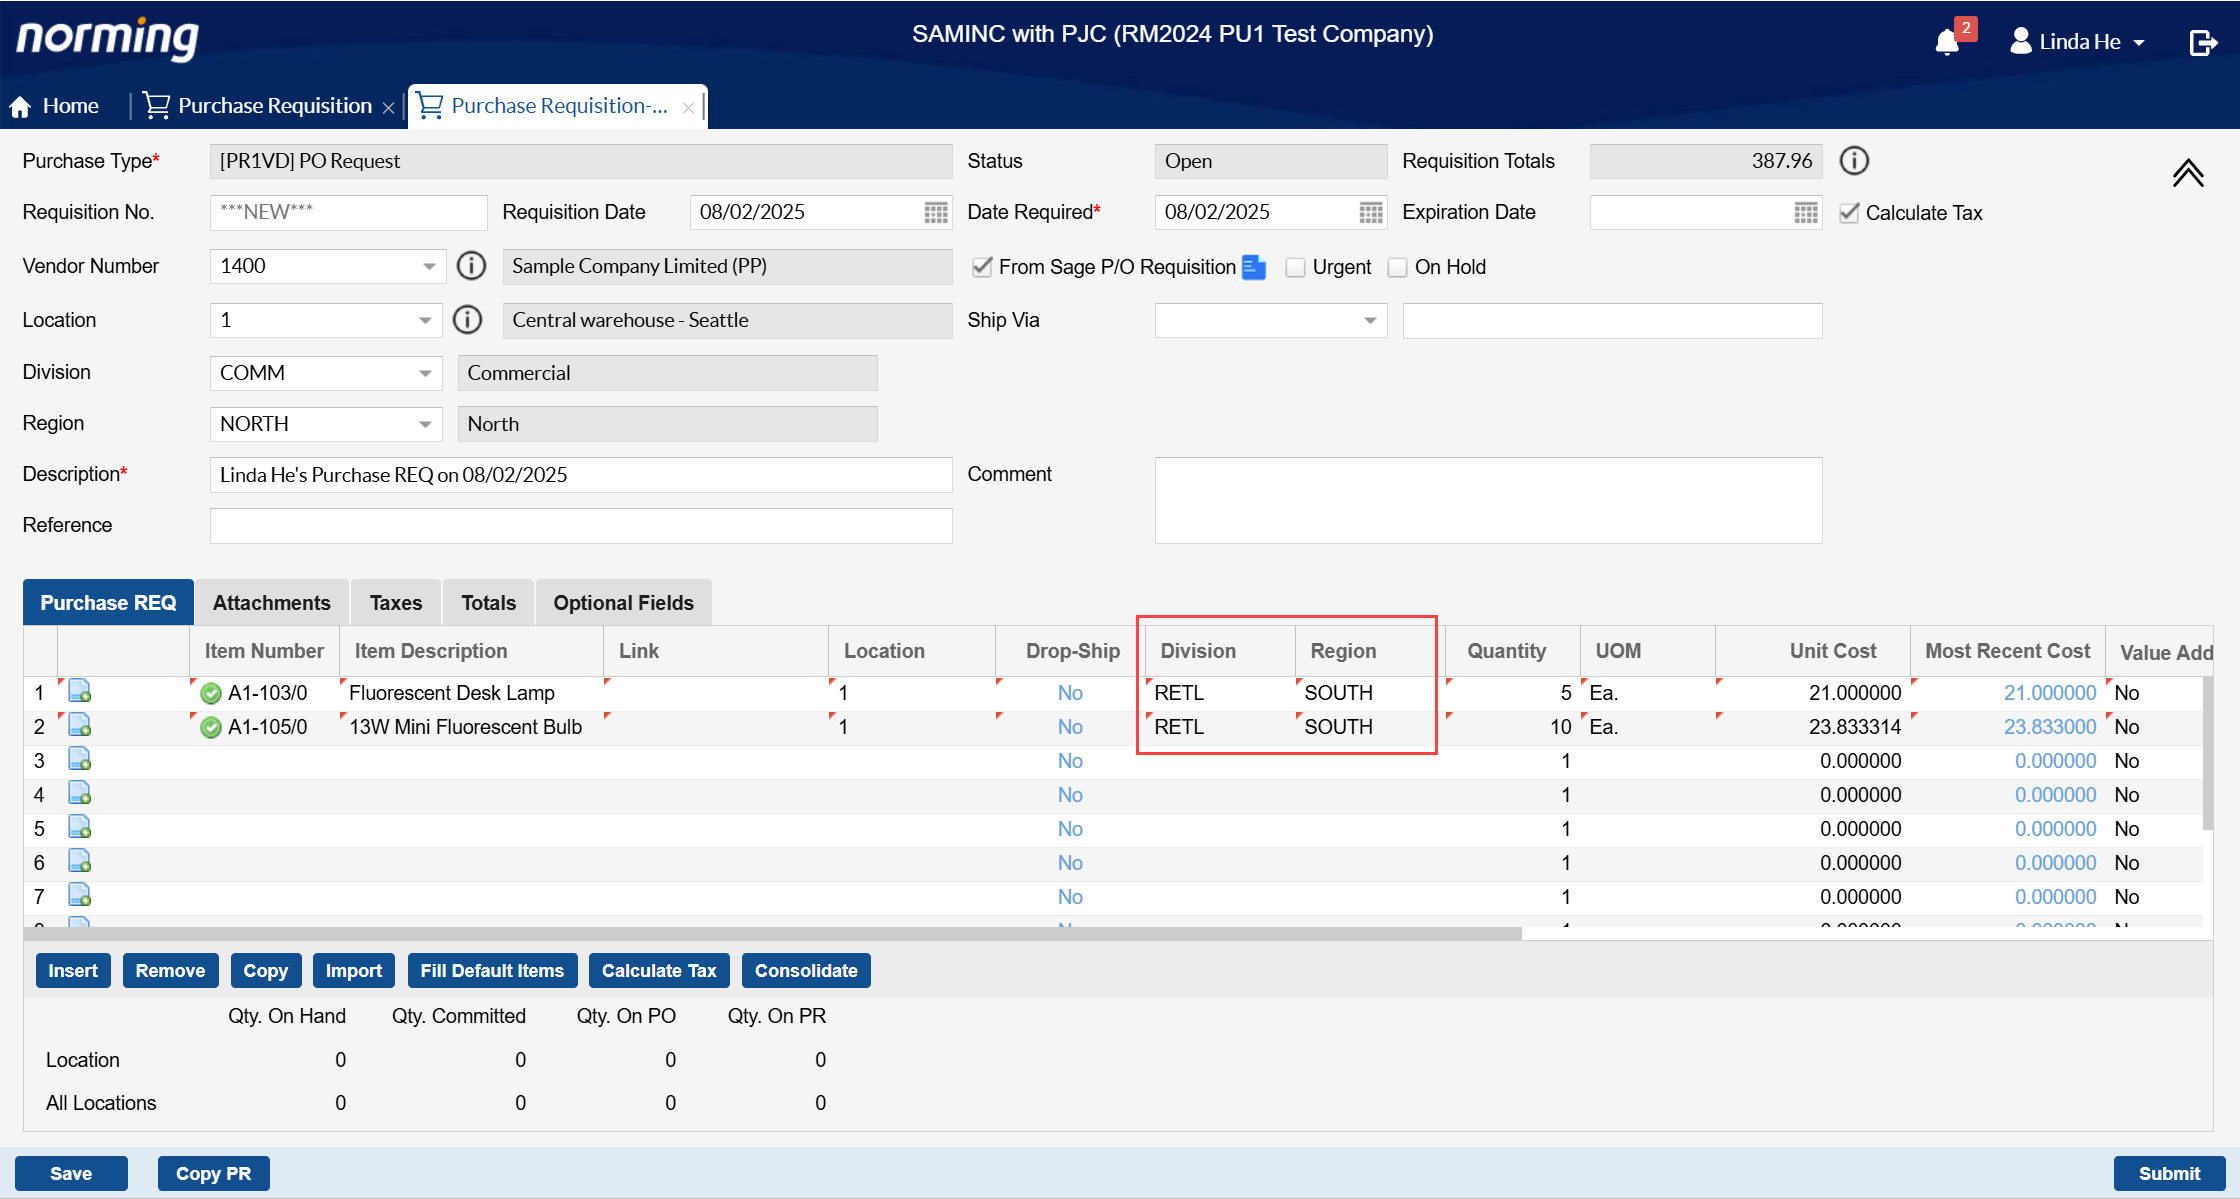
Create a PO request from the above Requisition Entry.

Now you can see, the Division and Region codes are copied from the PR Request.
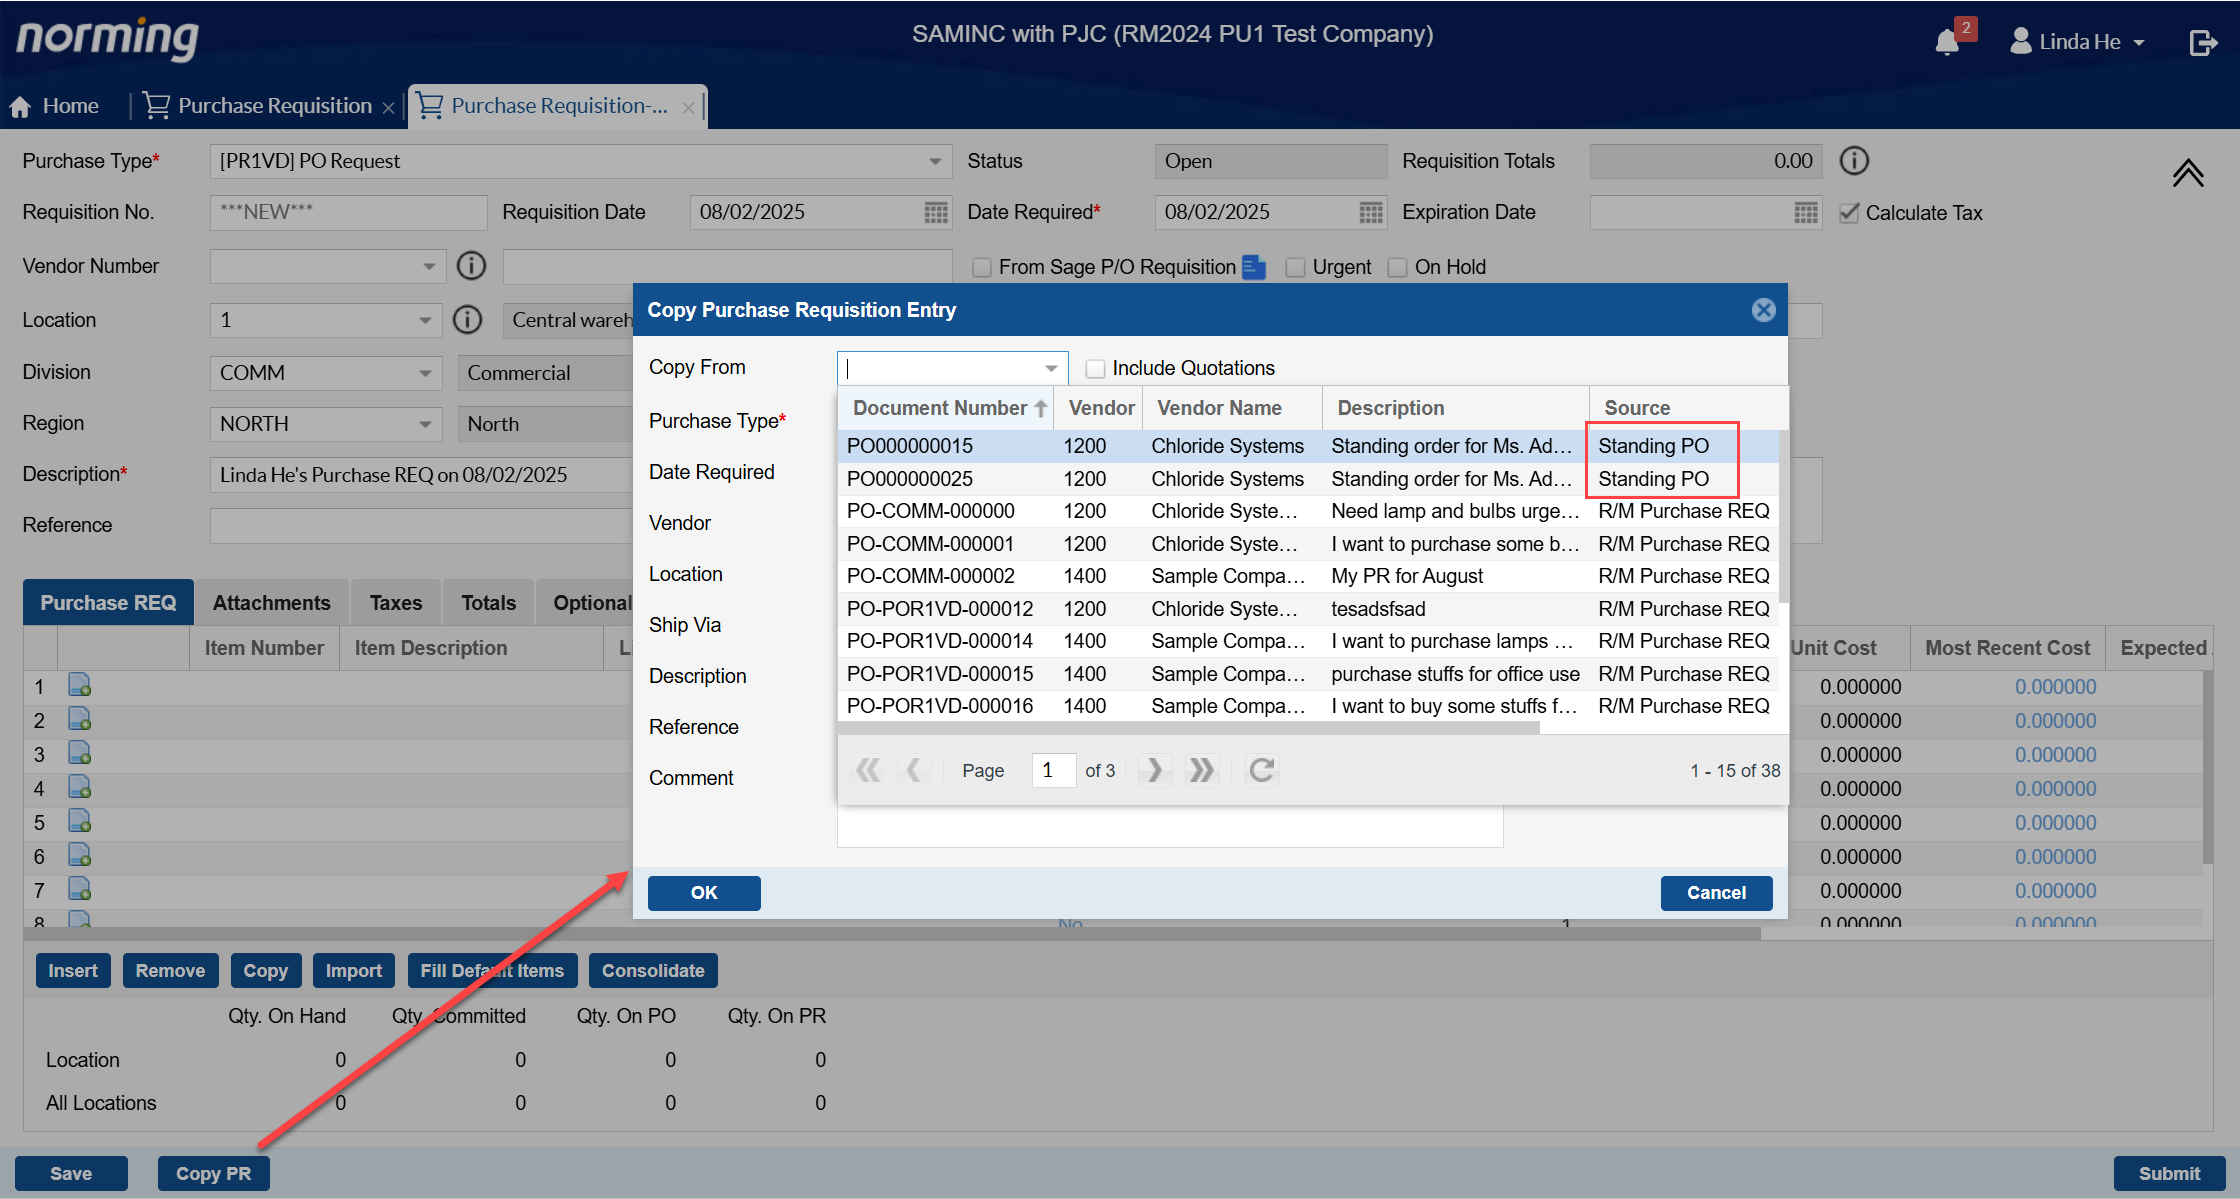
4. Improve the 'Copy PR' function to allow creating a PO request by copying a Sage 300 Standing PO.
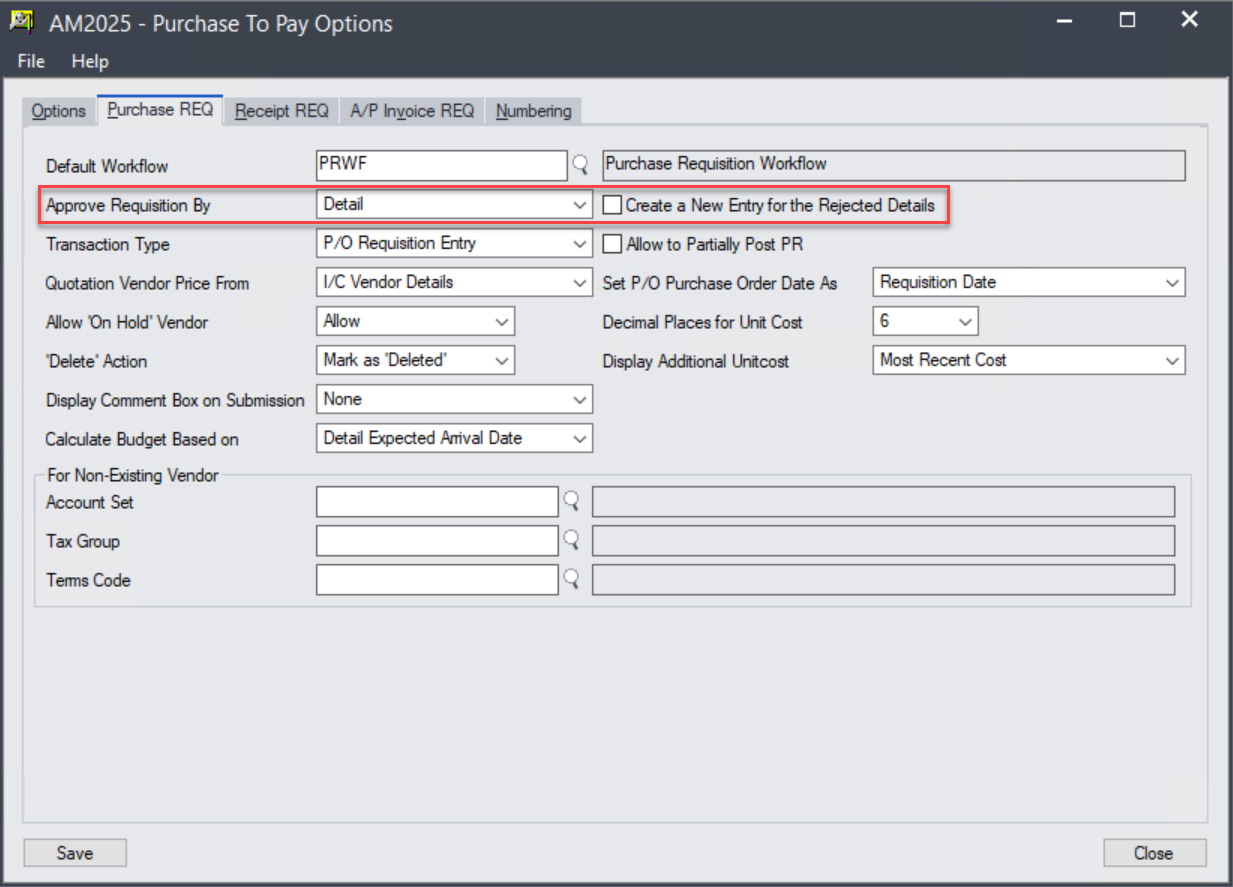
5. Under the setting of approving Purchase Requisition by detail, a purchase requisition with the status of 'Open', 'Awaiting Approval', 'Rejected' and 'Approved' can be partially posted if any of its details are fully approved.
P/O Invoice Requisition
Two enhancements are made in this release:
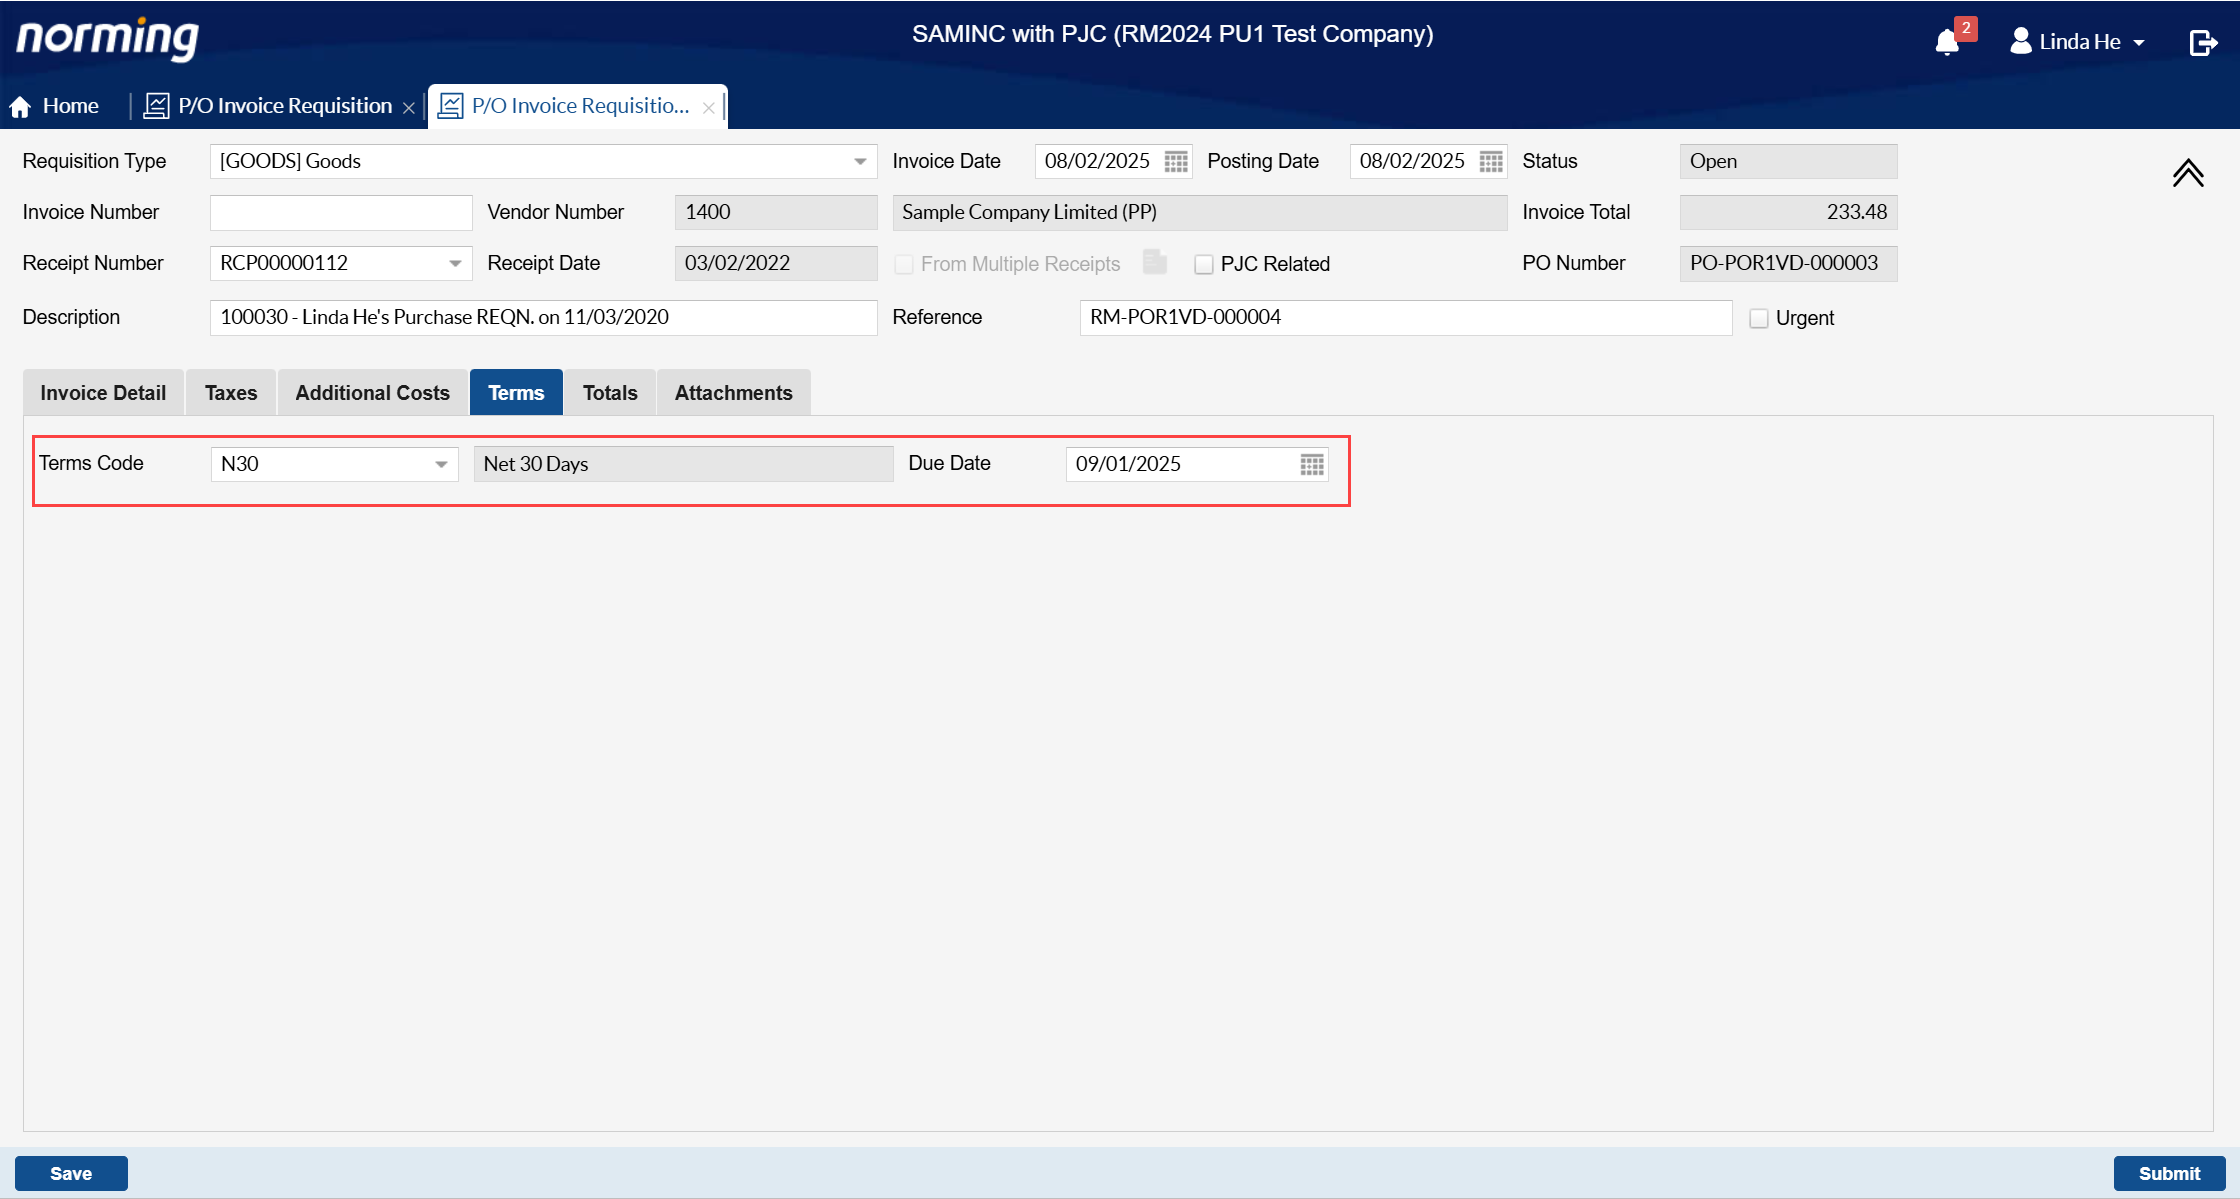
1. 'Terms Code' and 'Due Date' can be maintained in P/O Invoice Requisition > Terms page.
By default, these two fields are hidden. To display them, go to Admin Portal > ESS Group or ESS User to change the permission settings.
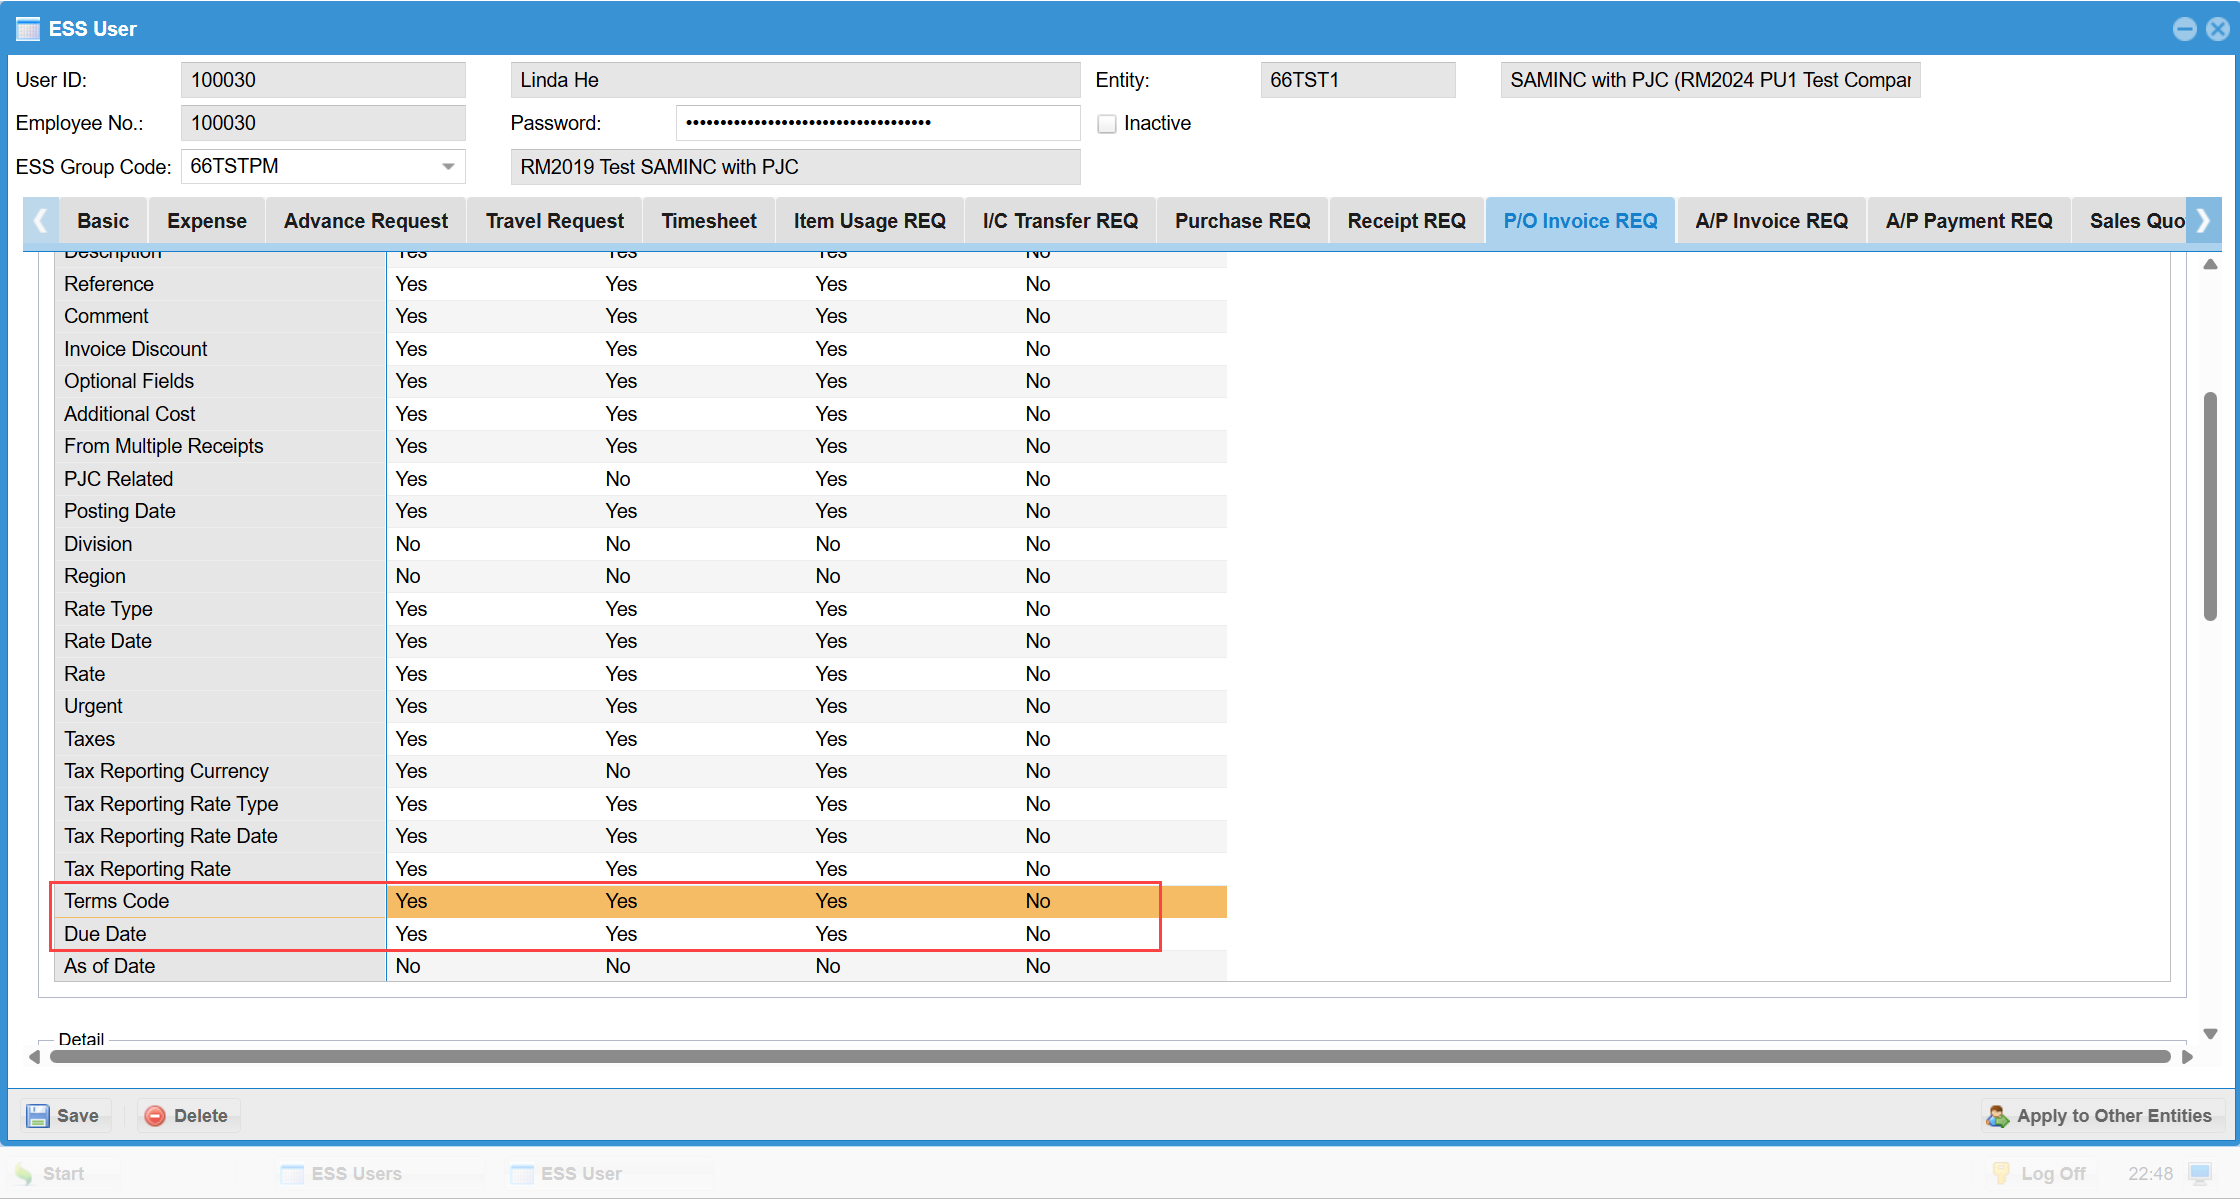
Then you’re able to view/edit these two fields in P/O Invoice Requisition screen, and they can be pushed to Sage 300 P/O Invoice as well upon posting.
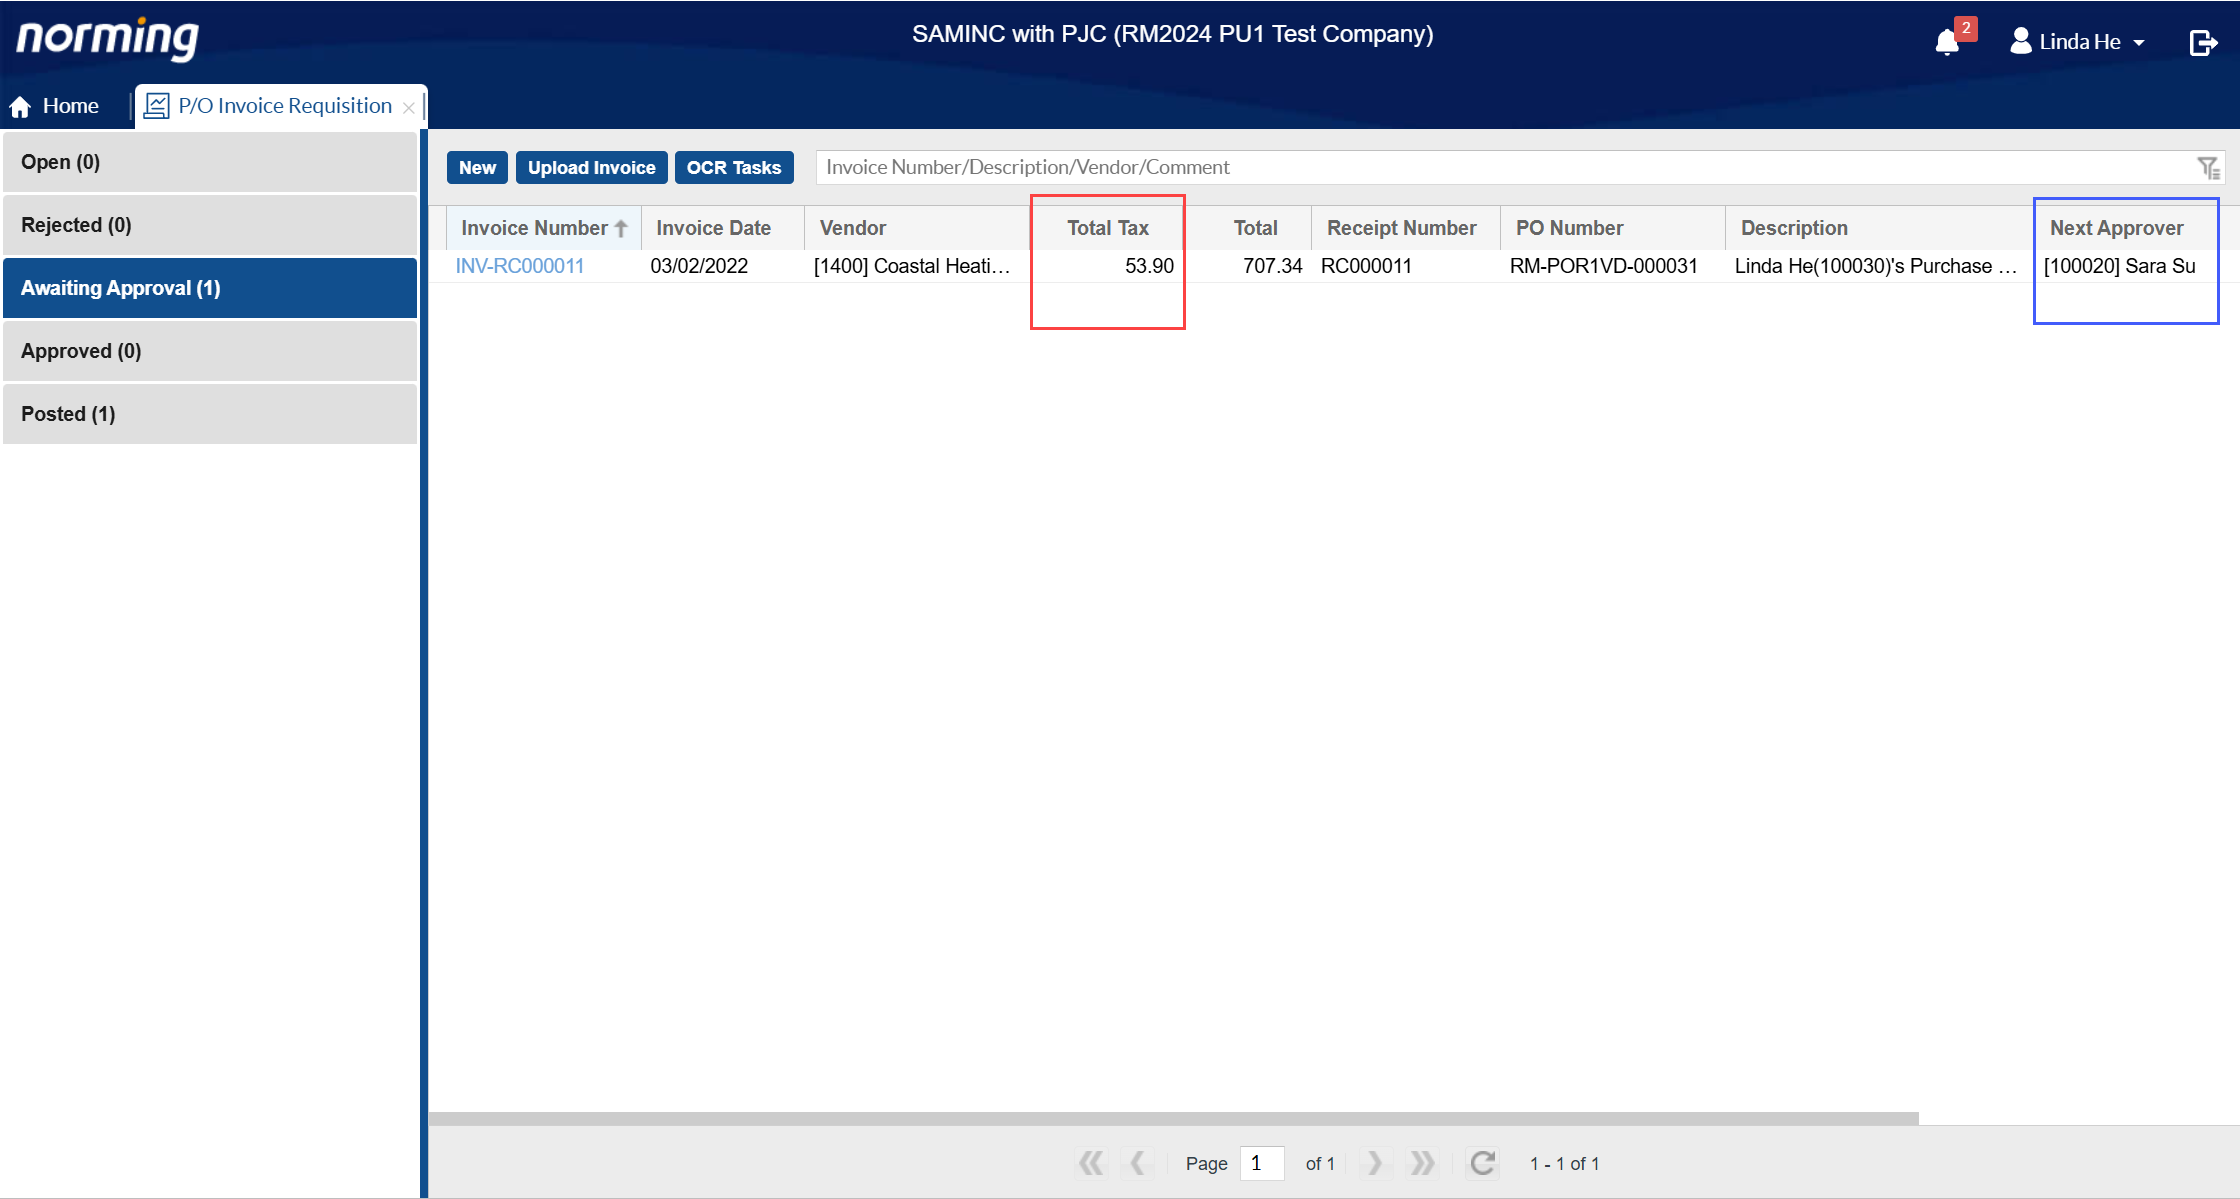
2. A new column – 'Total Tax' is added to P/O Invoice Requisition List for all statuses.
Additionally, one more column – 'Next Approver' is added to the 'Awaiting Approval' requisition list.
P/O Invoice Automation(OCR)
In this release, four major improvements are made to P/O Invoice Automation module:
1. Provide the 'P/O Invoice Automation Mapping' utility.
The item numbers/description and additional cost codes maintained in Sage 300 are for your company internal use, while the item numbers and additional cost codes/description in vendor invoices are using their own numbering rules. Normally, the numbers/codes in two systems are different.
Without the mappings for the numbers/codes between the two systems, it’s hard to auto-convert the vendors’ numbers/codes that captured by the Automation Solution (OCR engine) to your Sage 300’s numbers/codes, which means you will have to do a lot of work to manually change the captured information to your Sage 300 numbers/codes.
To reduce manual work, prevent human error and increase OCR’s accuracy, you can use this utility to maintain the mappings between your Sage 300 numbers/codes/description with your vendors’ numbers/codes/description.
How to maintain numbers/codes mappings
Go to Resource Manager Back End > Procure to Pay > Setup > P/O Invoice Automation Mapping for the below screen:
Step 1 - decide whether to define mappings for item number or additional cost.
Step 2 - decide the layout to define mappings, define mappings(against all item) for one vendor after another, or define mappings(against all vendors) for one item after another.
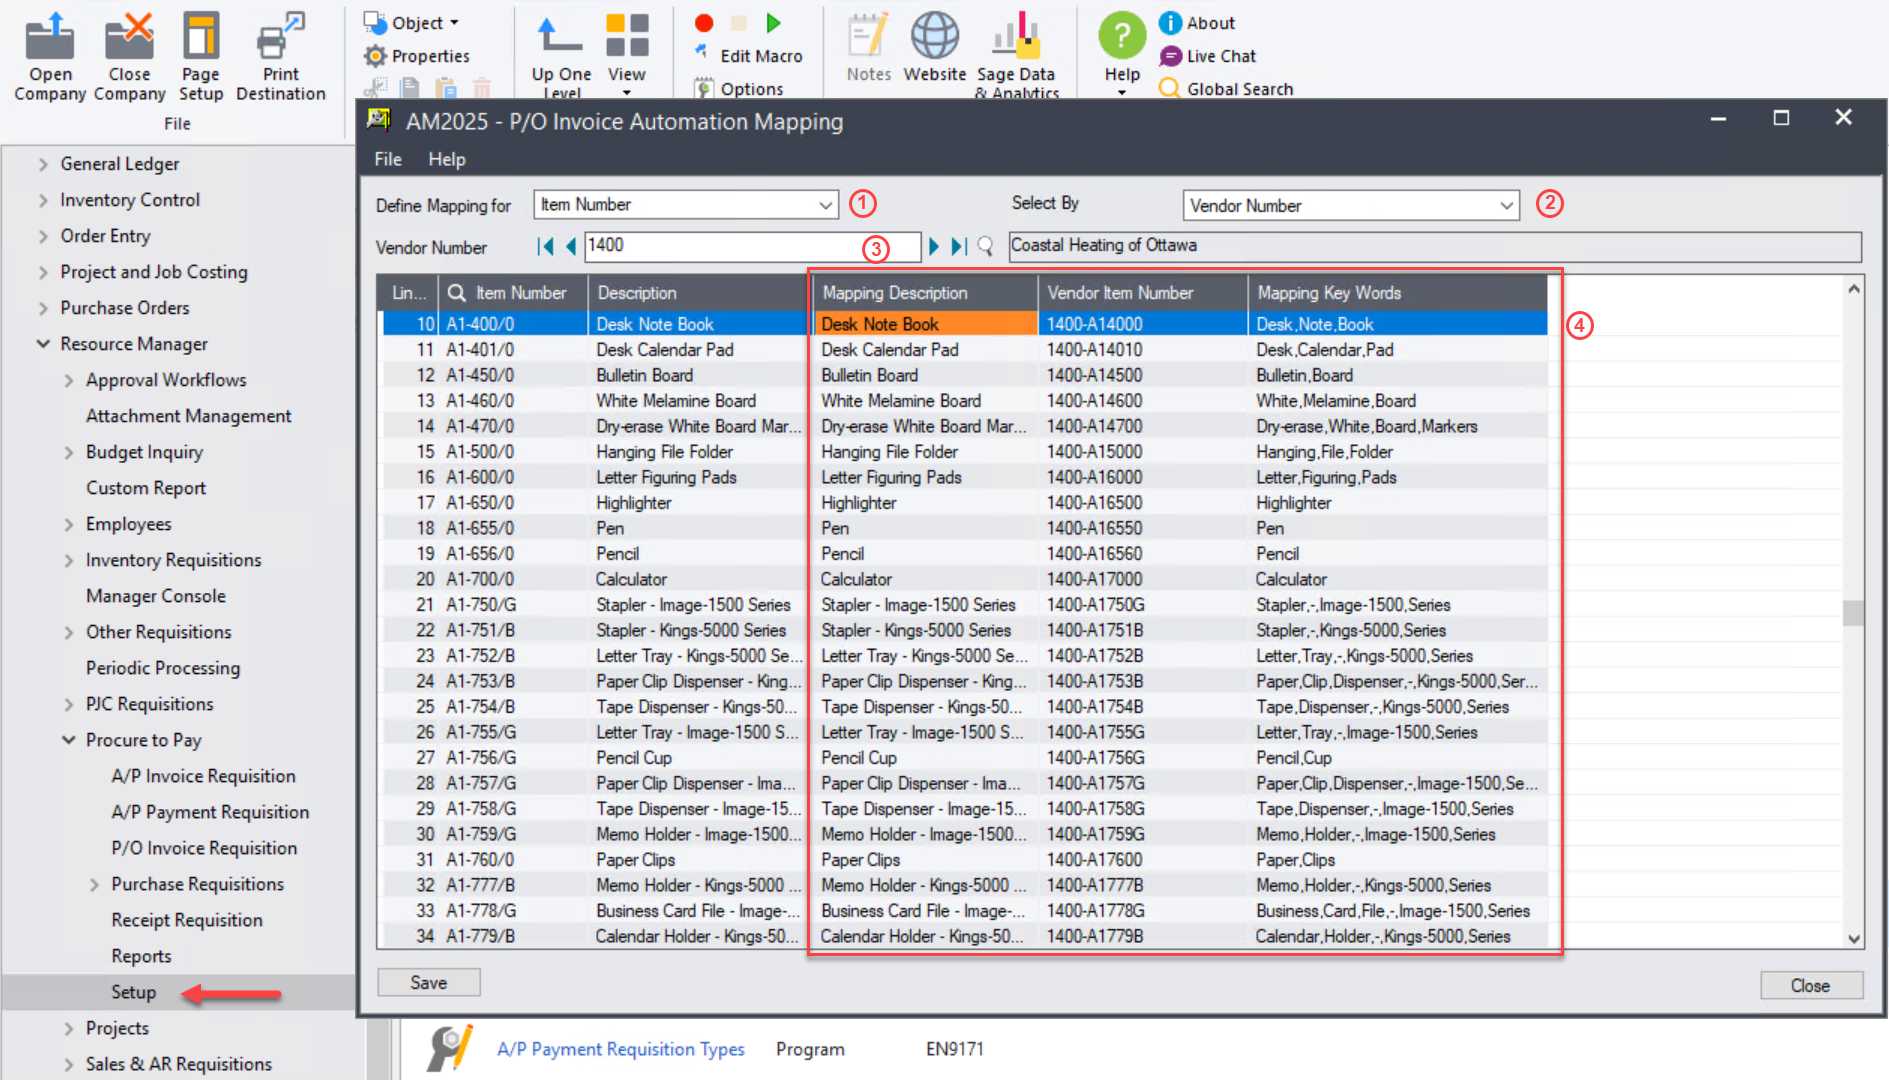
Step 3 - select a vendor(item or additional cost) to define mappings for.
Step 4 - define mappings. In the above screen, Item Number and Description in detail table are from your Sage 300 items, you can maintain mappings in the following three columns:
Mapping Description - item description used by vendors
Vendor Item Number - item number used by vendors
Mapping Key Words - some key words(for item) that might appear in vendors’ invoices.
Below is the order for the OCR Engine to translate vendor’s items/codes to your sage 300 items/codes:
Vendor Item Number > Mapping Description > Mapping Key Words
2. Support 'Additional Cost'
In this release, you’re able to handle additional cost that captured by OCR engine.
If mappings are defined, or the OCR engine is well trained, the information for additional cost(like additional cost code) can be correctly captured.
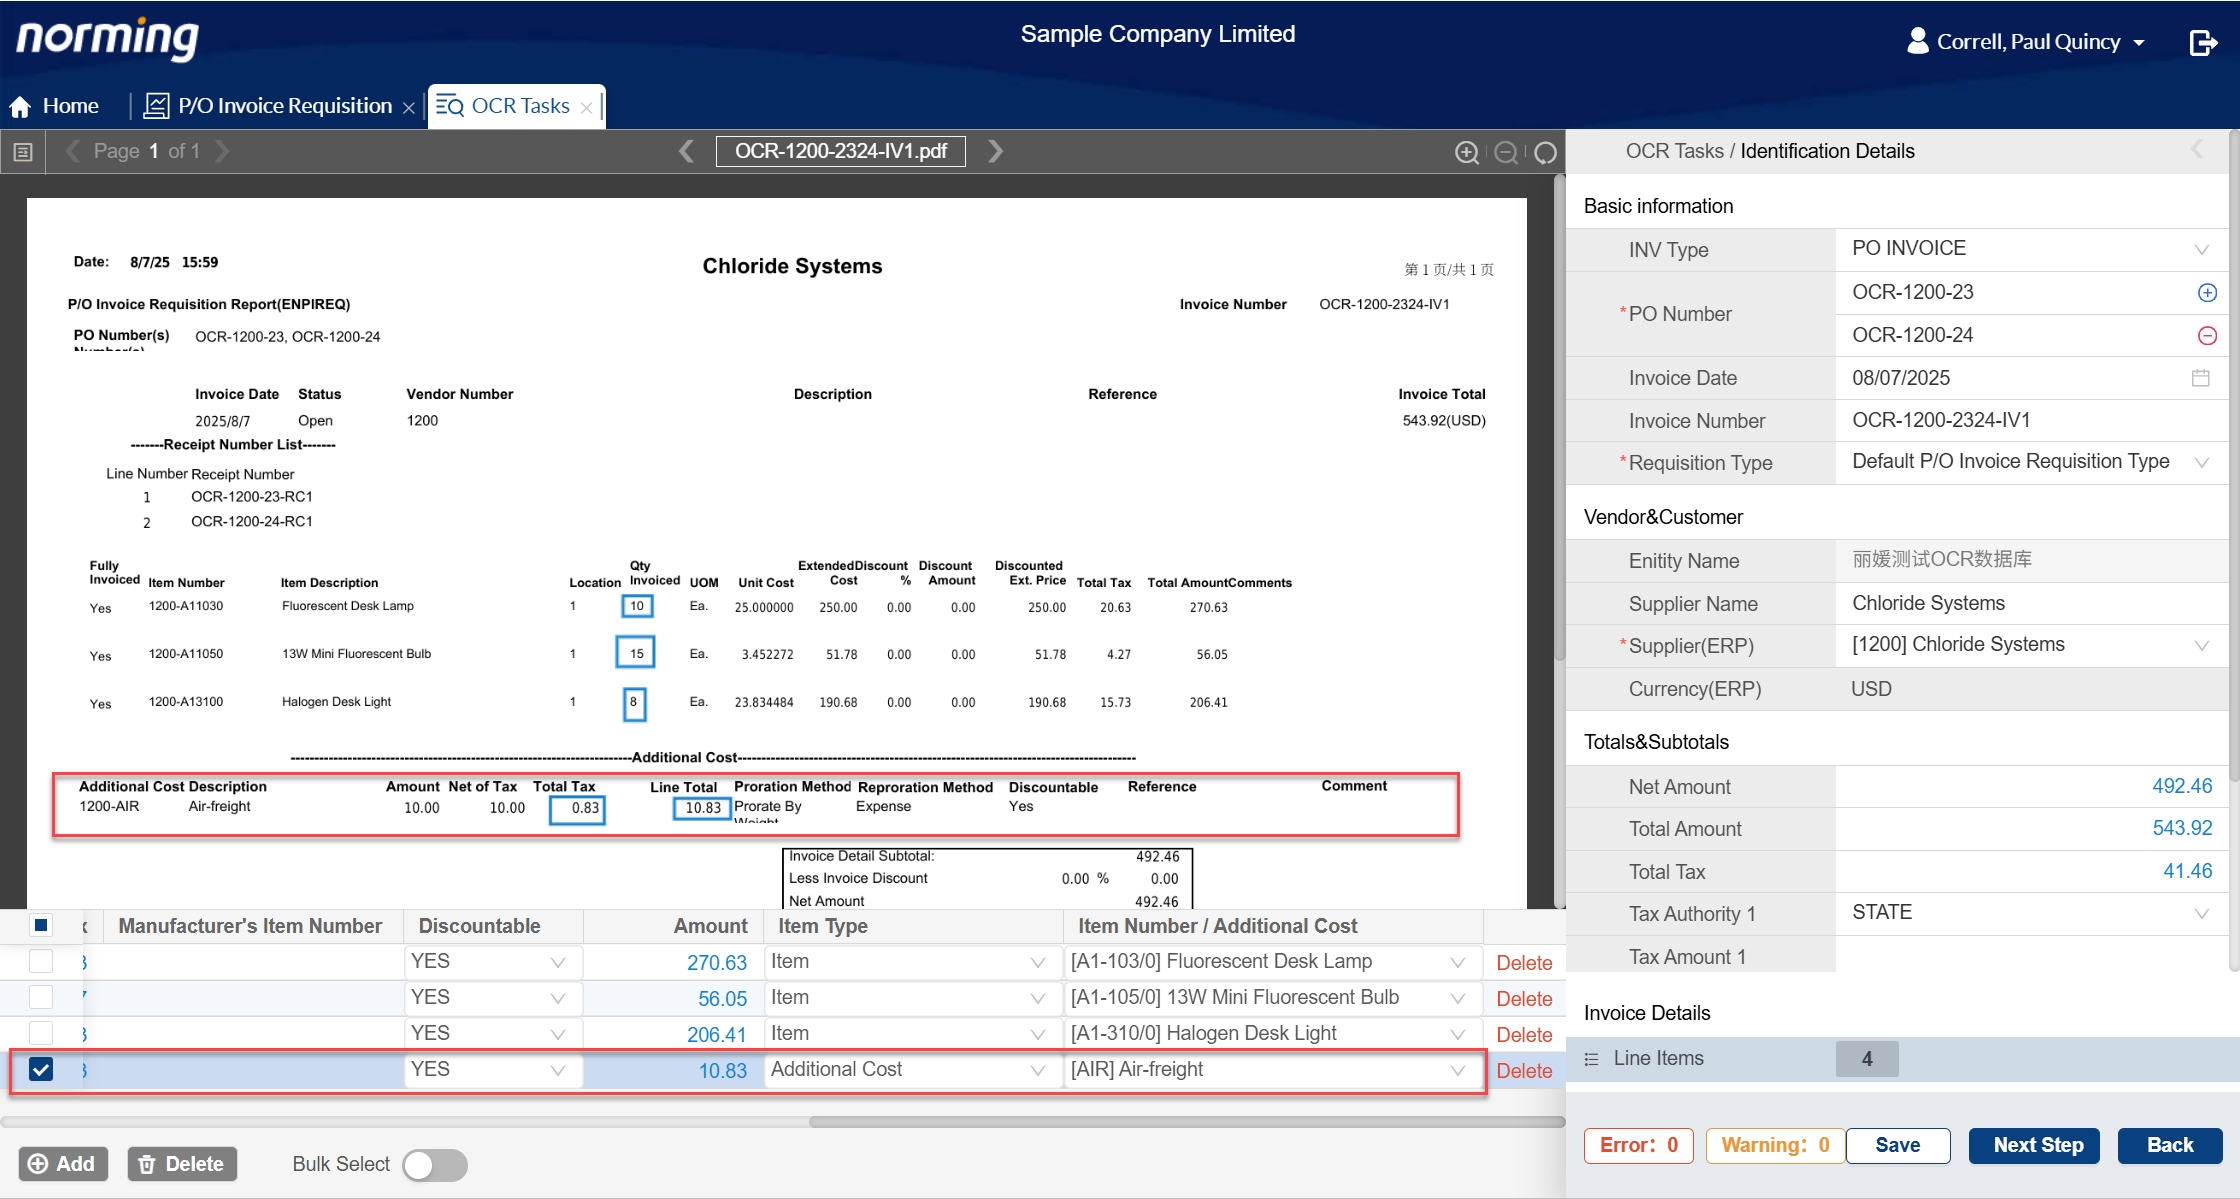
If any additional cost line is not captured, you can click the ‘Add’ button under detail table to add it manually.
If any information in an additional cost line is not correctly capture, you can use mouse to select the information into the corresponding field in the detail line, or manually correct it.
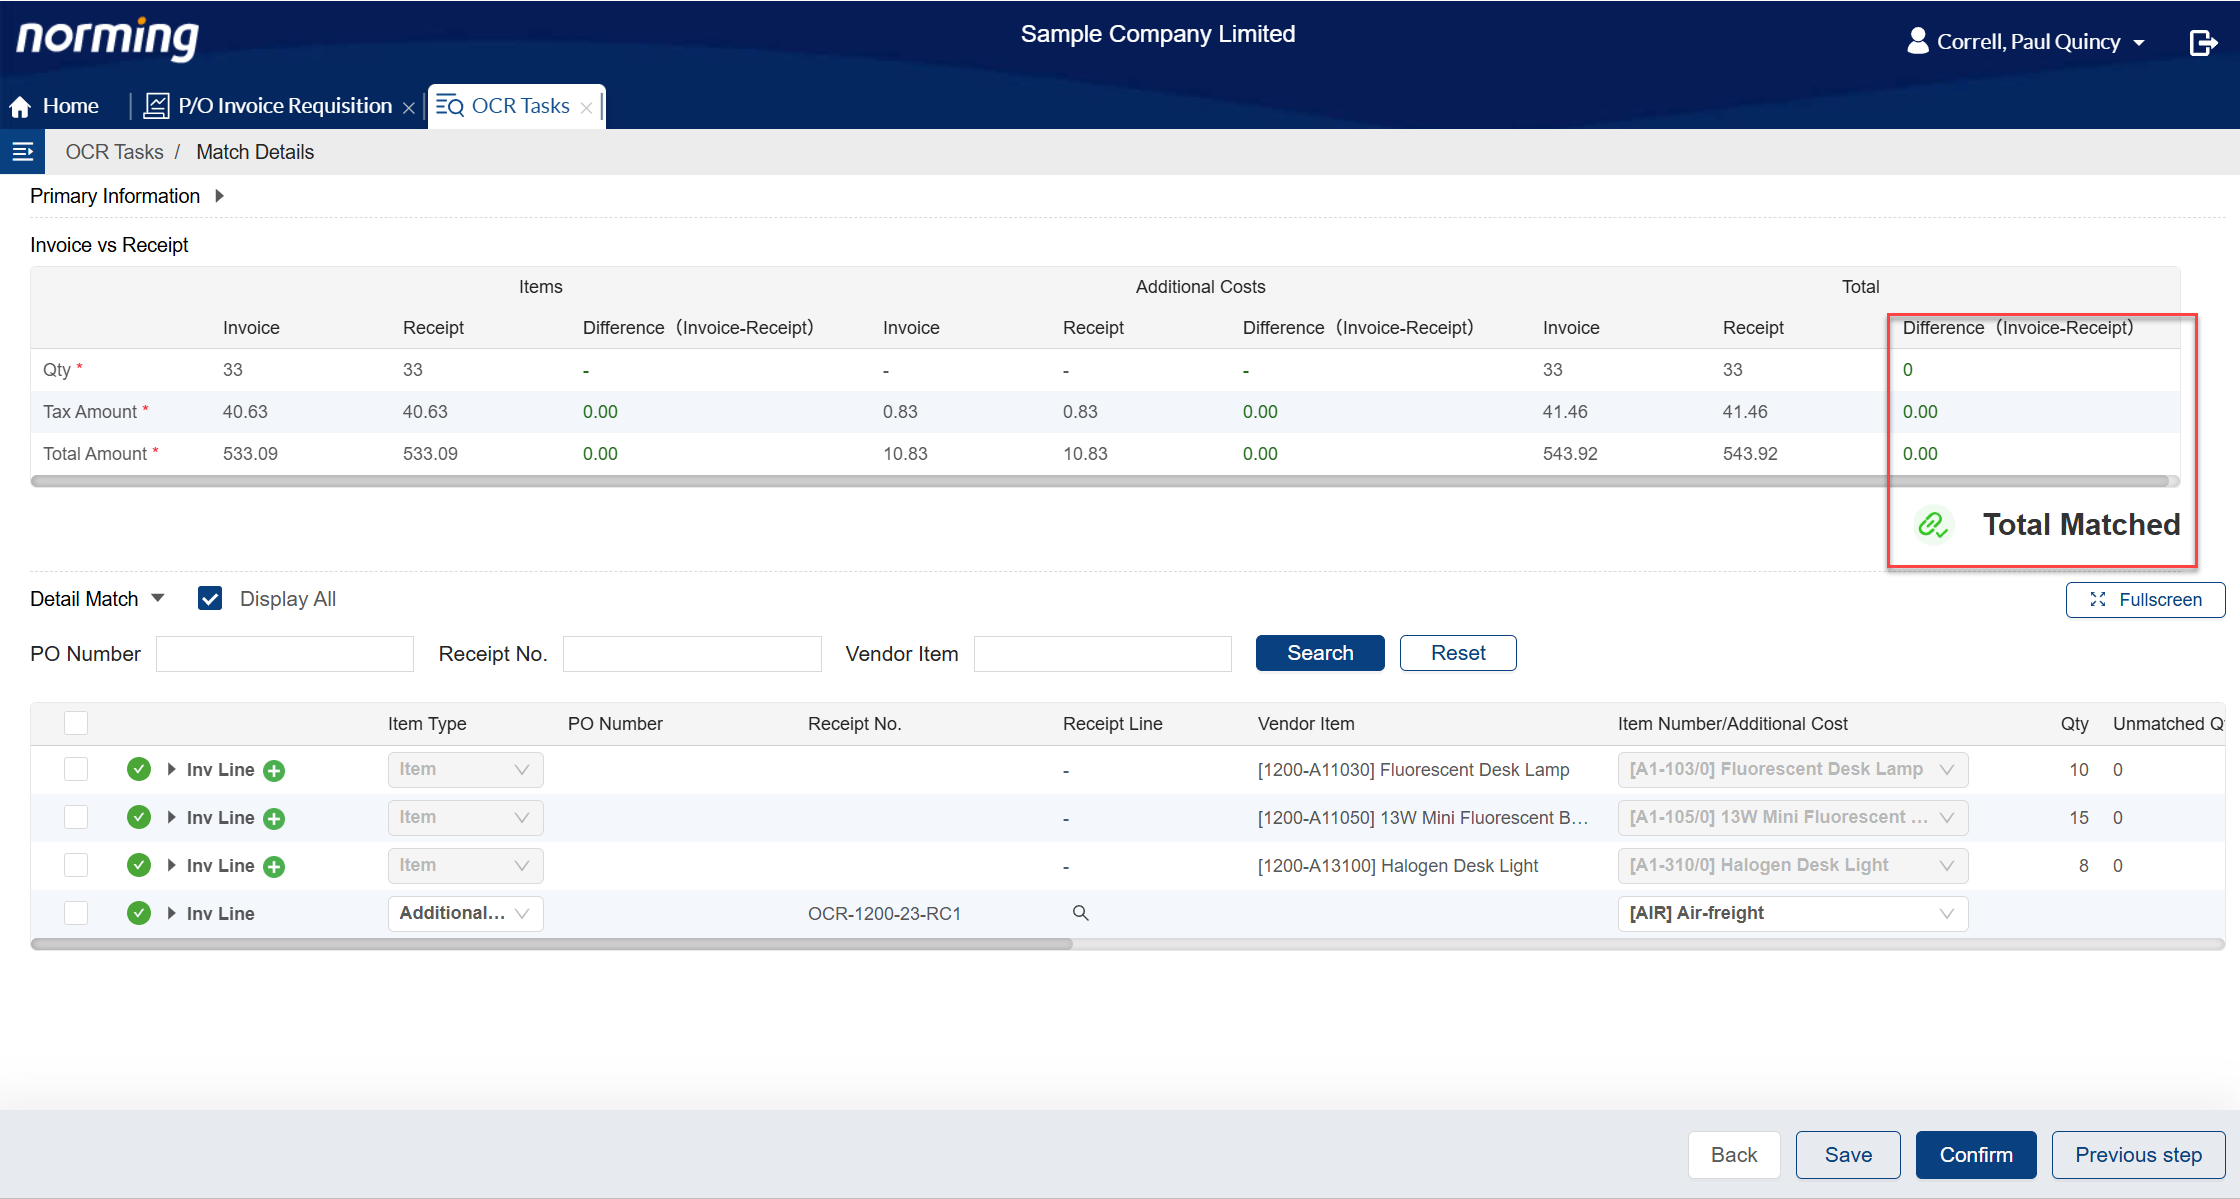
3. Support matching invoices based on the total invoice amount only, ignoring invoice line details.
To use this feature, you need select the option in the below screen.
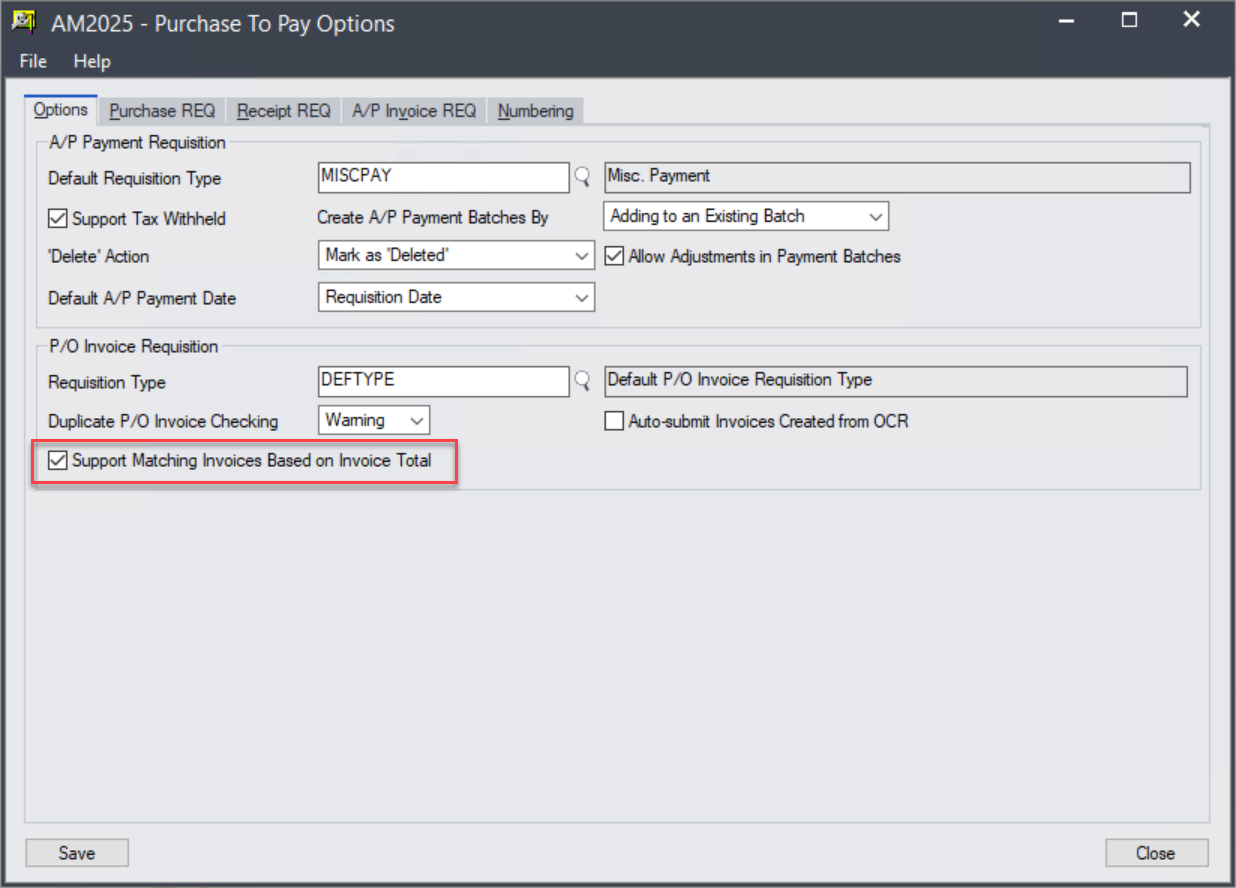
If this option on, those invoices that only matching receipts at invoice total level are generated directly from all line items in the goods receipt.
4. P/O invoice requisitions that created by P/O Invoice Automation can be auto-submitted.
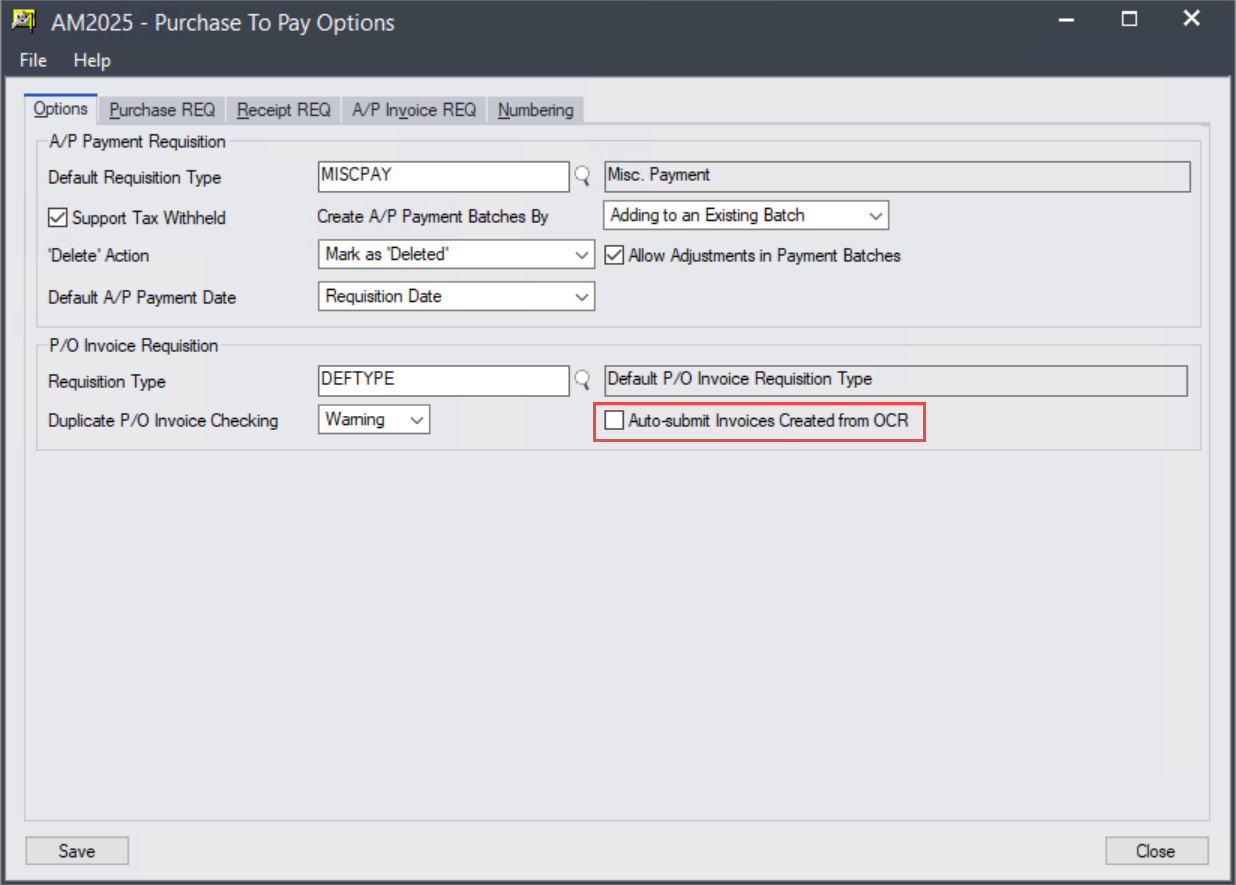
If this option on, the 'Confirm' button in the OCR Check screen will do two things:
a. Create a P/O invoice requisition.
b. Submit the requisition created with step a.
A/P Invoice Requisition
Two enhancements are made to A/P Invoice Requisition functionality:
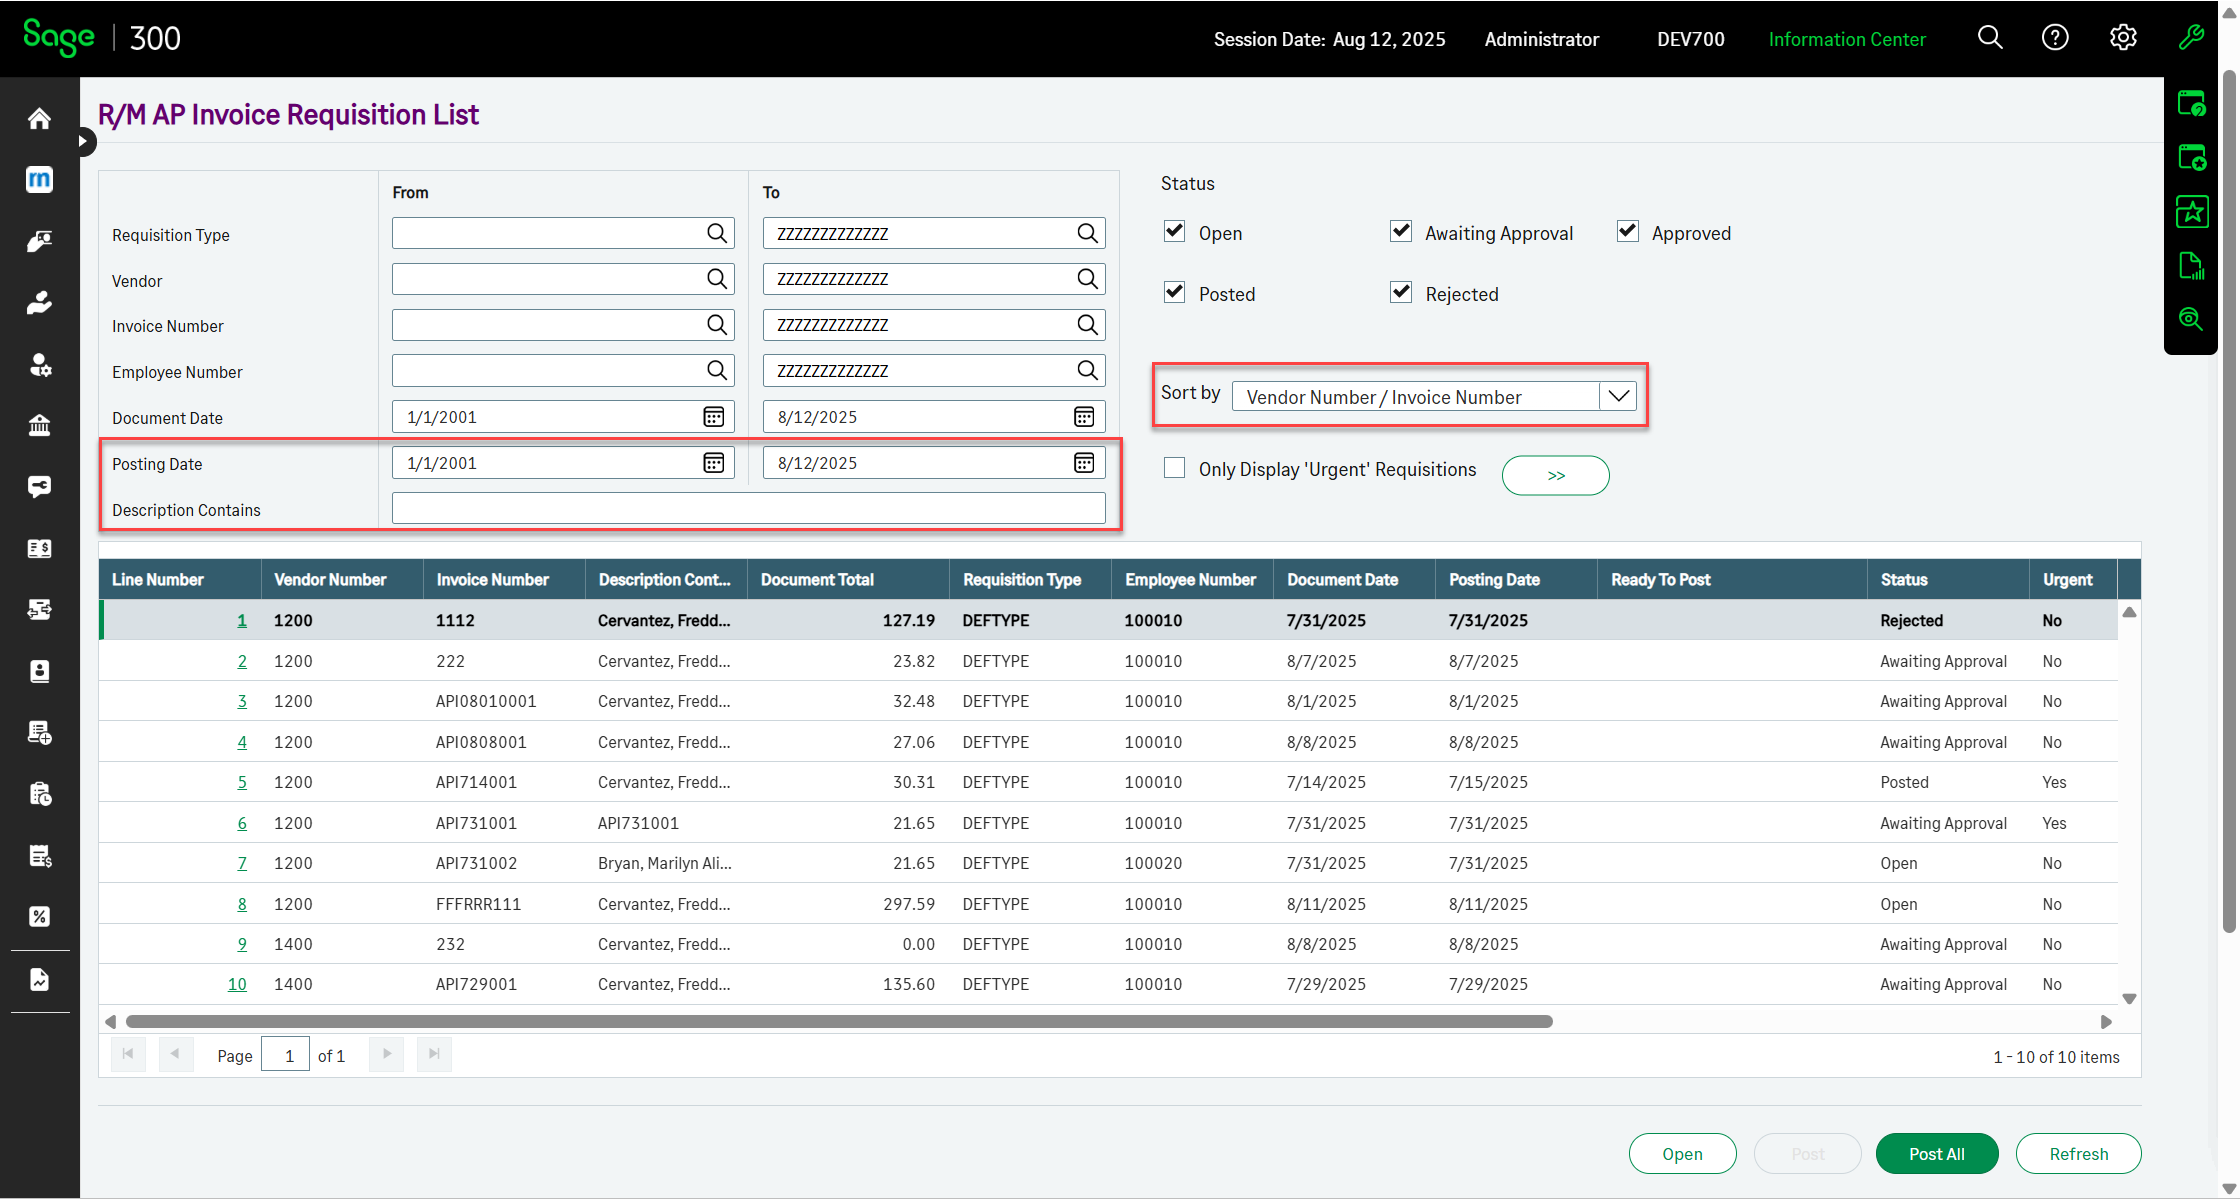
1. Improve the Backend > A/P Invoice Requisition List by adding two more filters and a 'Sort by' option.
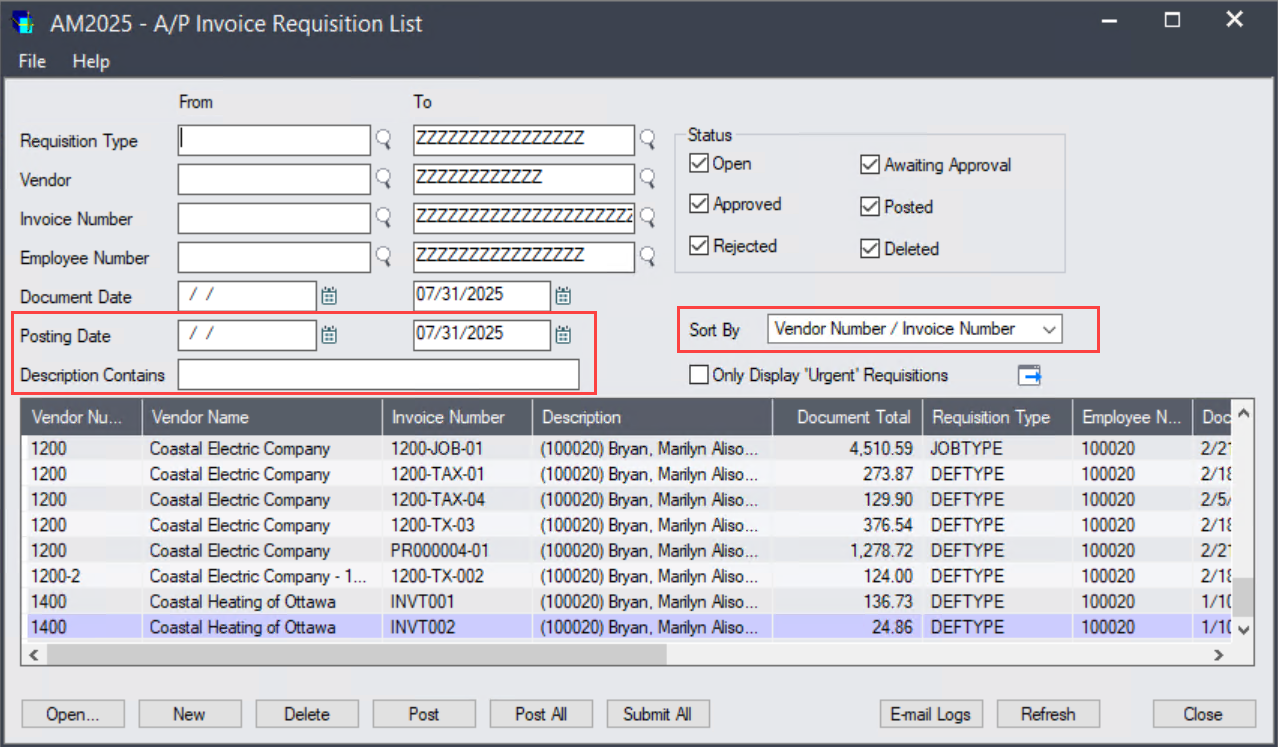
a. Add 'Posting Date' to filter the A/P invoice requisitions to list.
b. Provide the fuzzy searching capability on requisition description.
c. Invoice requisitions can be sorted by Vendor Number/Invoice Number, Invoice Number/Vendor Number, Document Date/Invoice Number and Approved Date/Invoice Number.
Note: this enhancement is also available in the Web Screen.
2. The maximum number of A/P Invoice Entries generated into an A/P invoice batch can be defined.
Note: Set maximum number as 0 if you do not want to limit the number of A/P invoice entries in a batch.

A/P Automation
Three new features are added to A/P Automation module.
1. Provide the capability to bulk maintain G/L account for invoice details.
Previously, you have to maintain GL account for invoice details one by one.
With this new feature, you do the following steps to maintain GL account for a number of details at the same time.

Step 1 - select the invoice details you want to maintain GL account for.
Step 2 - click the 'Set GL Account' button to open the 'Set GL Account' screen.
Step 3 - specify or select a GL account to replace the current one.
Step 4 - click OK button to do the change.
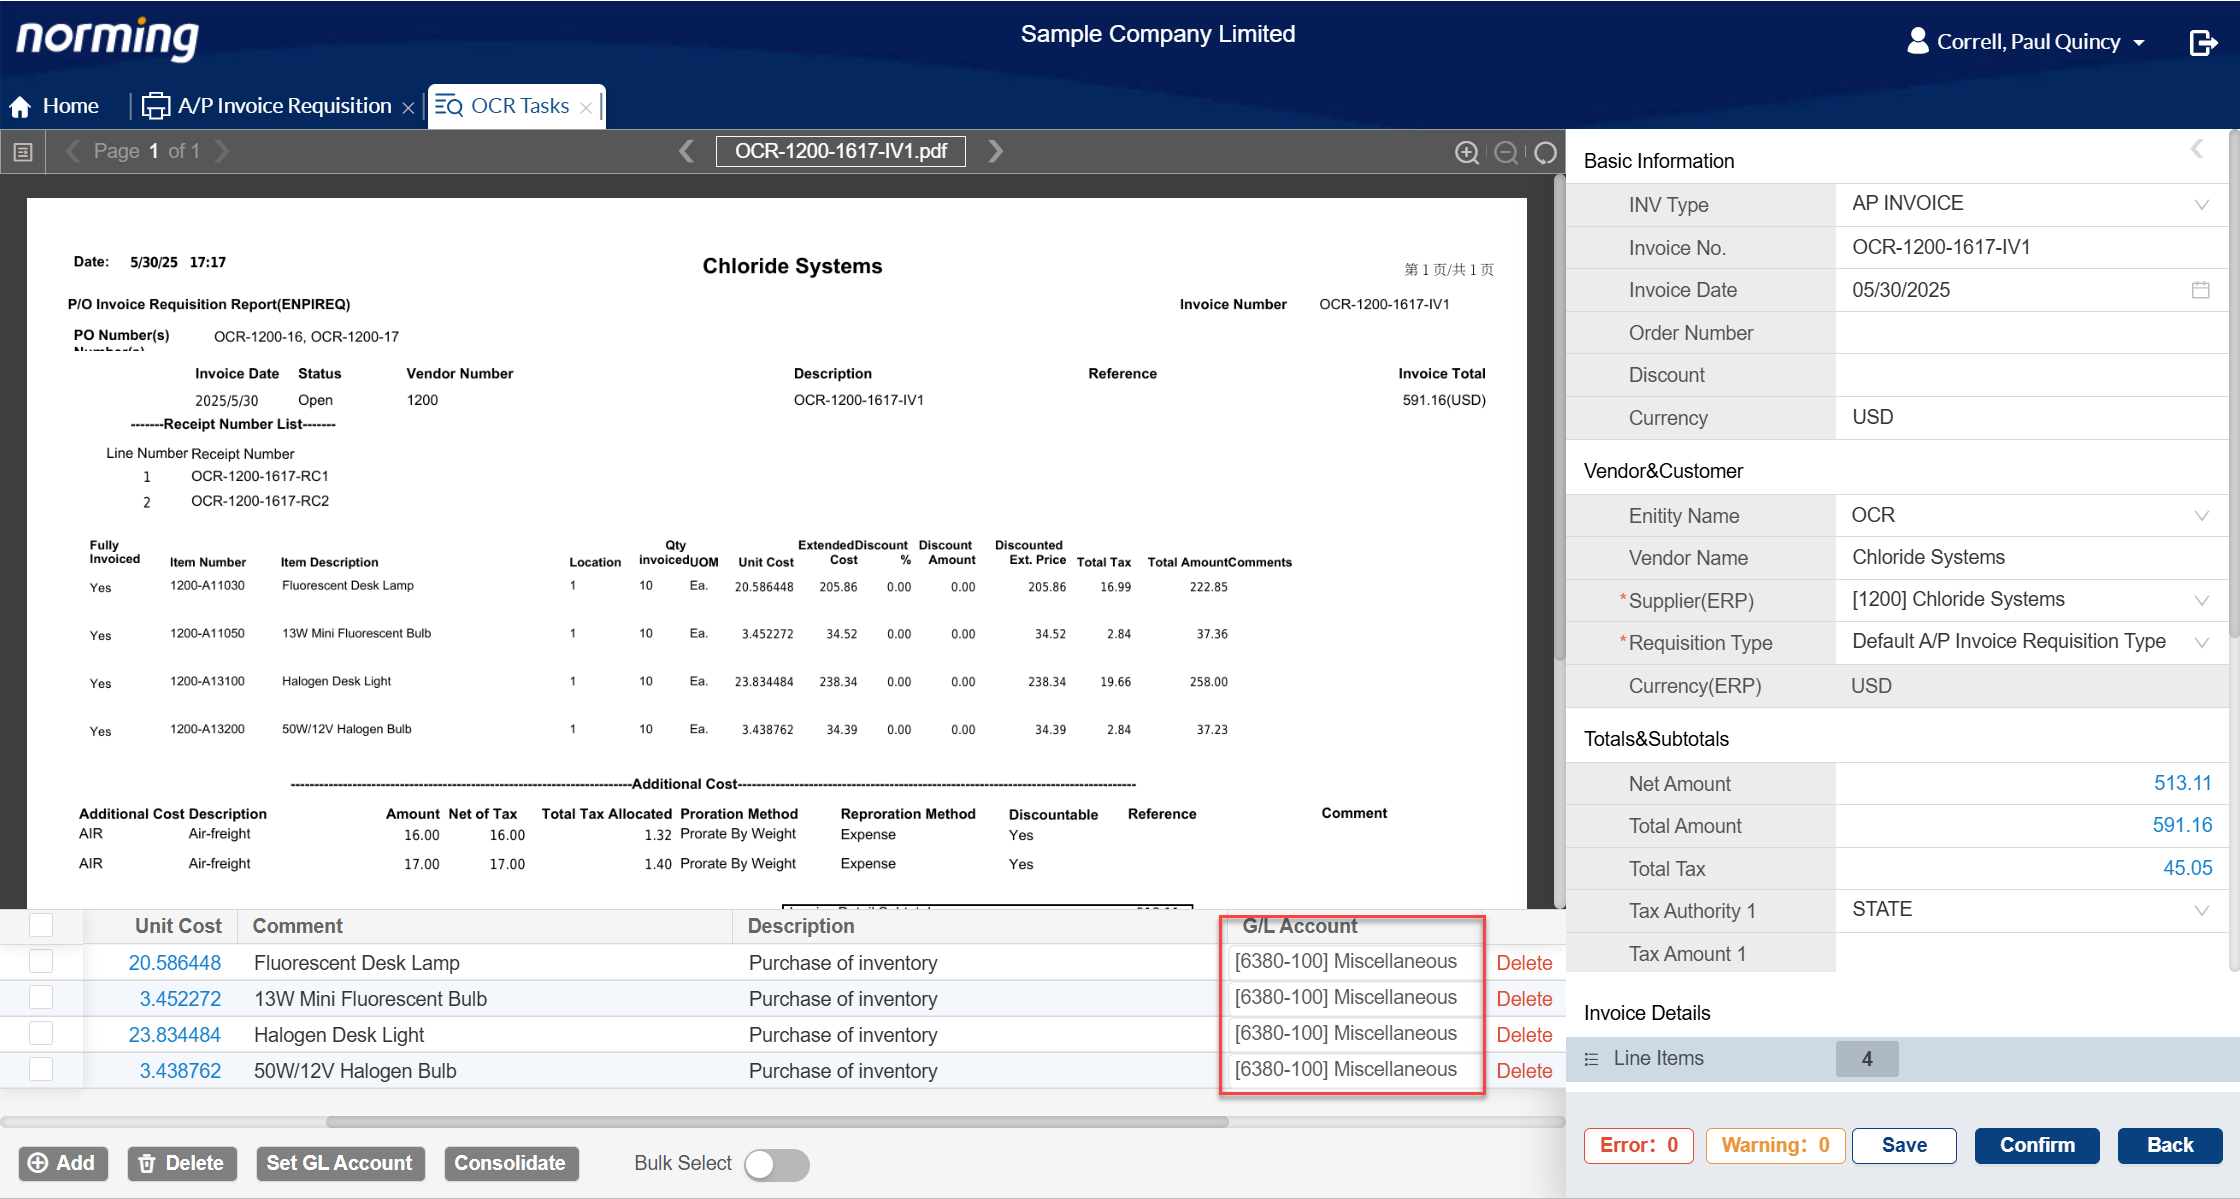
2. Invoice details can be consolidated by G/L account or distribution code.
Do the following steps to consolidate invoice details:
Step 1 - select the invoice details you want to consolidate.
Step 2 - click the 'Consolidate' button to load the below popup window.
Step 3 - specify how to consolidate the details, by GL Account or Distribution Code.
Step 4 - click 'OK' button to do consolidation.
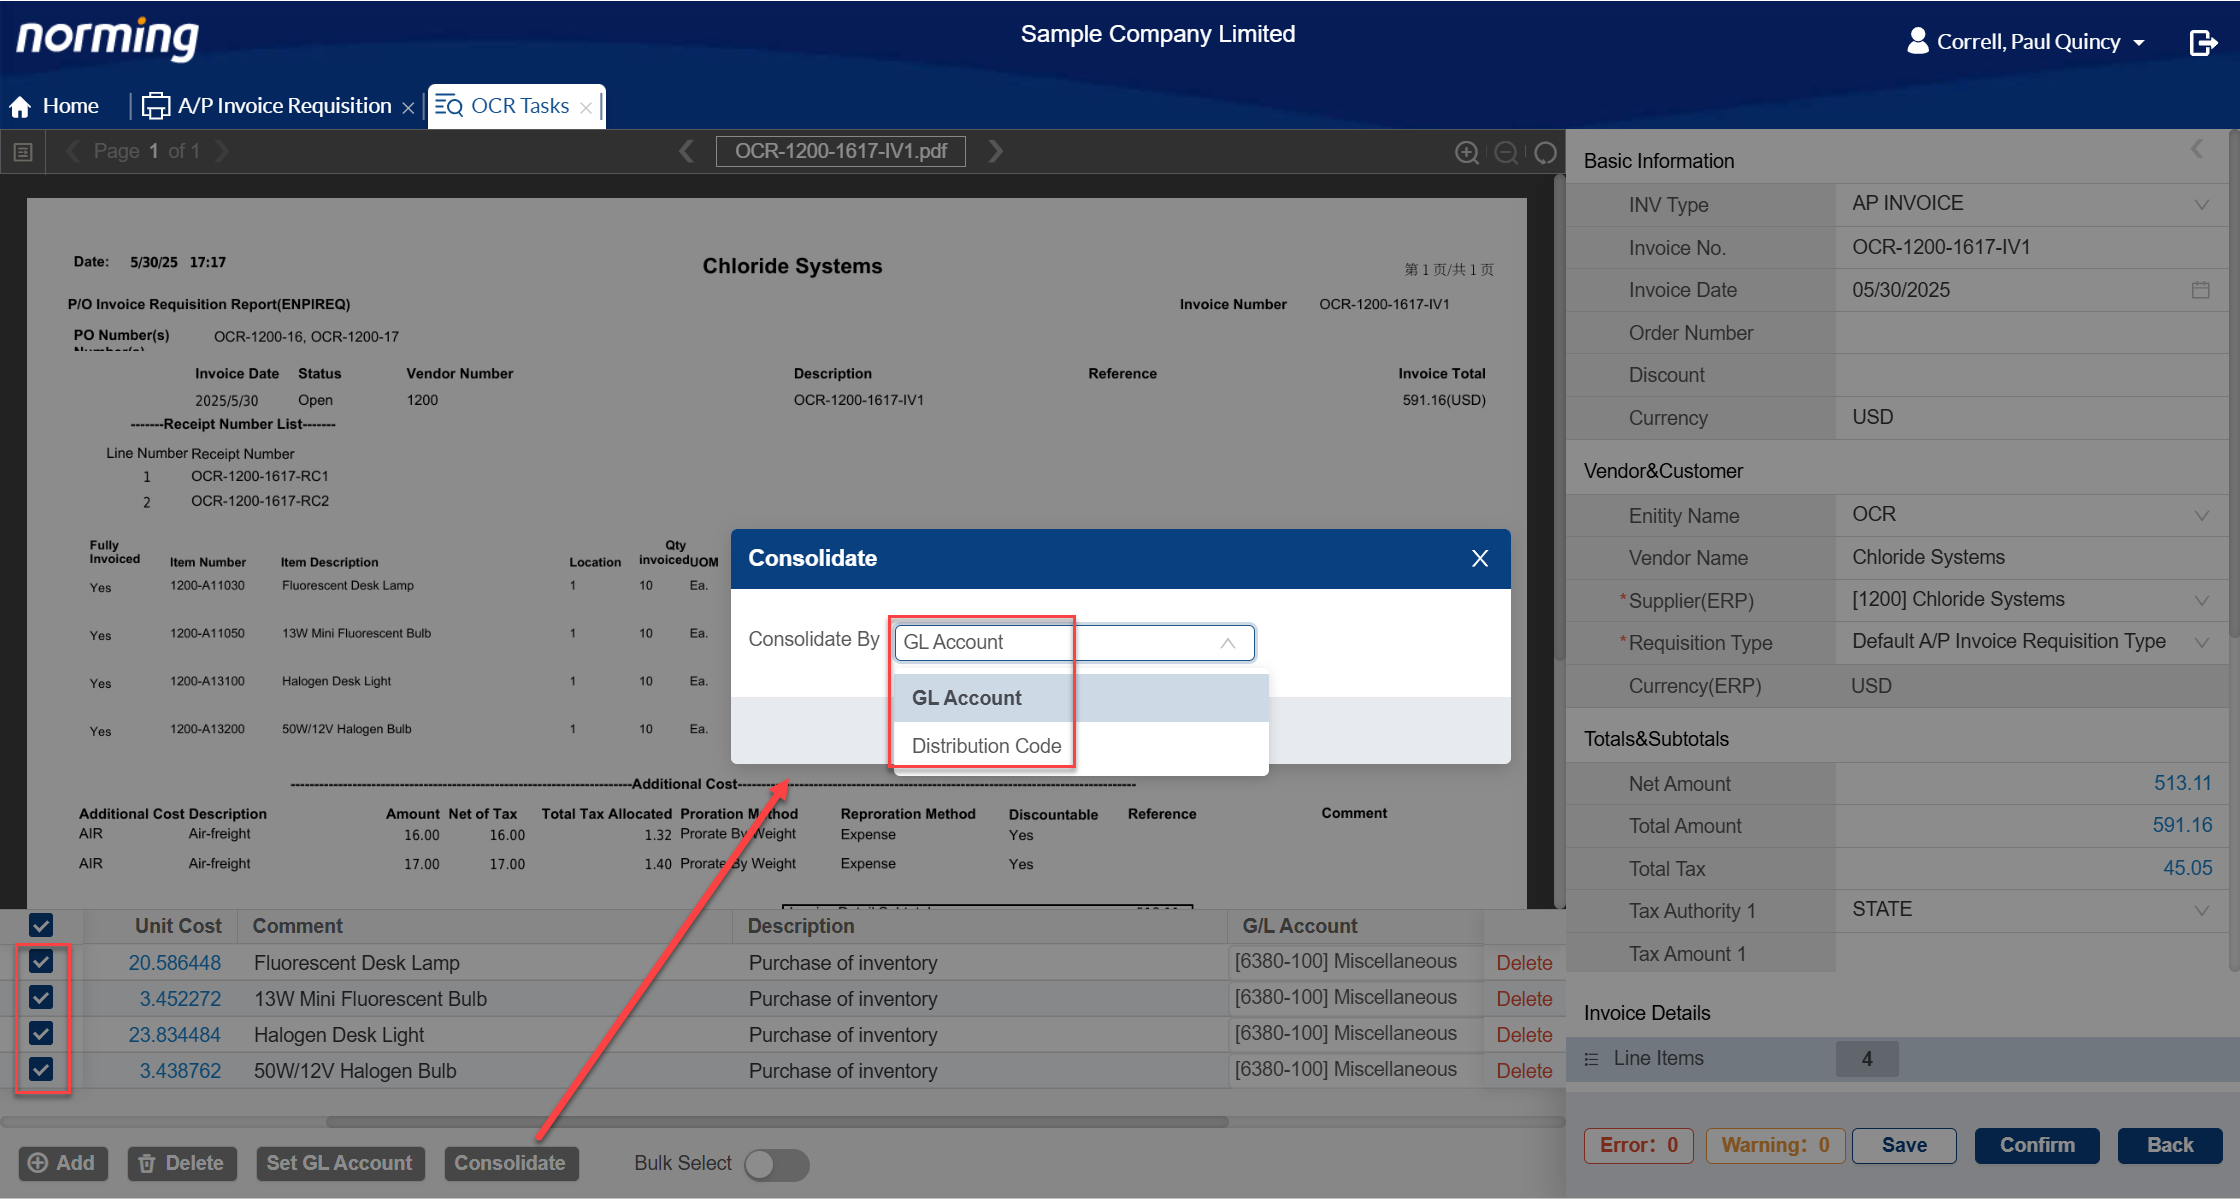
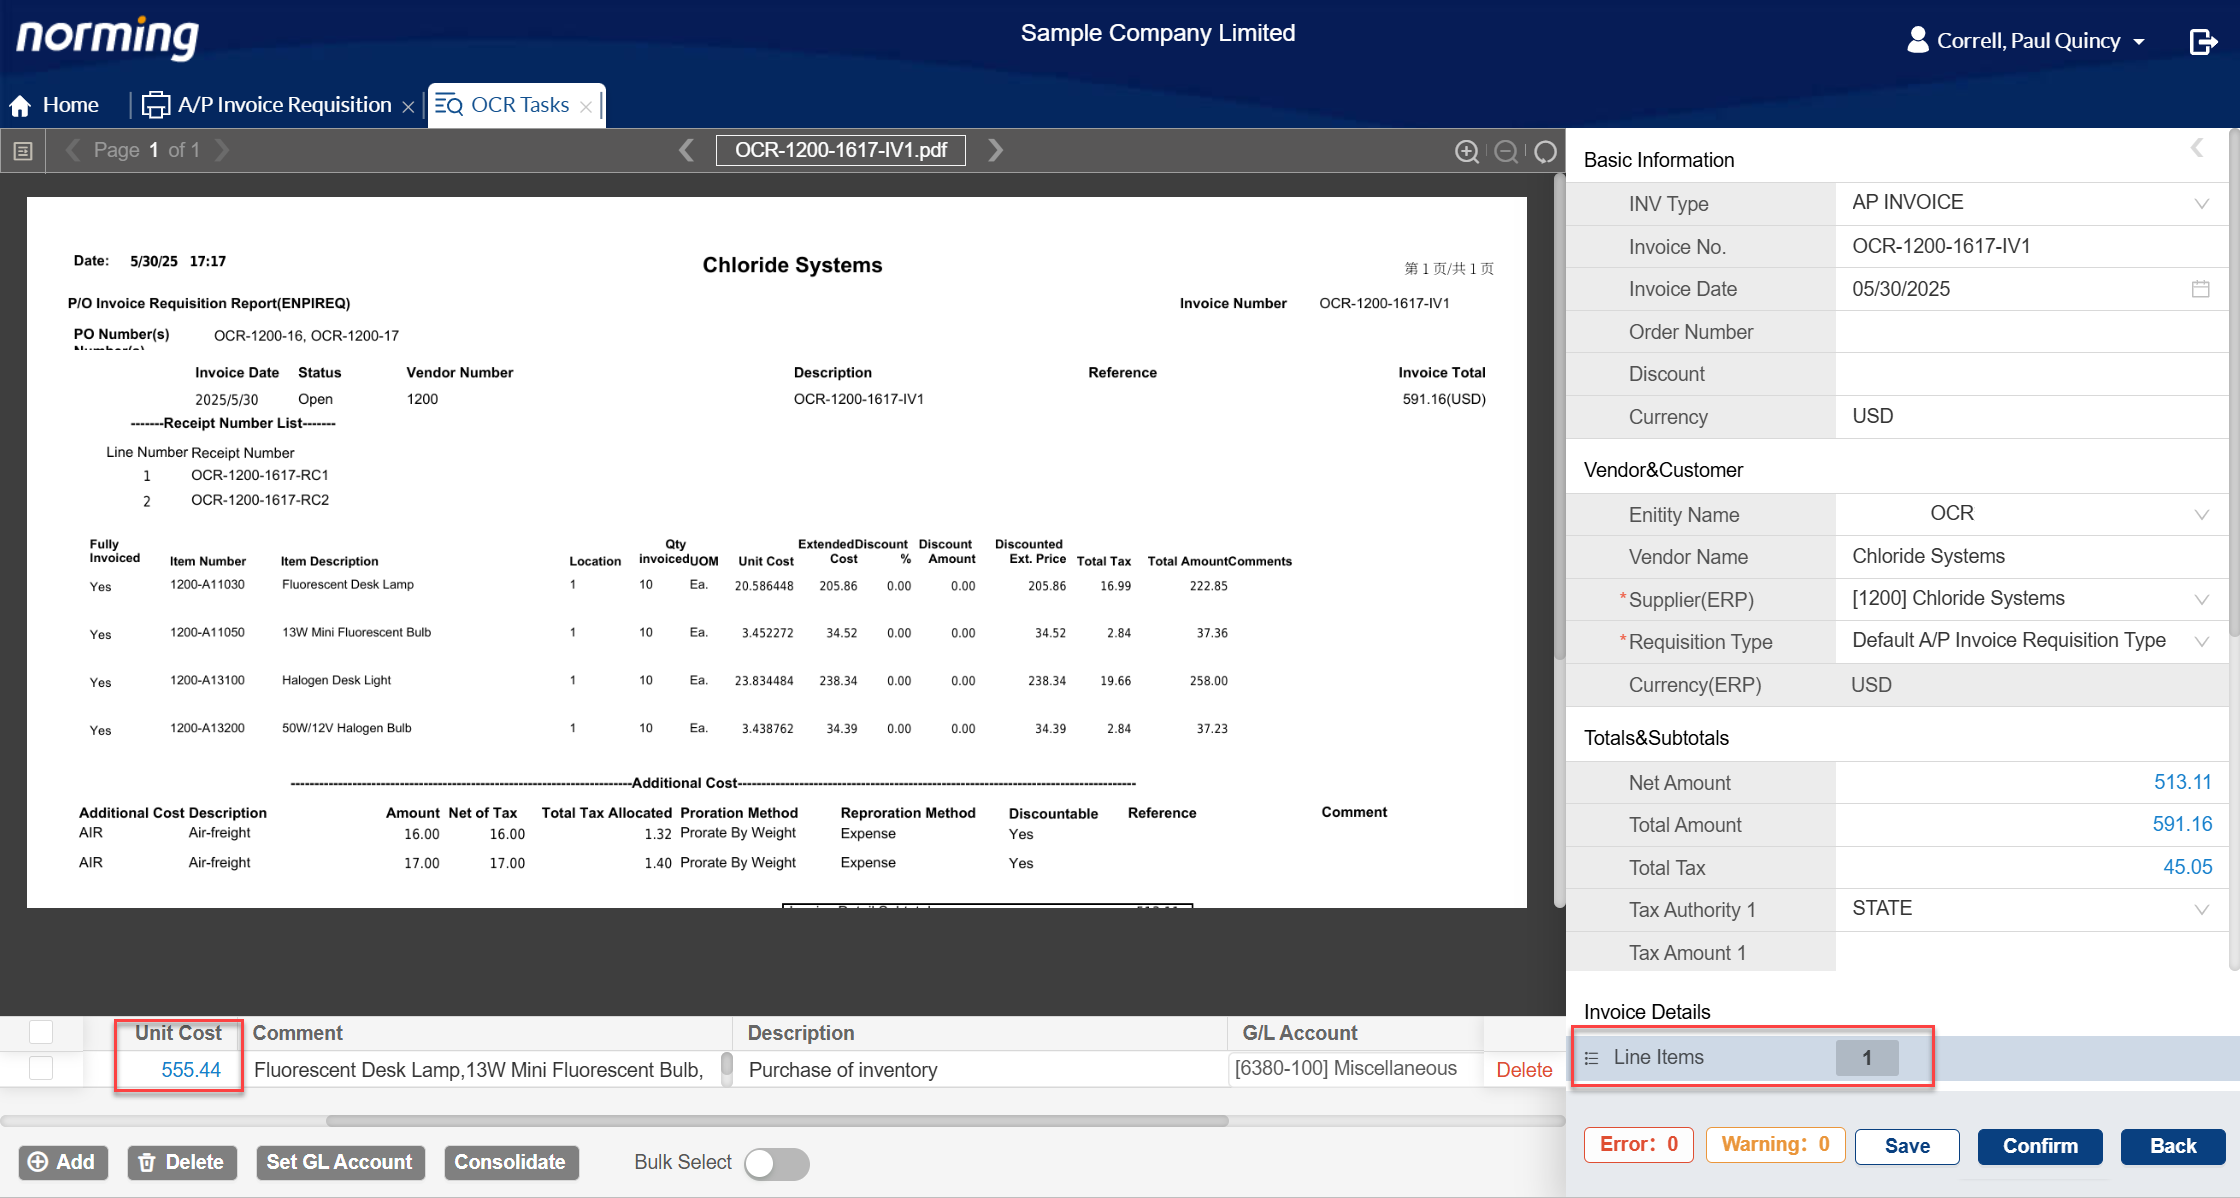
For the above example, all of four details will be consolidated into one line since they have the same GL Account.
Below is the consolidation result:
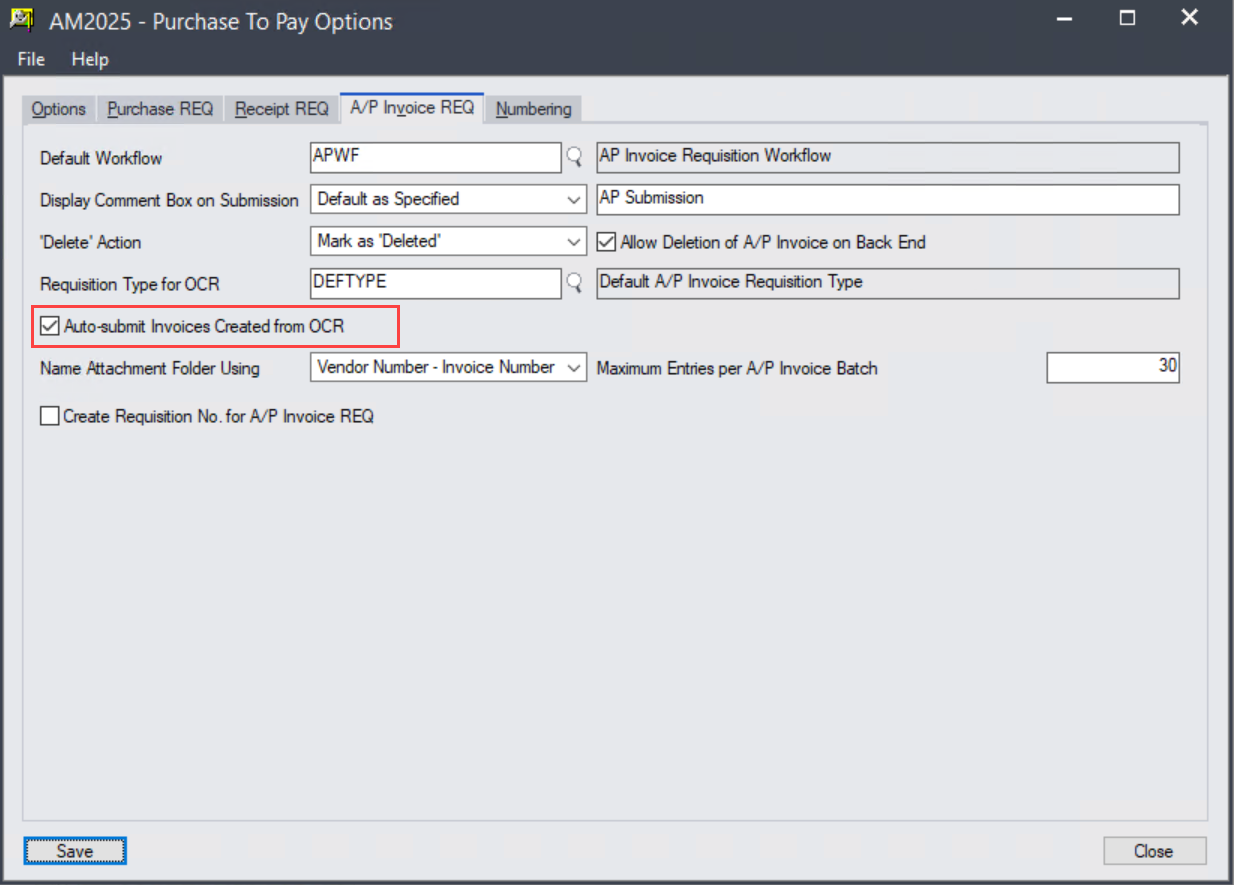
3. A/P invoice requisitions that created by A/P Automation can be auto-submitted.
To enable this feature, go to Resource Manager Back End > Procure to Pay > Setup > Options > A/P Invoice REQ page to enable the below option.
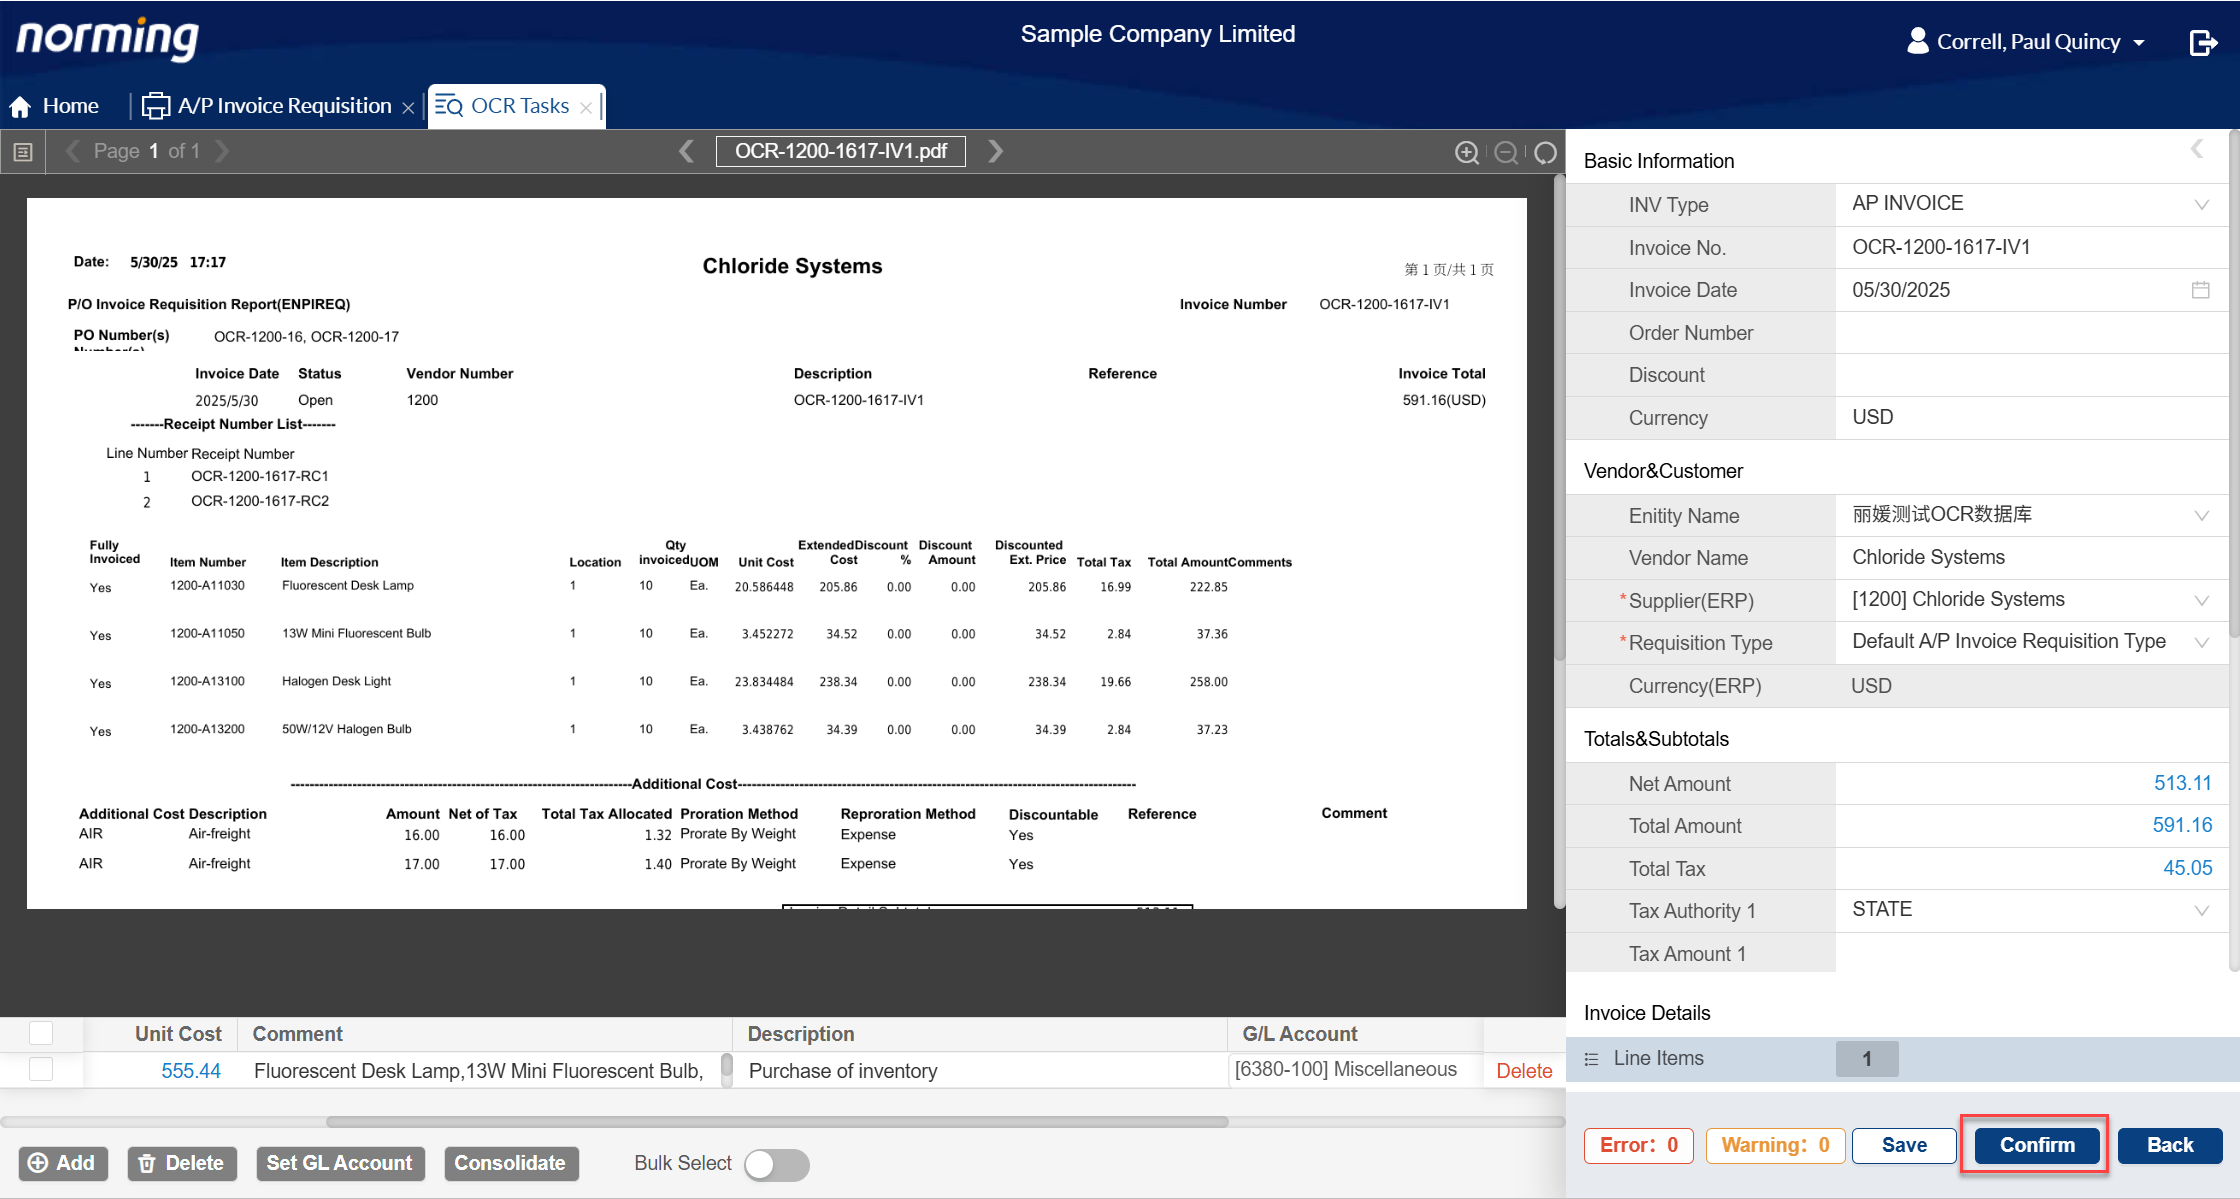
If this option on, the 'Confirm' operation in the below screen will do two things:
a. Create an A/P invoice requisition.
b. Submit the requisition created with step a.
Travel Request
Two enhancements are made to Travel Request.
1. Allow to define access permission for fields in Employee Portal > Travel Request > Itinerary page.
To define fields' permission:
● Go to Admin Portal > ESS Group or ESS User > Travel Request tab.
● Find the 'Itinerary' table under Detail section.
● Change the permission settings for the fields per your needs.

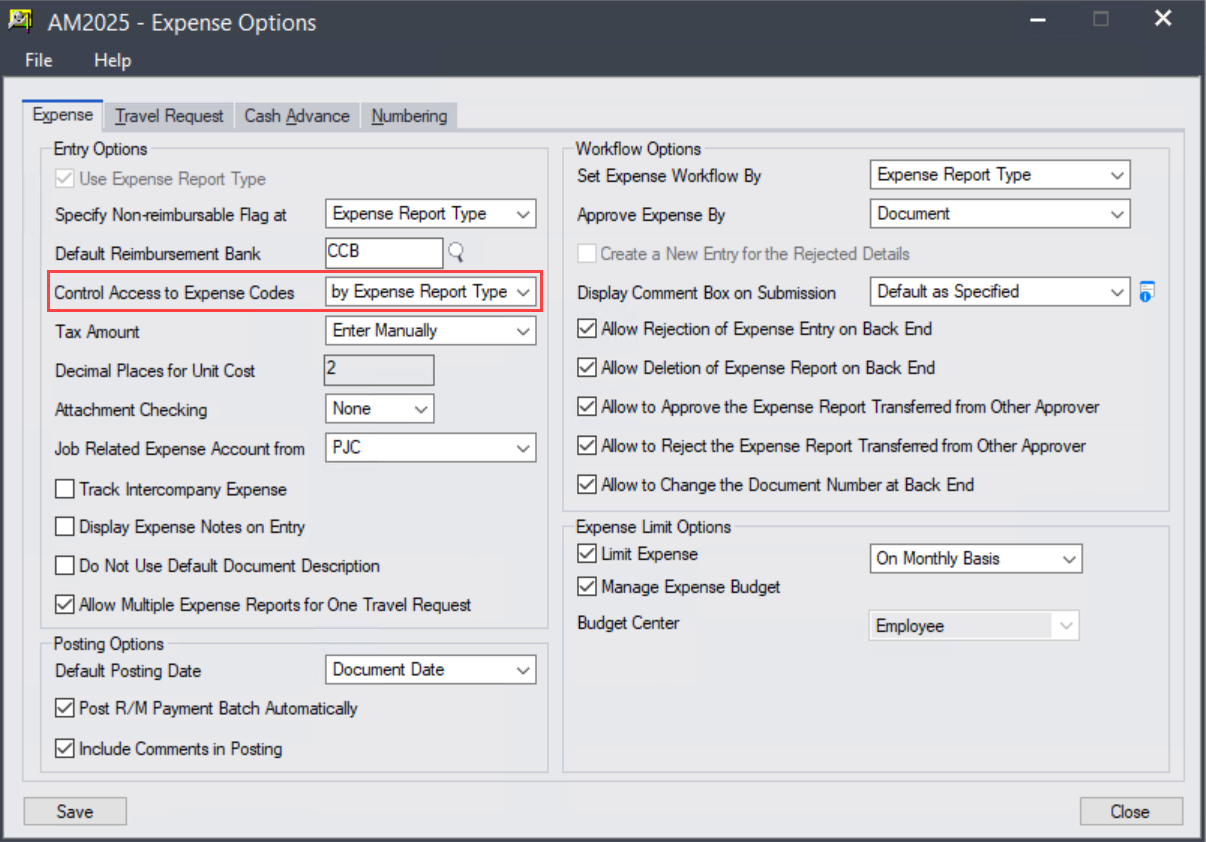
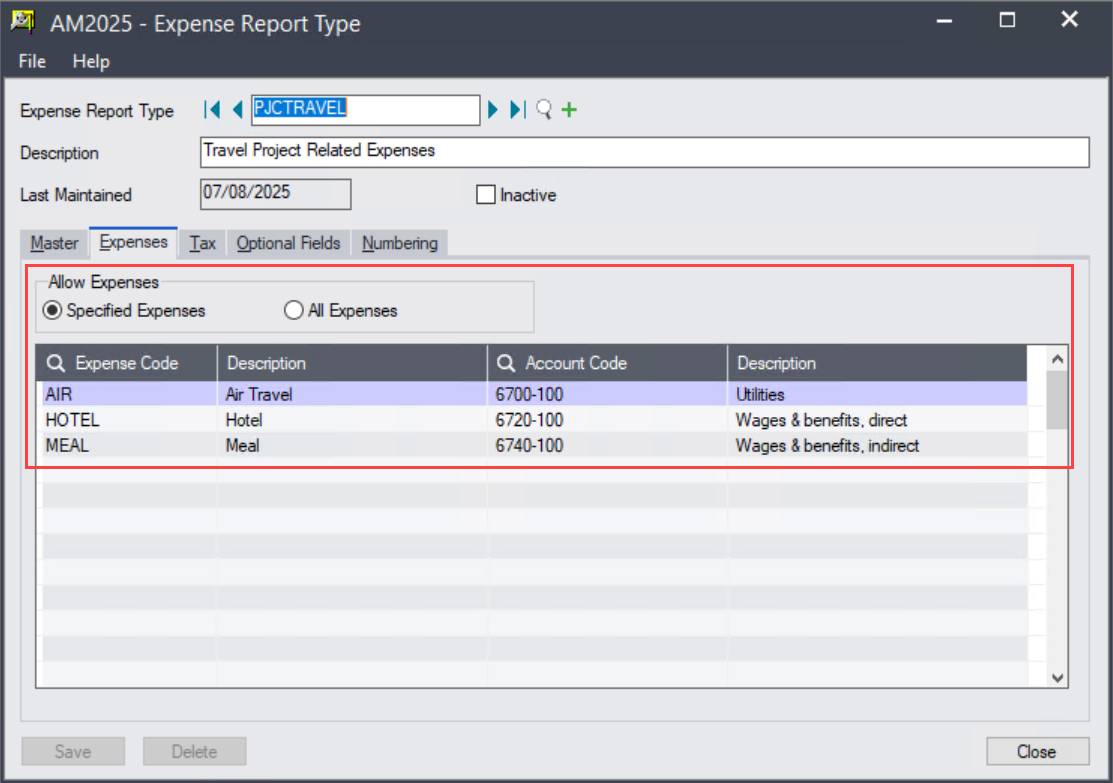
2. If the option 'Control Access to Expense Codes' is selected as 'by Expense Report Type', expense codes in Travel Request > Estimate page that can be chosen are limited to the range defined in the granted expense report type(s).
Previously, no matter how this option is selected, expense codes always come from Employee Register > Expense Control page.
Expense Report
Five enhancements are made to Expense Report.
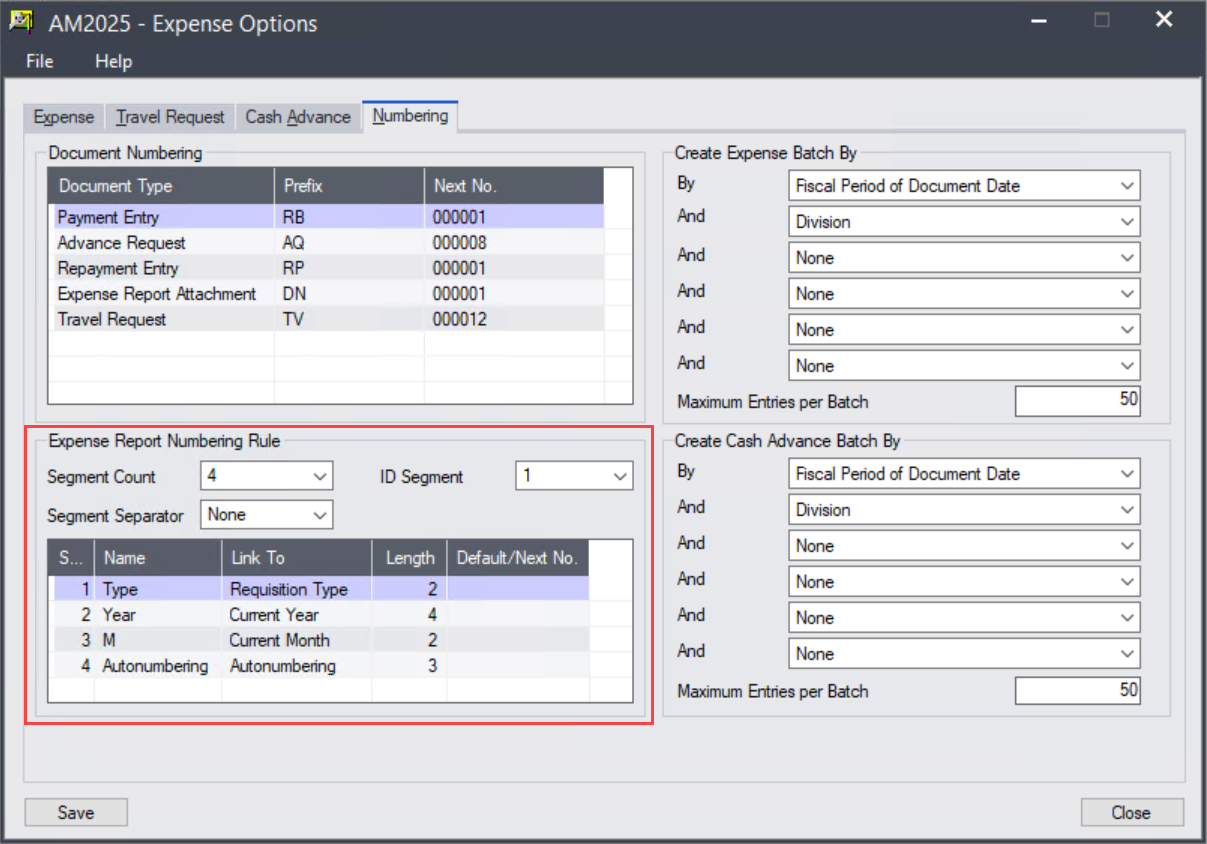
1. Improve the numbering rule for Expense Report to allow multiple segments.
Previously, document number for expense report can have two segments only, say Prefix + Autonumbering.
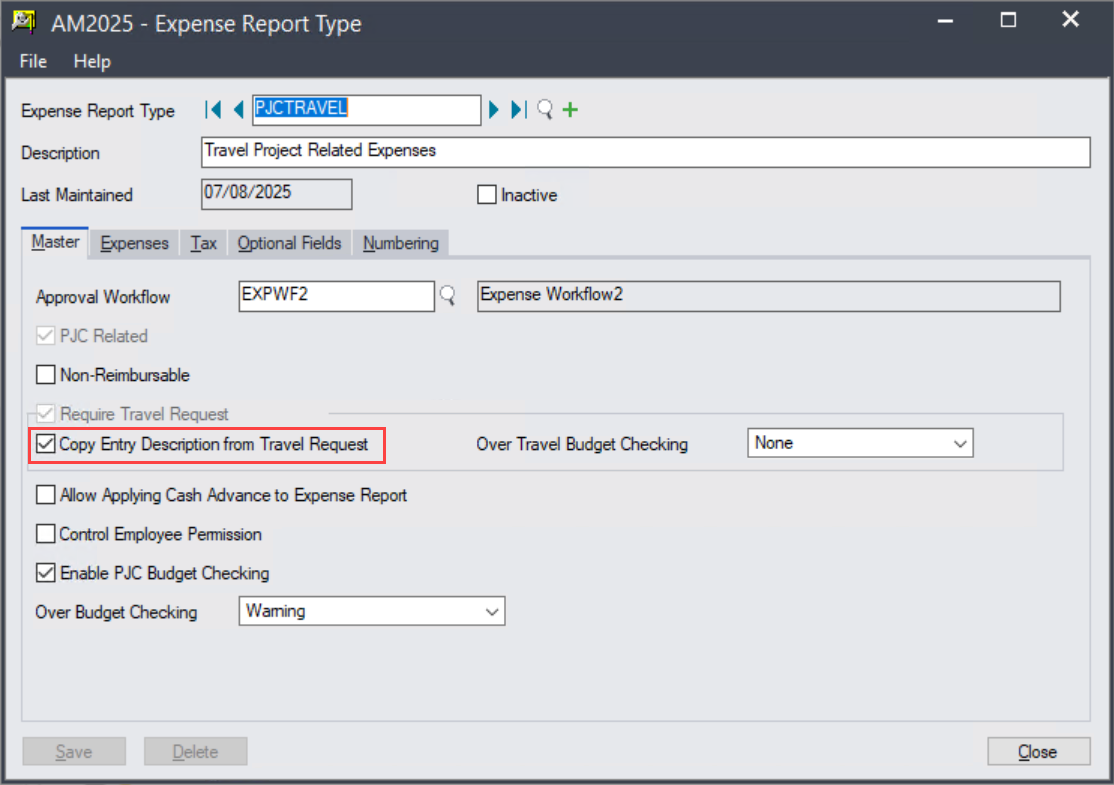
2. Improve the integration with Travel Request.
a. Allow to define whether to default expense report's description as travel request's description.
To use this feature, select the below option in Expense Report Type.
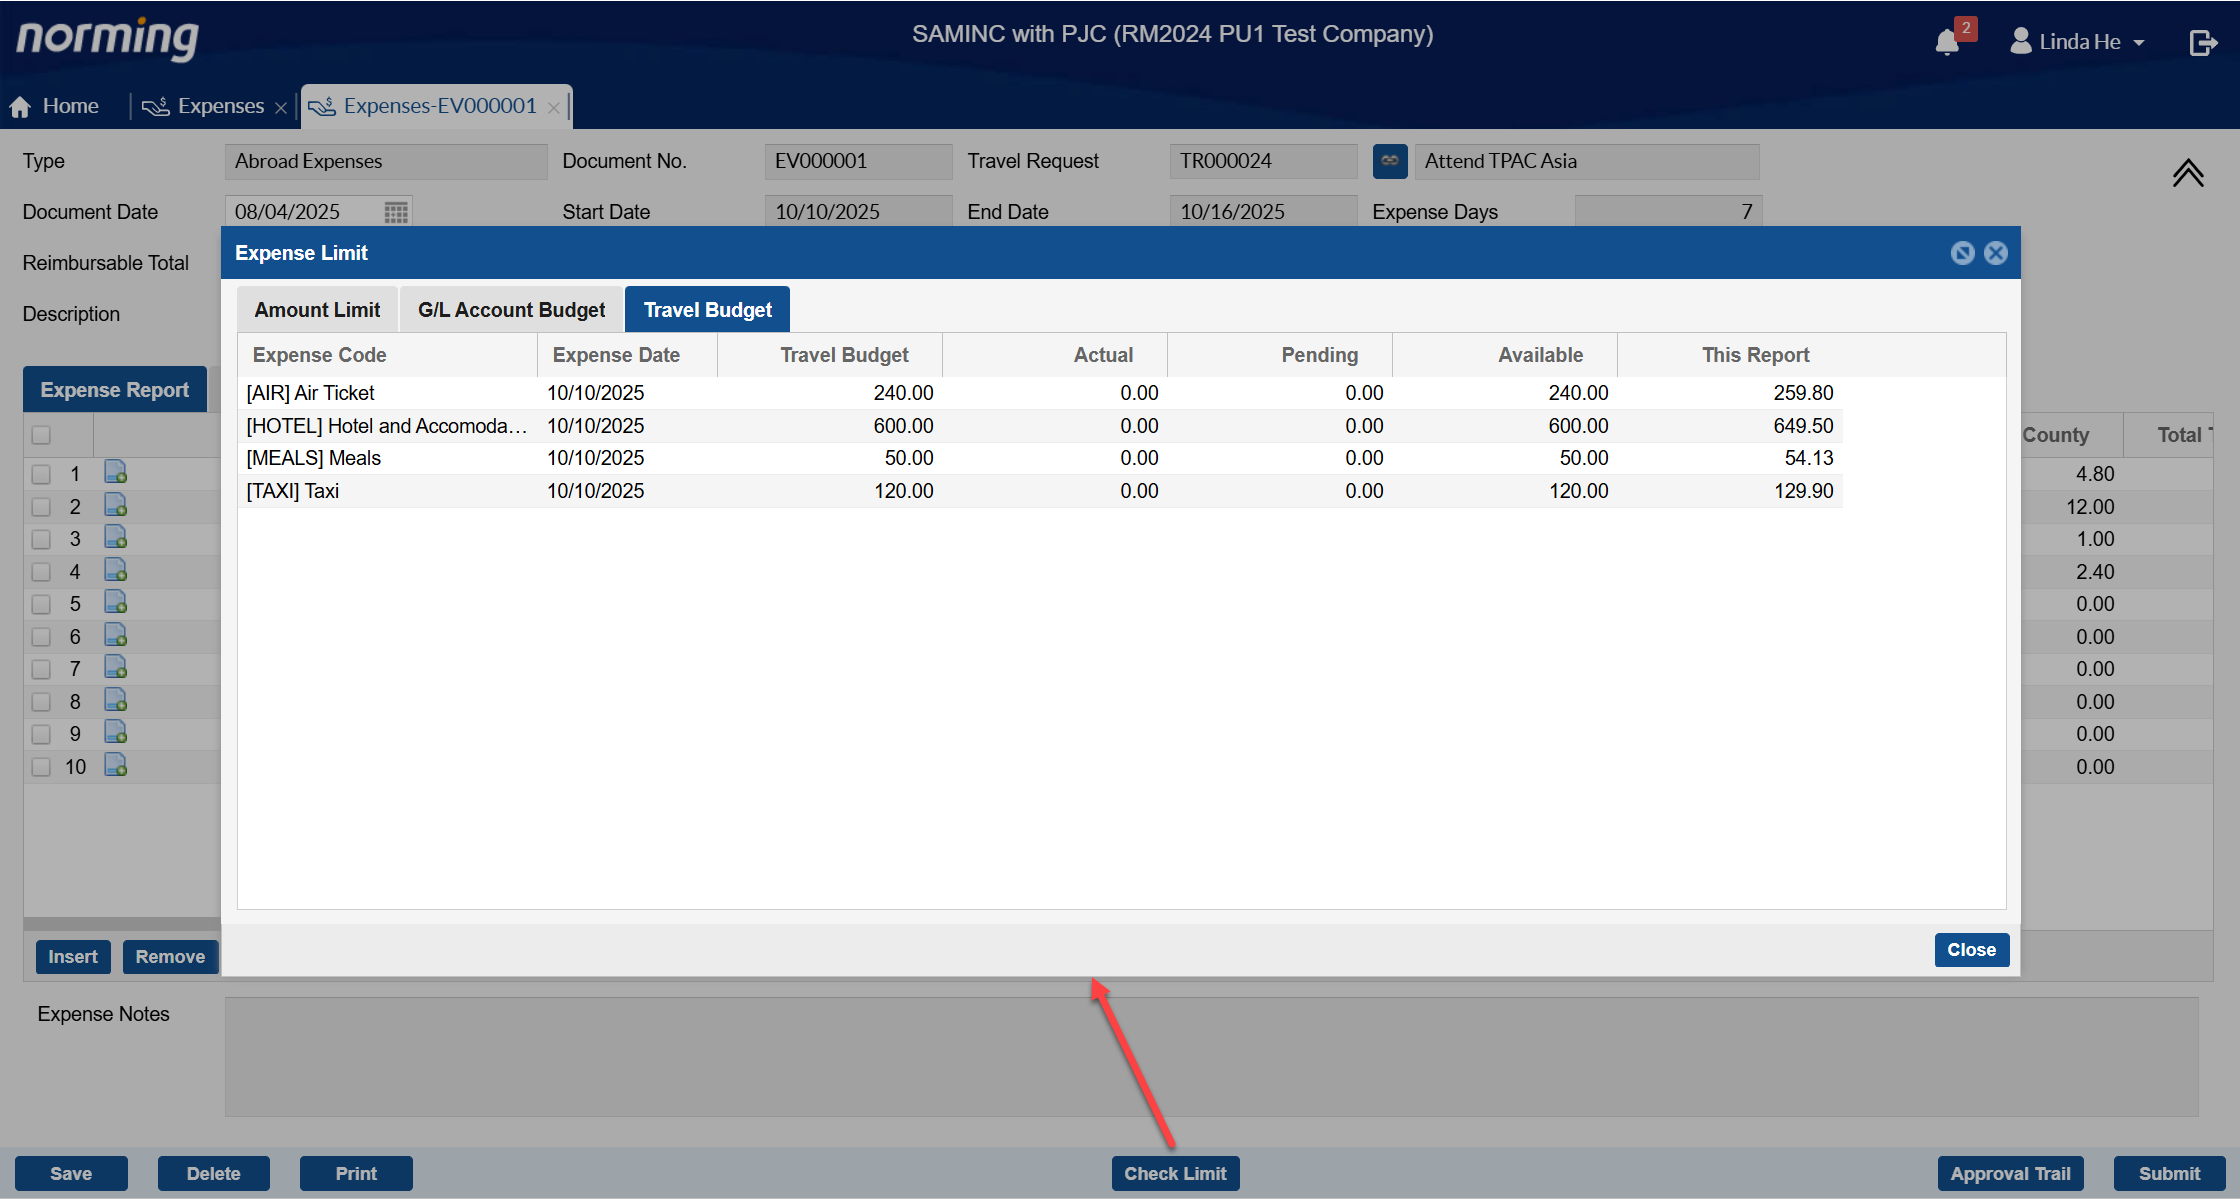
b. Travel Budget information is available in the 'Check Limit' screen.
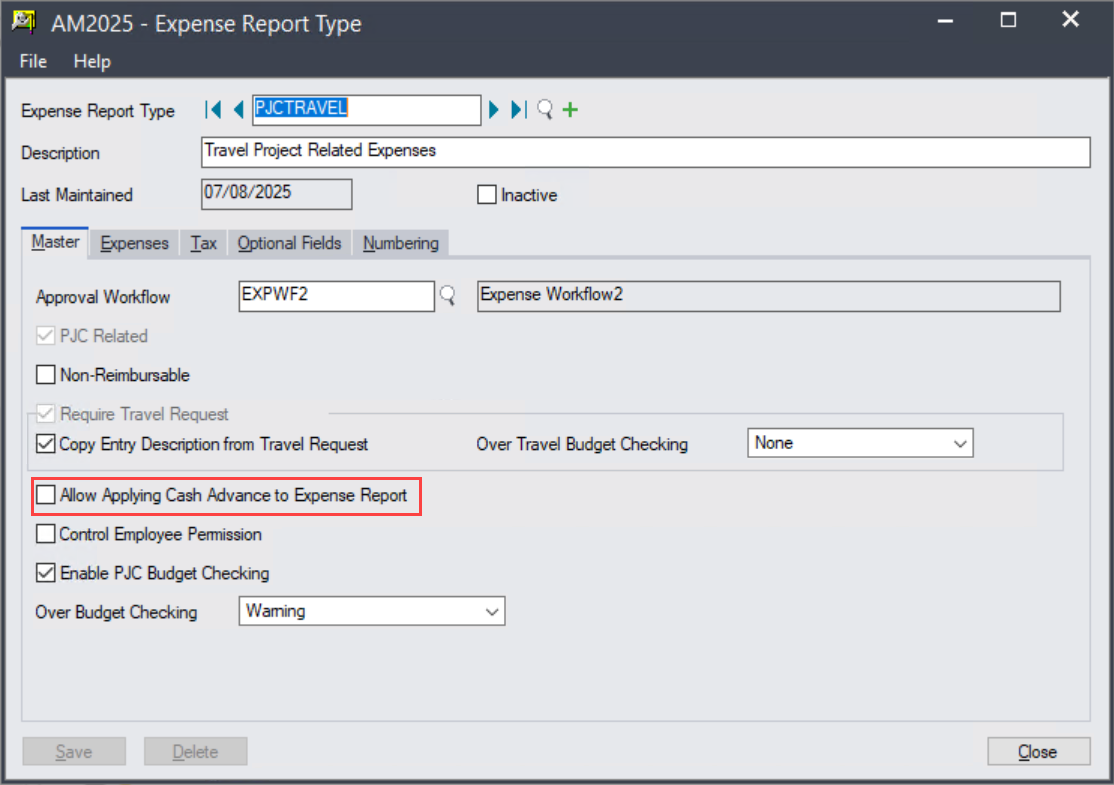
3. Allow to specify whether to allow applying cash advance to expense report.
To enable this function, select the below option in expense report type, then ESS users are able to specify cash advance requests to apply to expense reports.
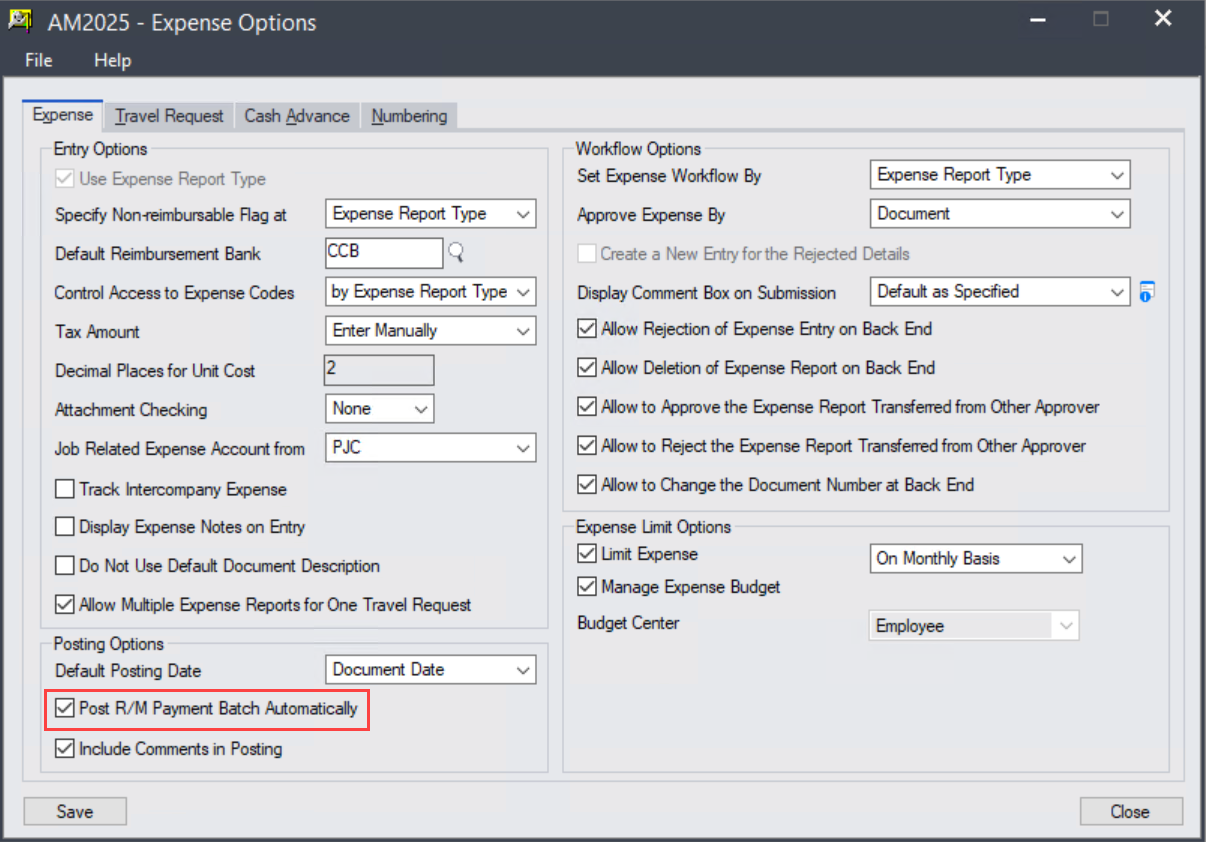
4. Payment entry (that generated by the posting of expense report) can be posted automatically.
To enable this function, select the option in the below screen.
Note: A payment entry can be generated by an expense report automatically, only if a cash advance request is specified on the expense report to apply to.
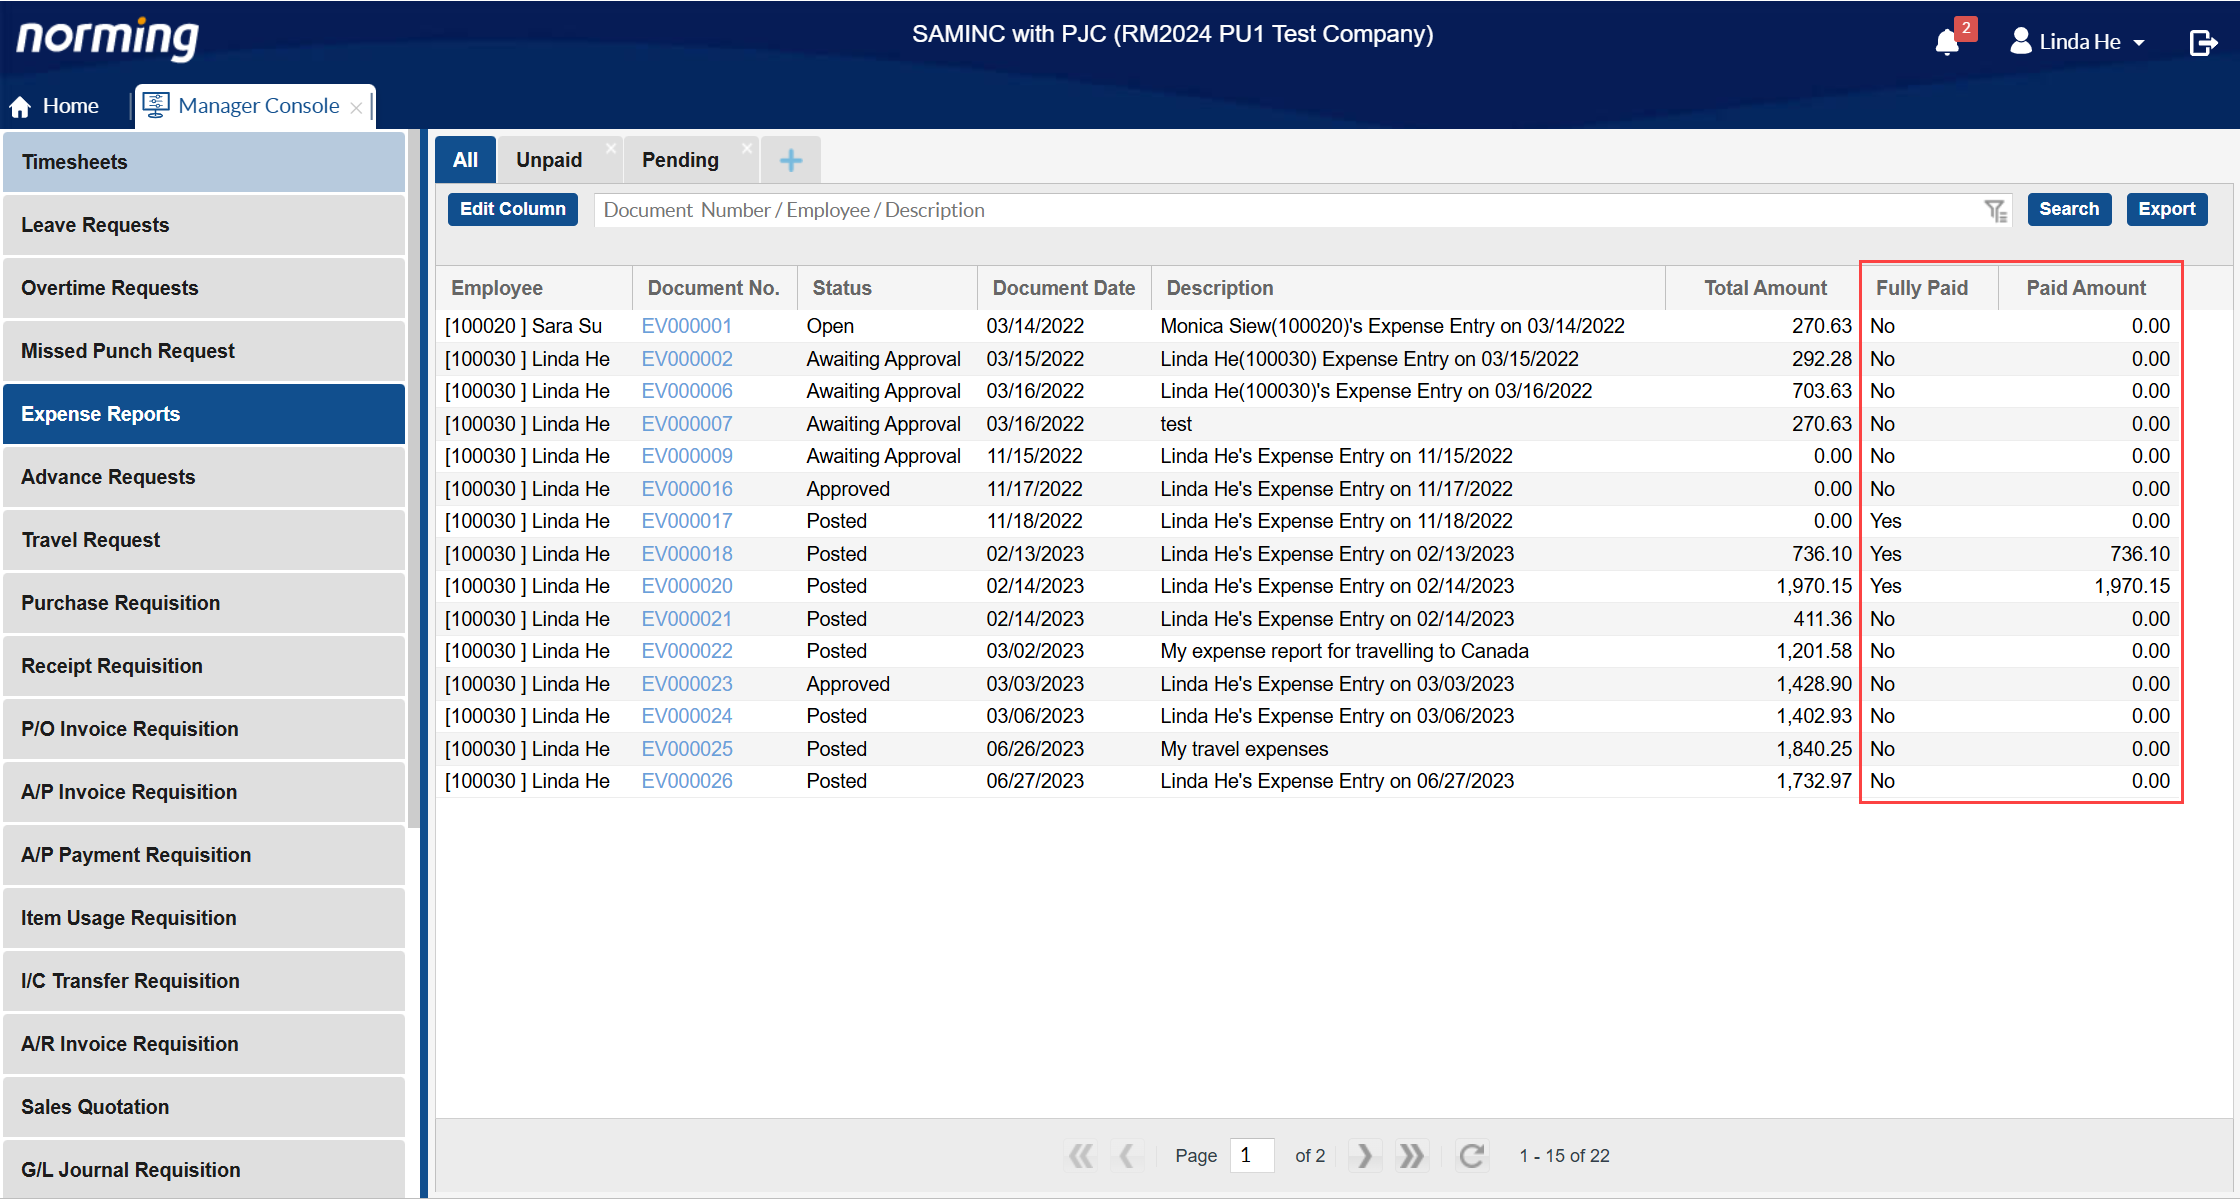
5. Two more fields(columns) are available for Expense Report list in Employee Portal > Manager Console, 'Fully Paid' and 'Paid Amount'.
Steps to add these two fields in Expense Report list:
● Click the 'Edit Column' button to display the Edit Column screen.
● Click the 'Select Column' dropdown list.
● Select 'Fully Paid' and/or 'Paid Amount' field(s).
● Click 'Save' button to save the changes.
● Click 'Apply' button if you want to apply the changes to other tab(s).

Timesheet
Two improvements are made to Timesheet in this version.
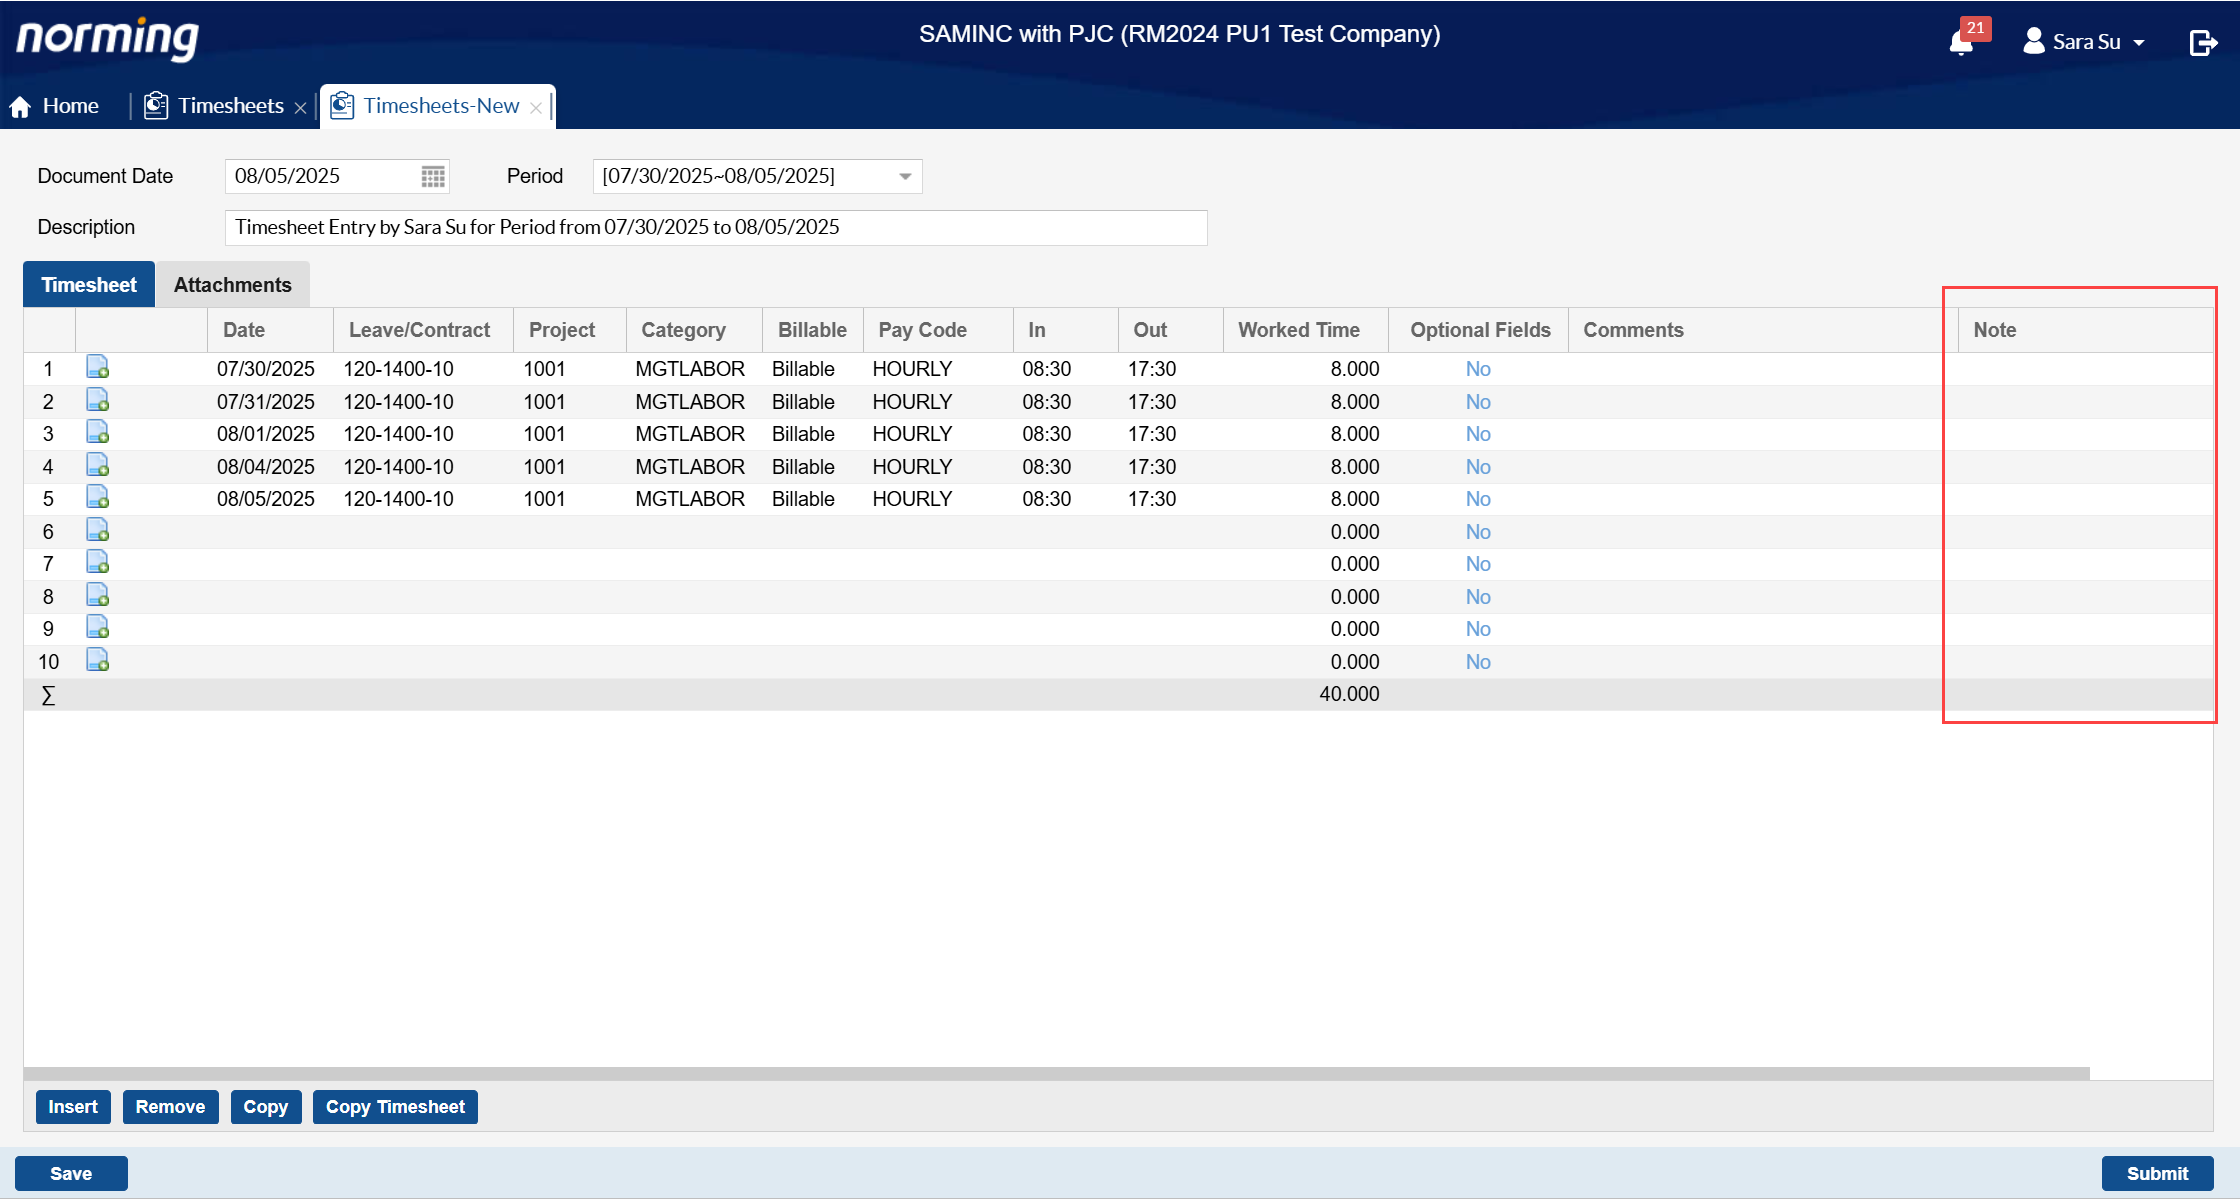
1. Improve 'In/Out' Timesheet mode to allow inputting Note for details.
Previously, only 'Comments' can be entered at detail level under In/Out timesheet format.
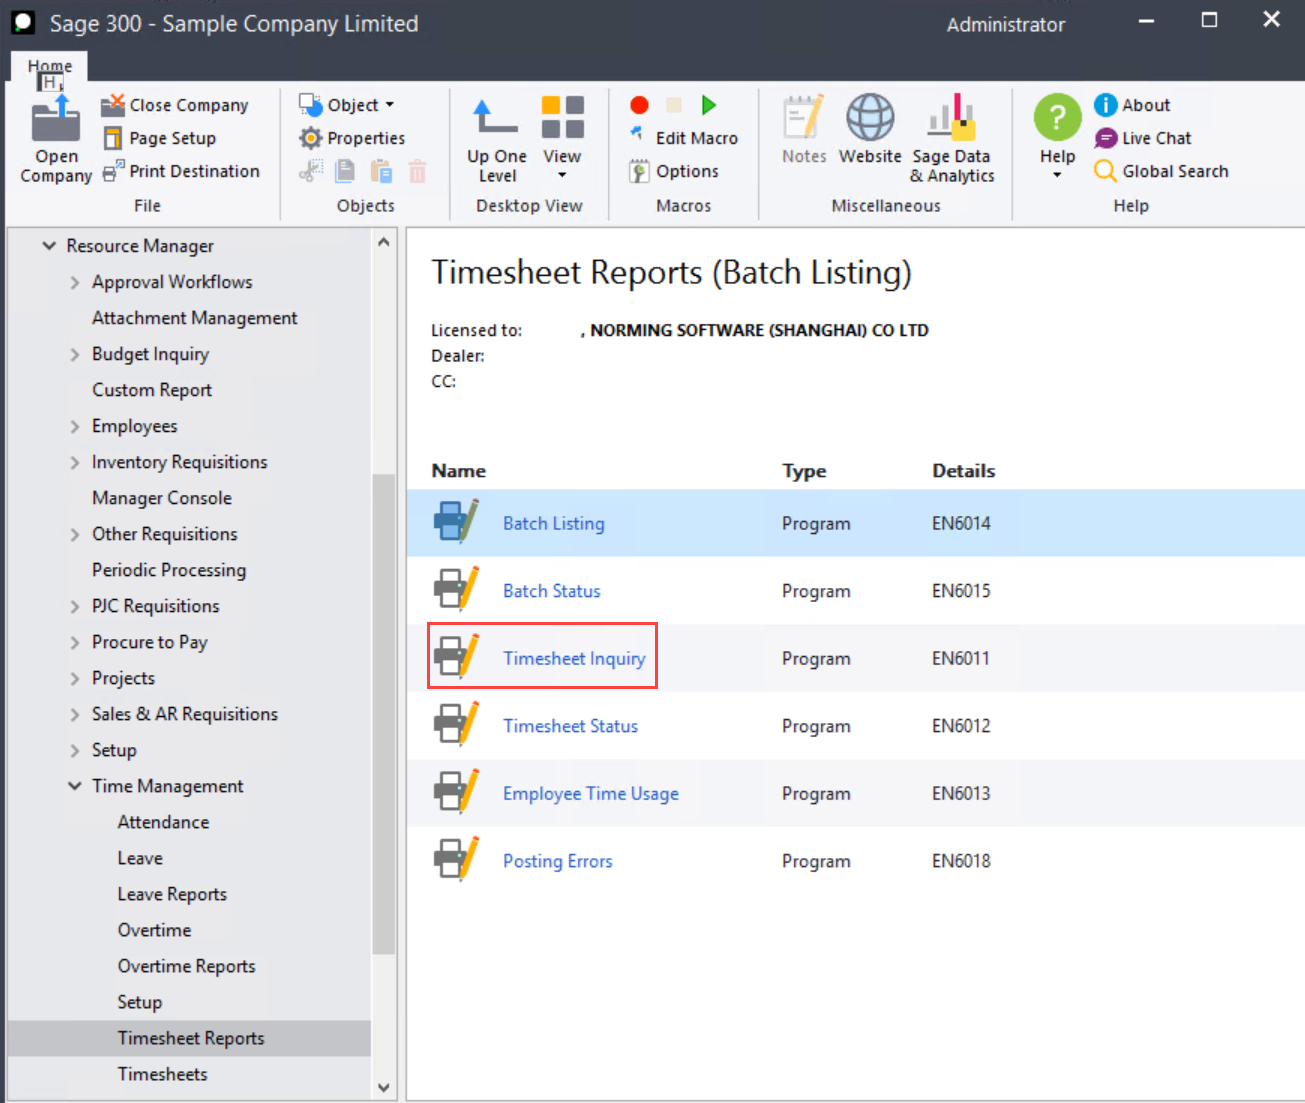
2. Improve 'Timesheet Inquiry' report to display both 'Comments' and 'Note' fields.

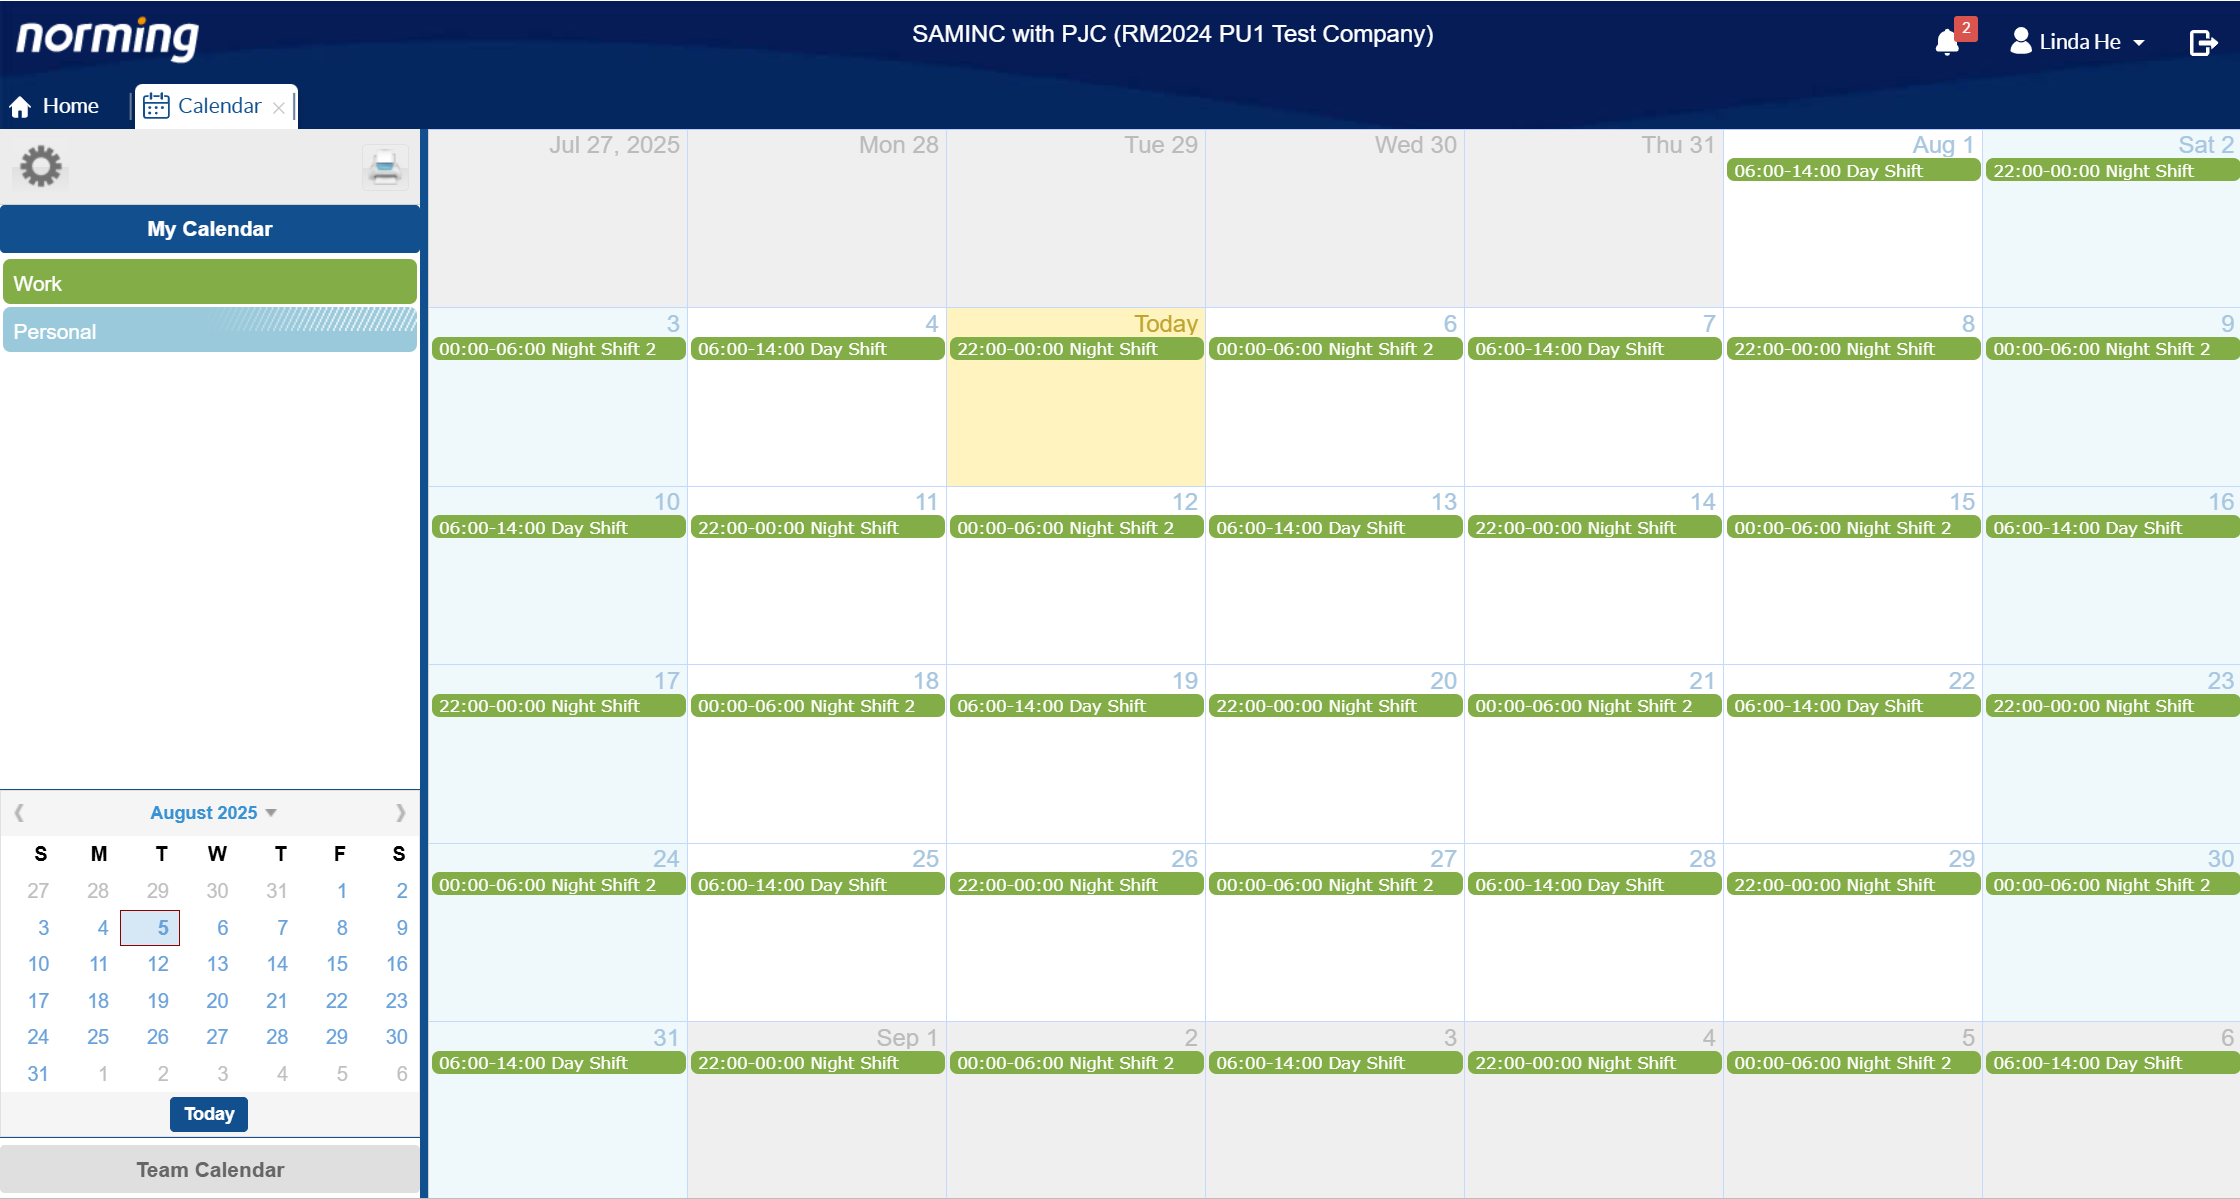
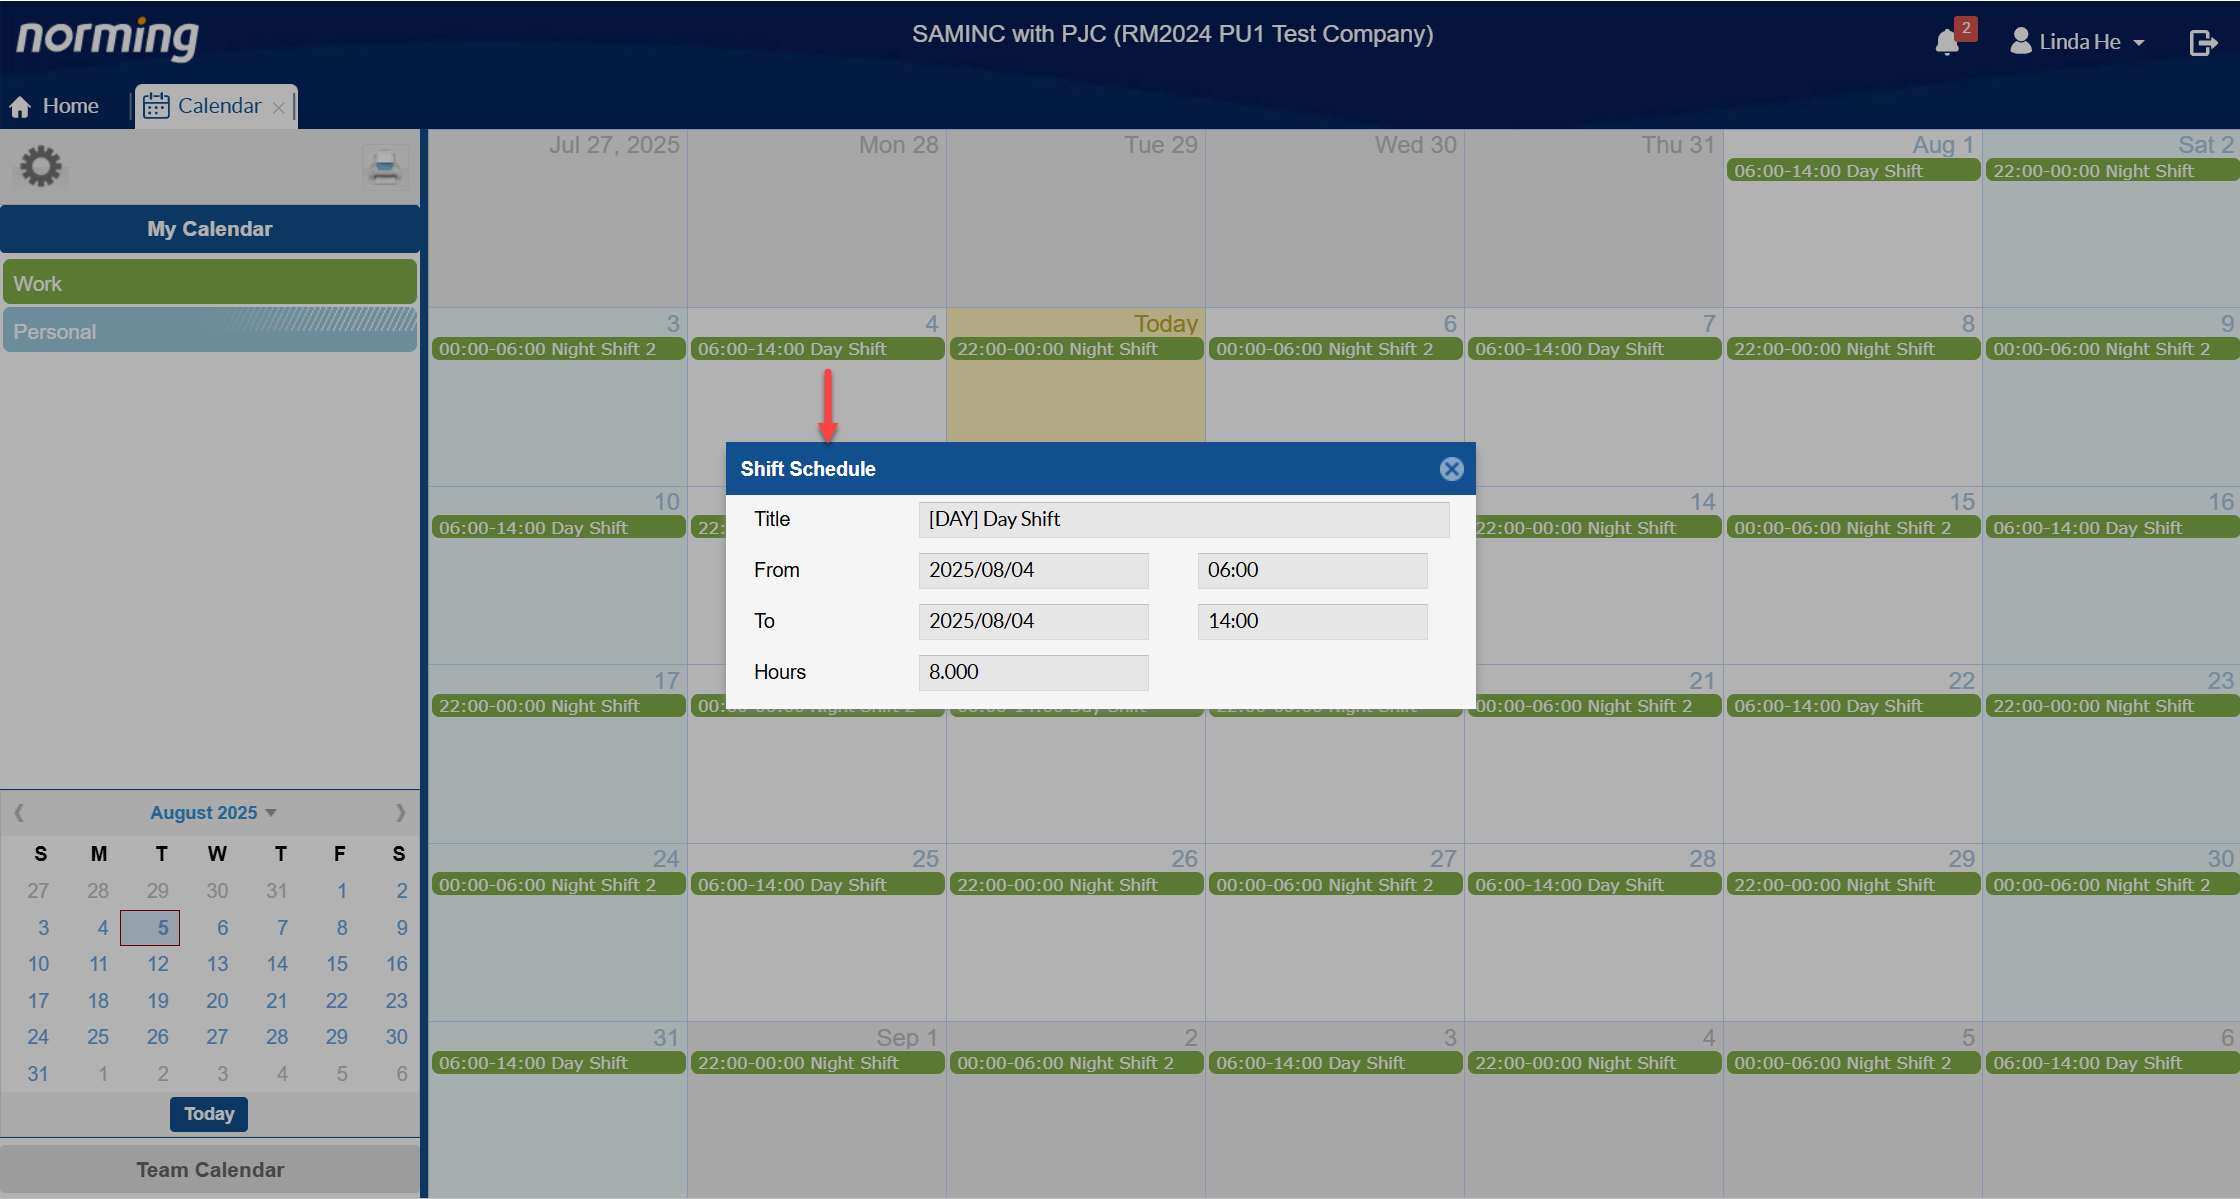
Calendar
Shift schedule can be displayed in Calendar of the ESS Portal.
Sales Quotation
Two enhancements are made to Sales Quotation:
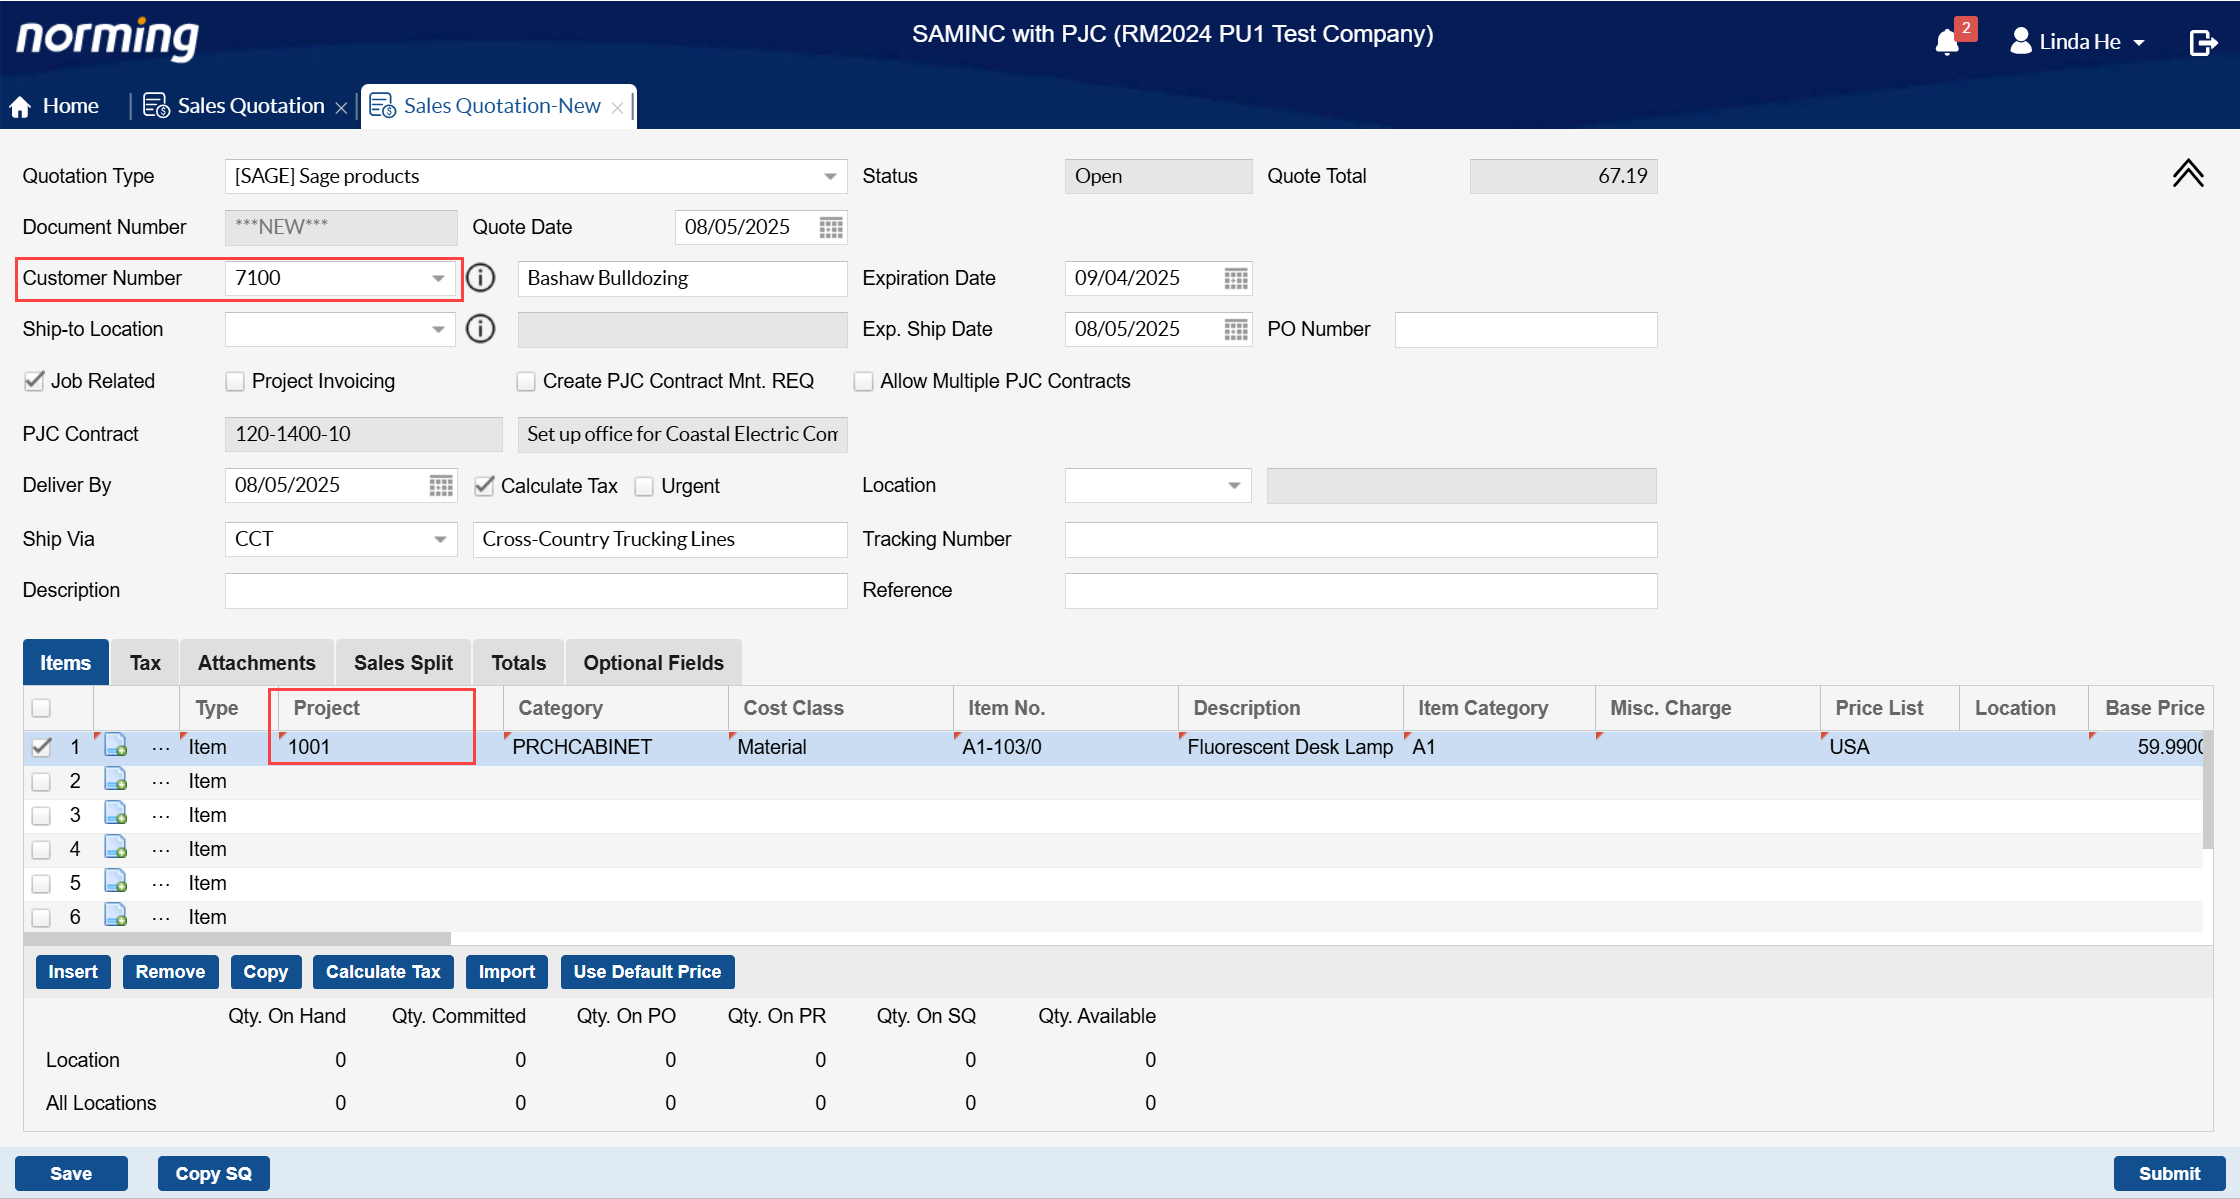
1. Enhance Sales Quotation to support billing to multiple customers if the 'Invoice to Multiple Customers' option is selected for a PJC project.

For example, select the 'Invoice to Multiple Customers' option for project 1001 under contract 120-1520-10, then you’re able to select another customer (like 7100) other than 1520 (assigned to the project) in the below sales quotation.
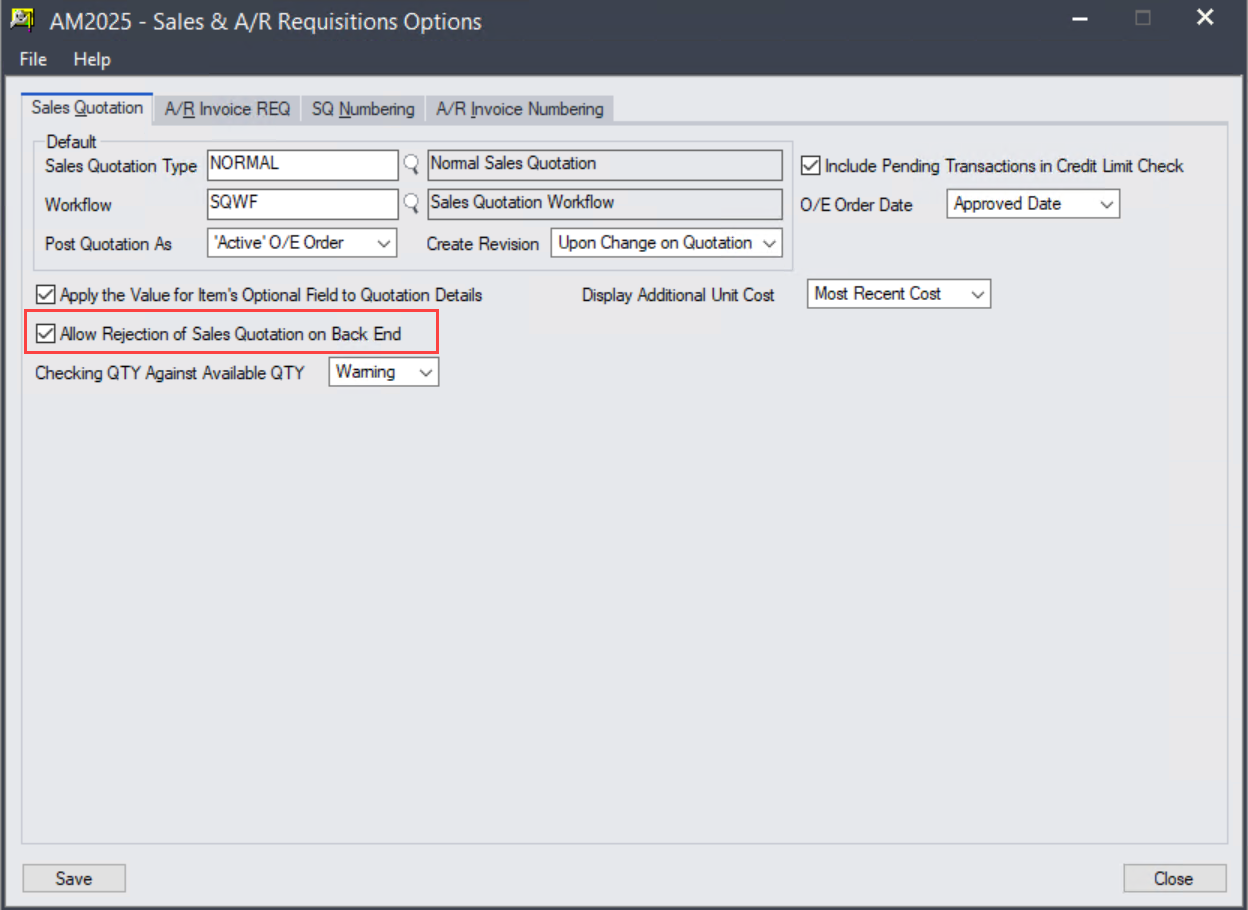
2. Allow to reject sales quotation from Back End.
For an 'Approved' or 'Won' sales quotation, a Back End user now has the chance to reject it back to requestor.
To enable this function, select the below option in Sales & A/R Requisition Options.
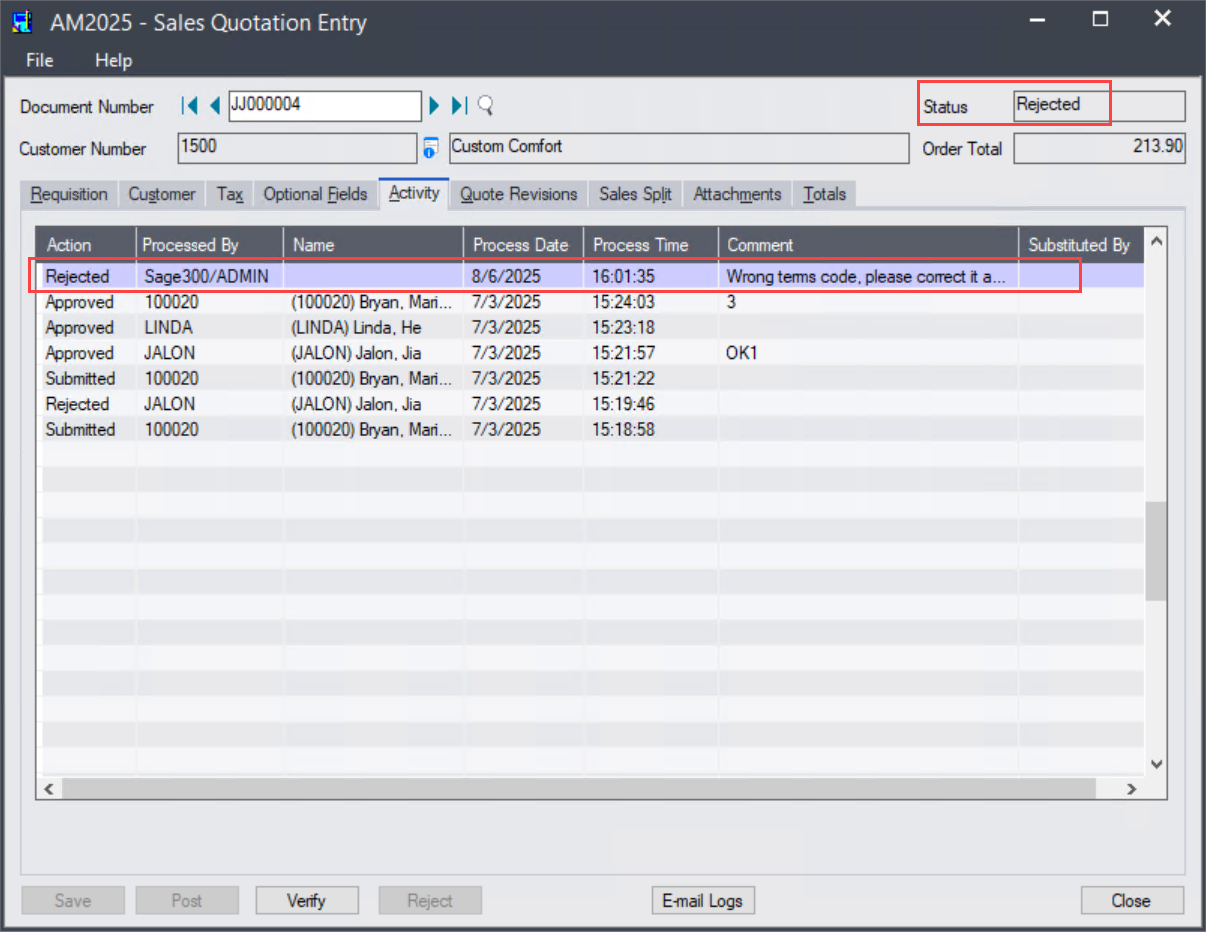
You will be able to see the 'Reject' button at Back End Sales Quotation Entry screen:
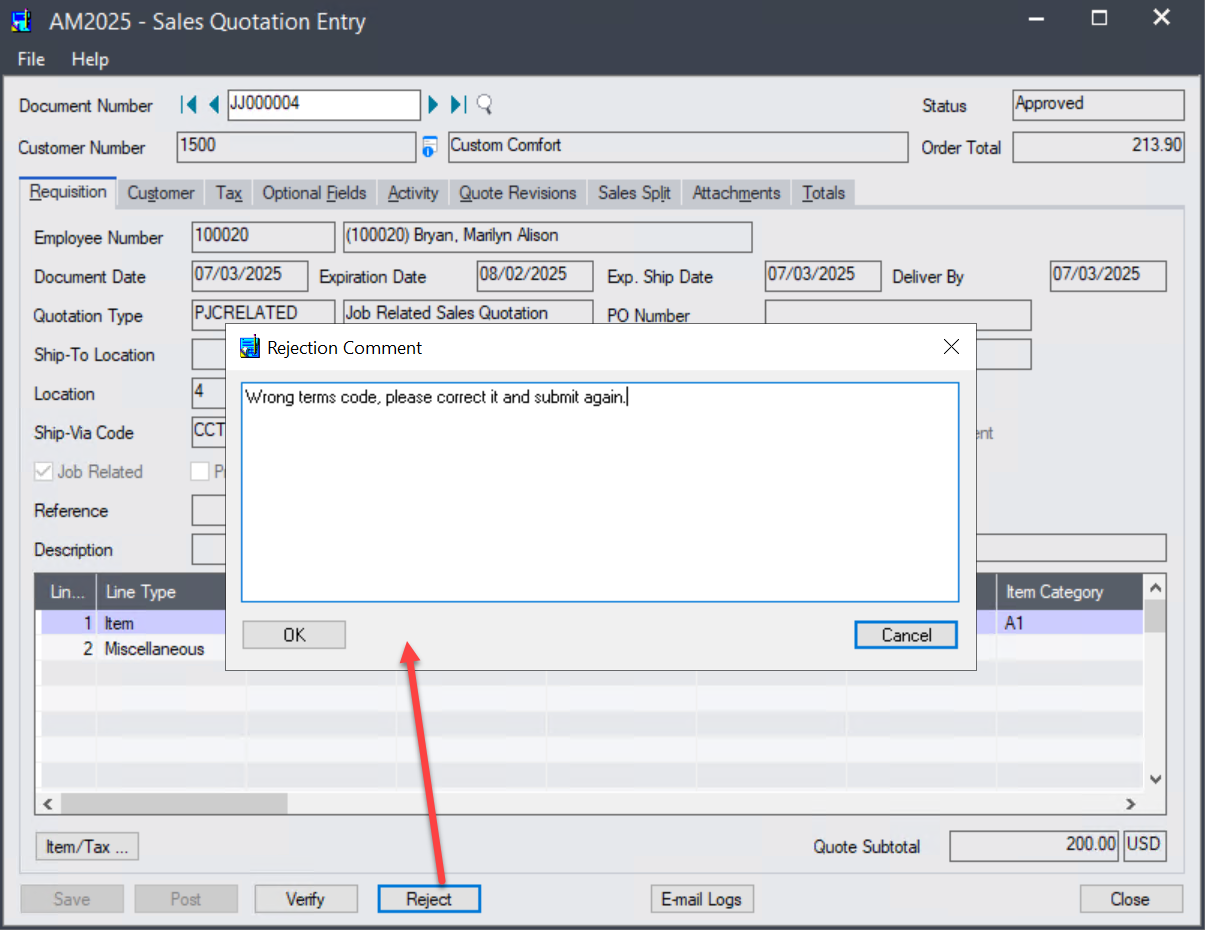
You're allowed to enter comment to tell requestor why rejecting his/her sale quotation. A record for rejection will be generated in Activity tab for audit purpose.
A/R Invoice Requisition
Two new features are added to A/R Invoice Requisition module:
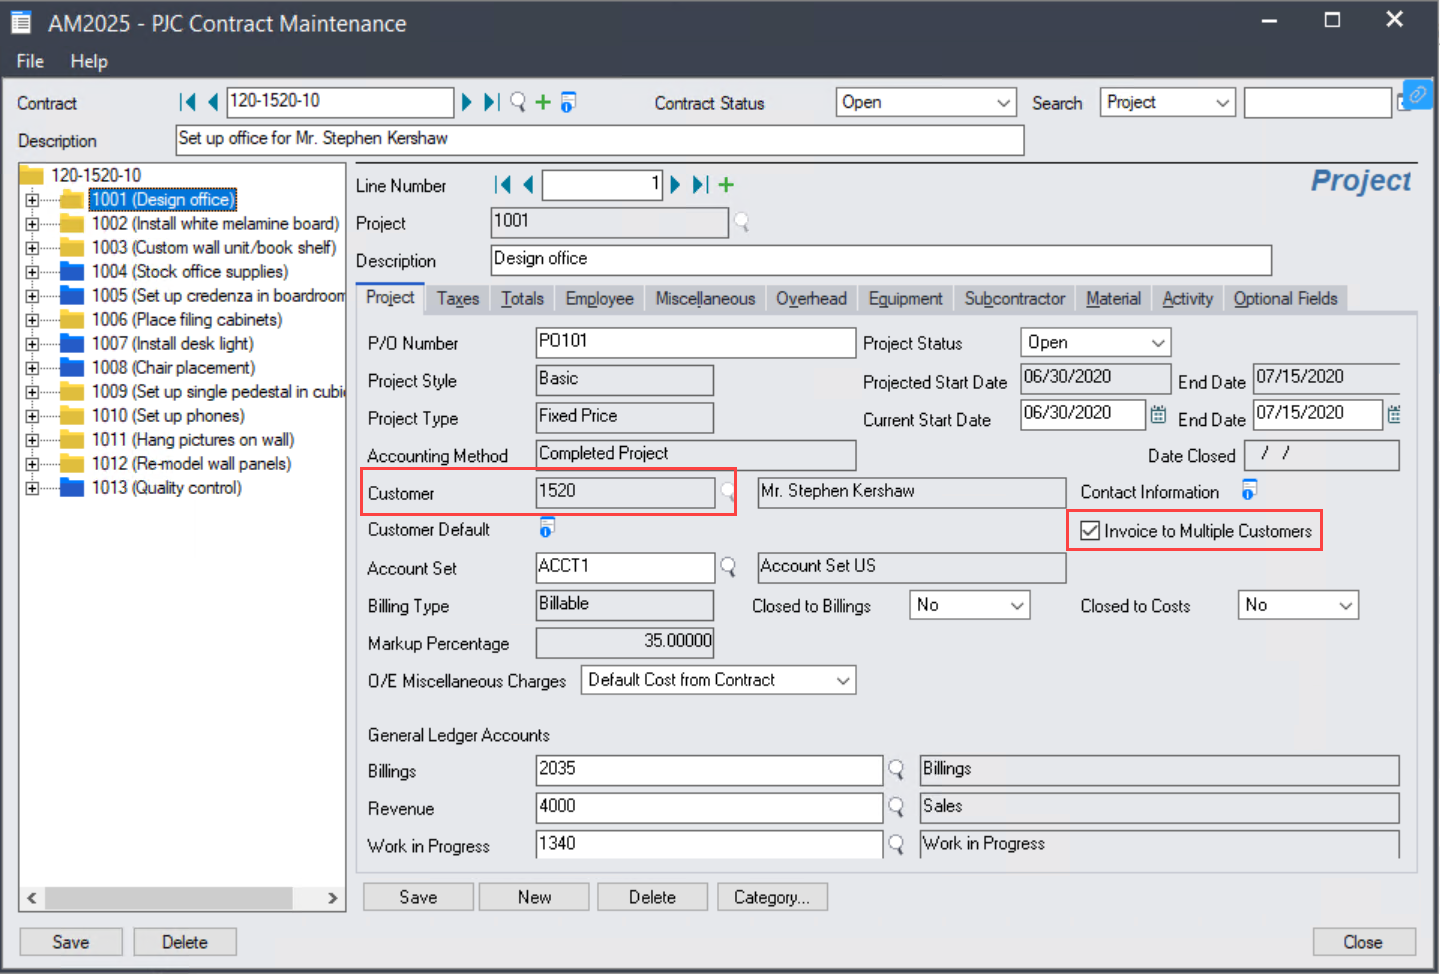
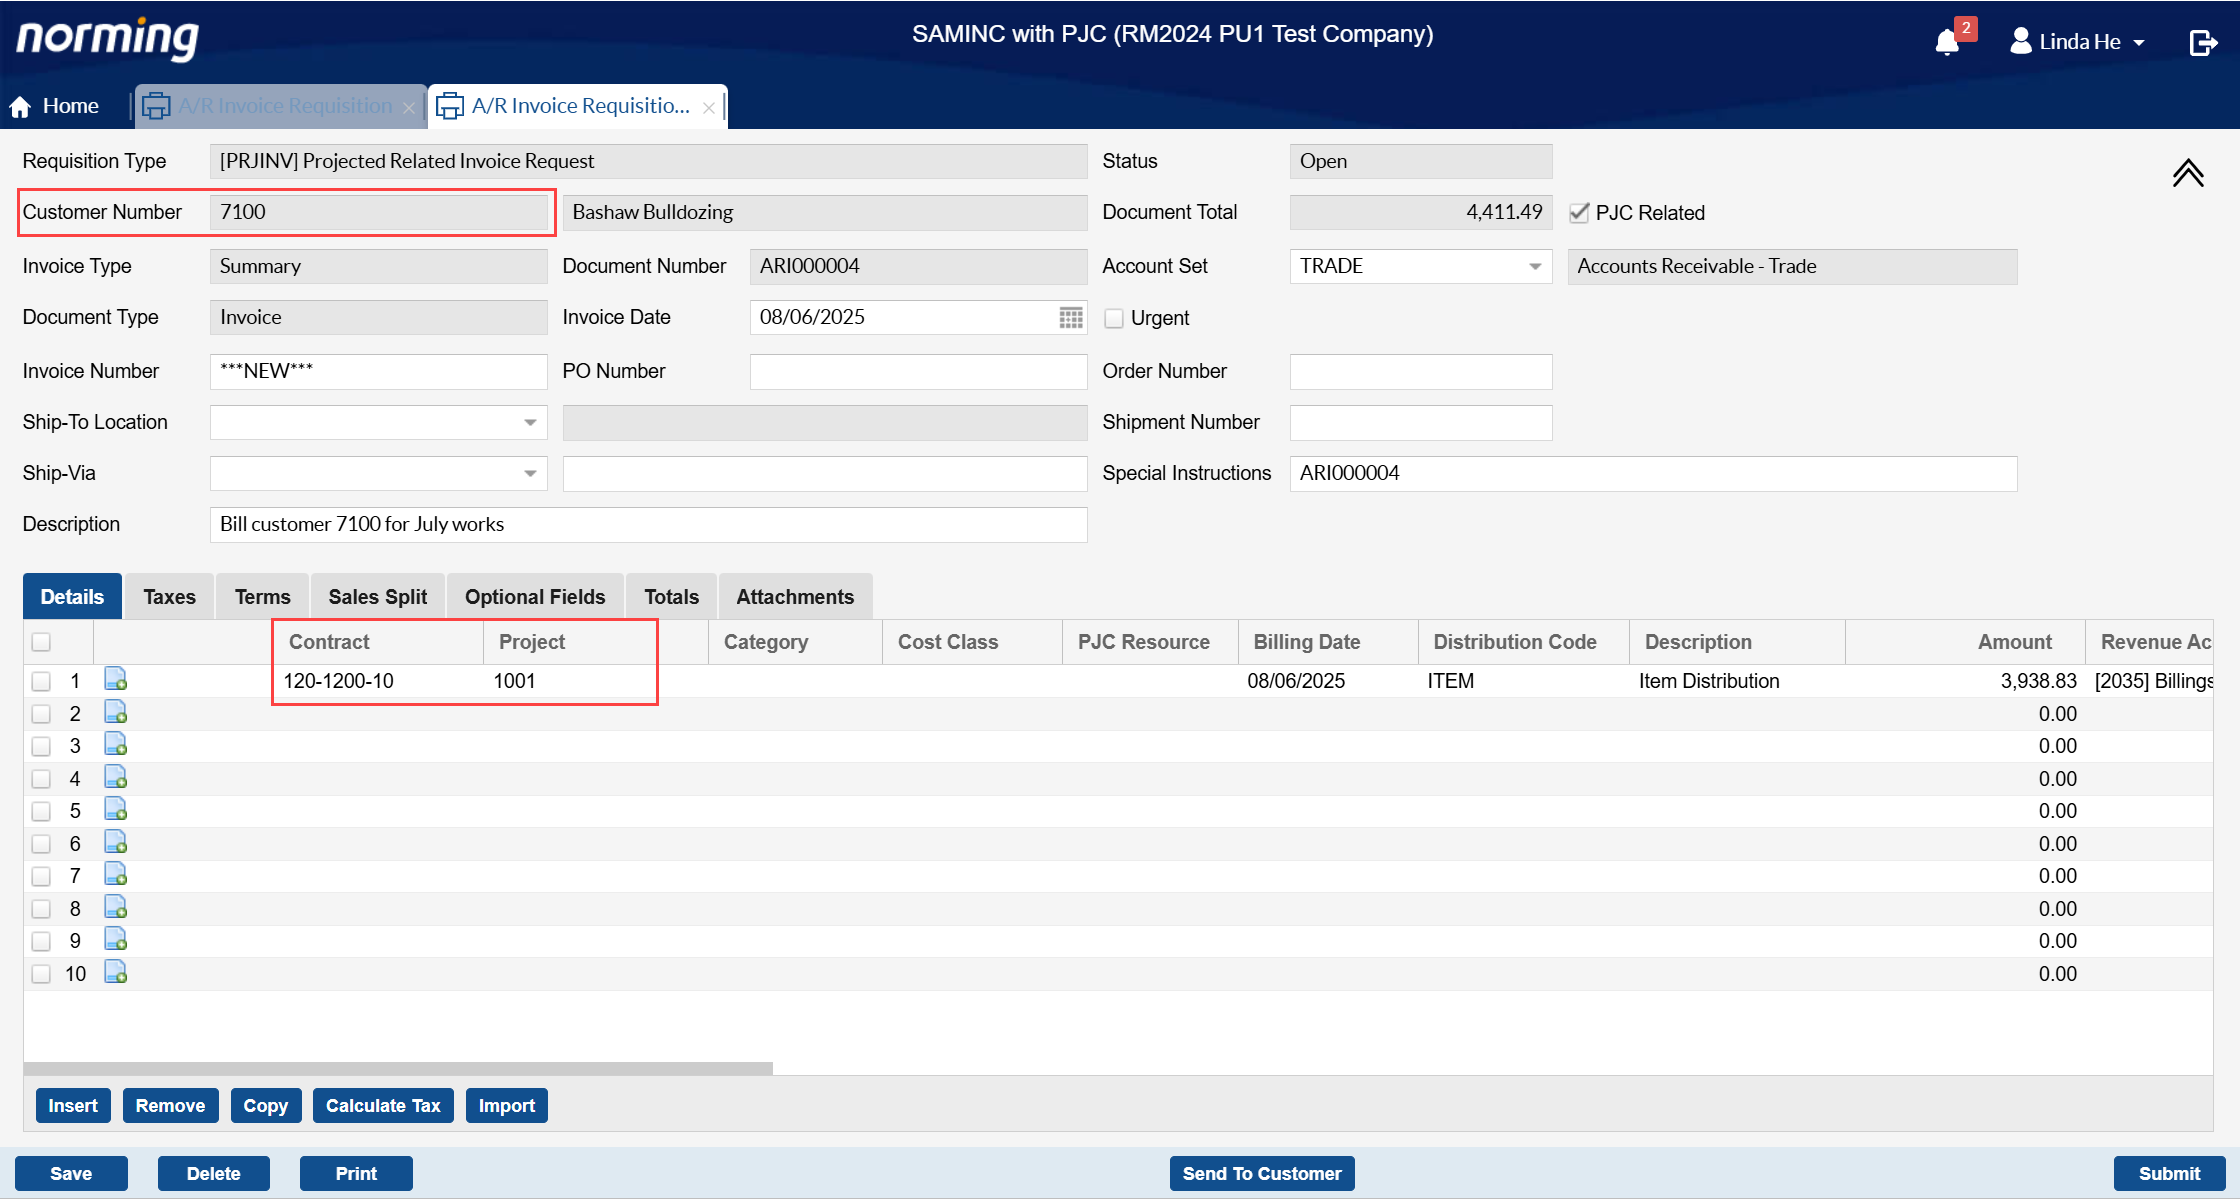
1. Improve A/R Invoice Requisition to support billing to multiple customers if the 'Invoice to Multiple Customers' option is selected for a PJC project.
Select the 'Invoice to Multiple Customers' option for project 1001 under contract 120-1520-10, then you're able to select another customer (like 7100) other than 1520 (assigned to the project) in an A/R invoice requisition.
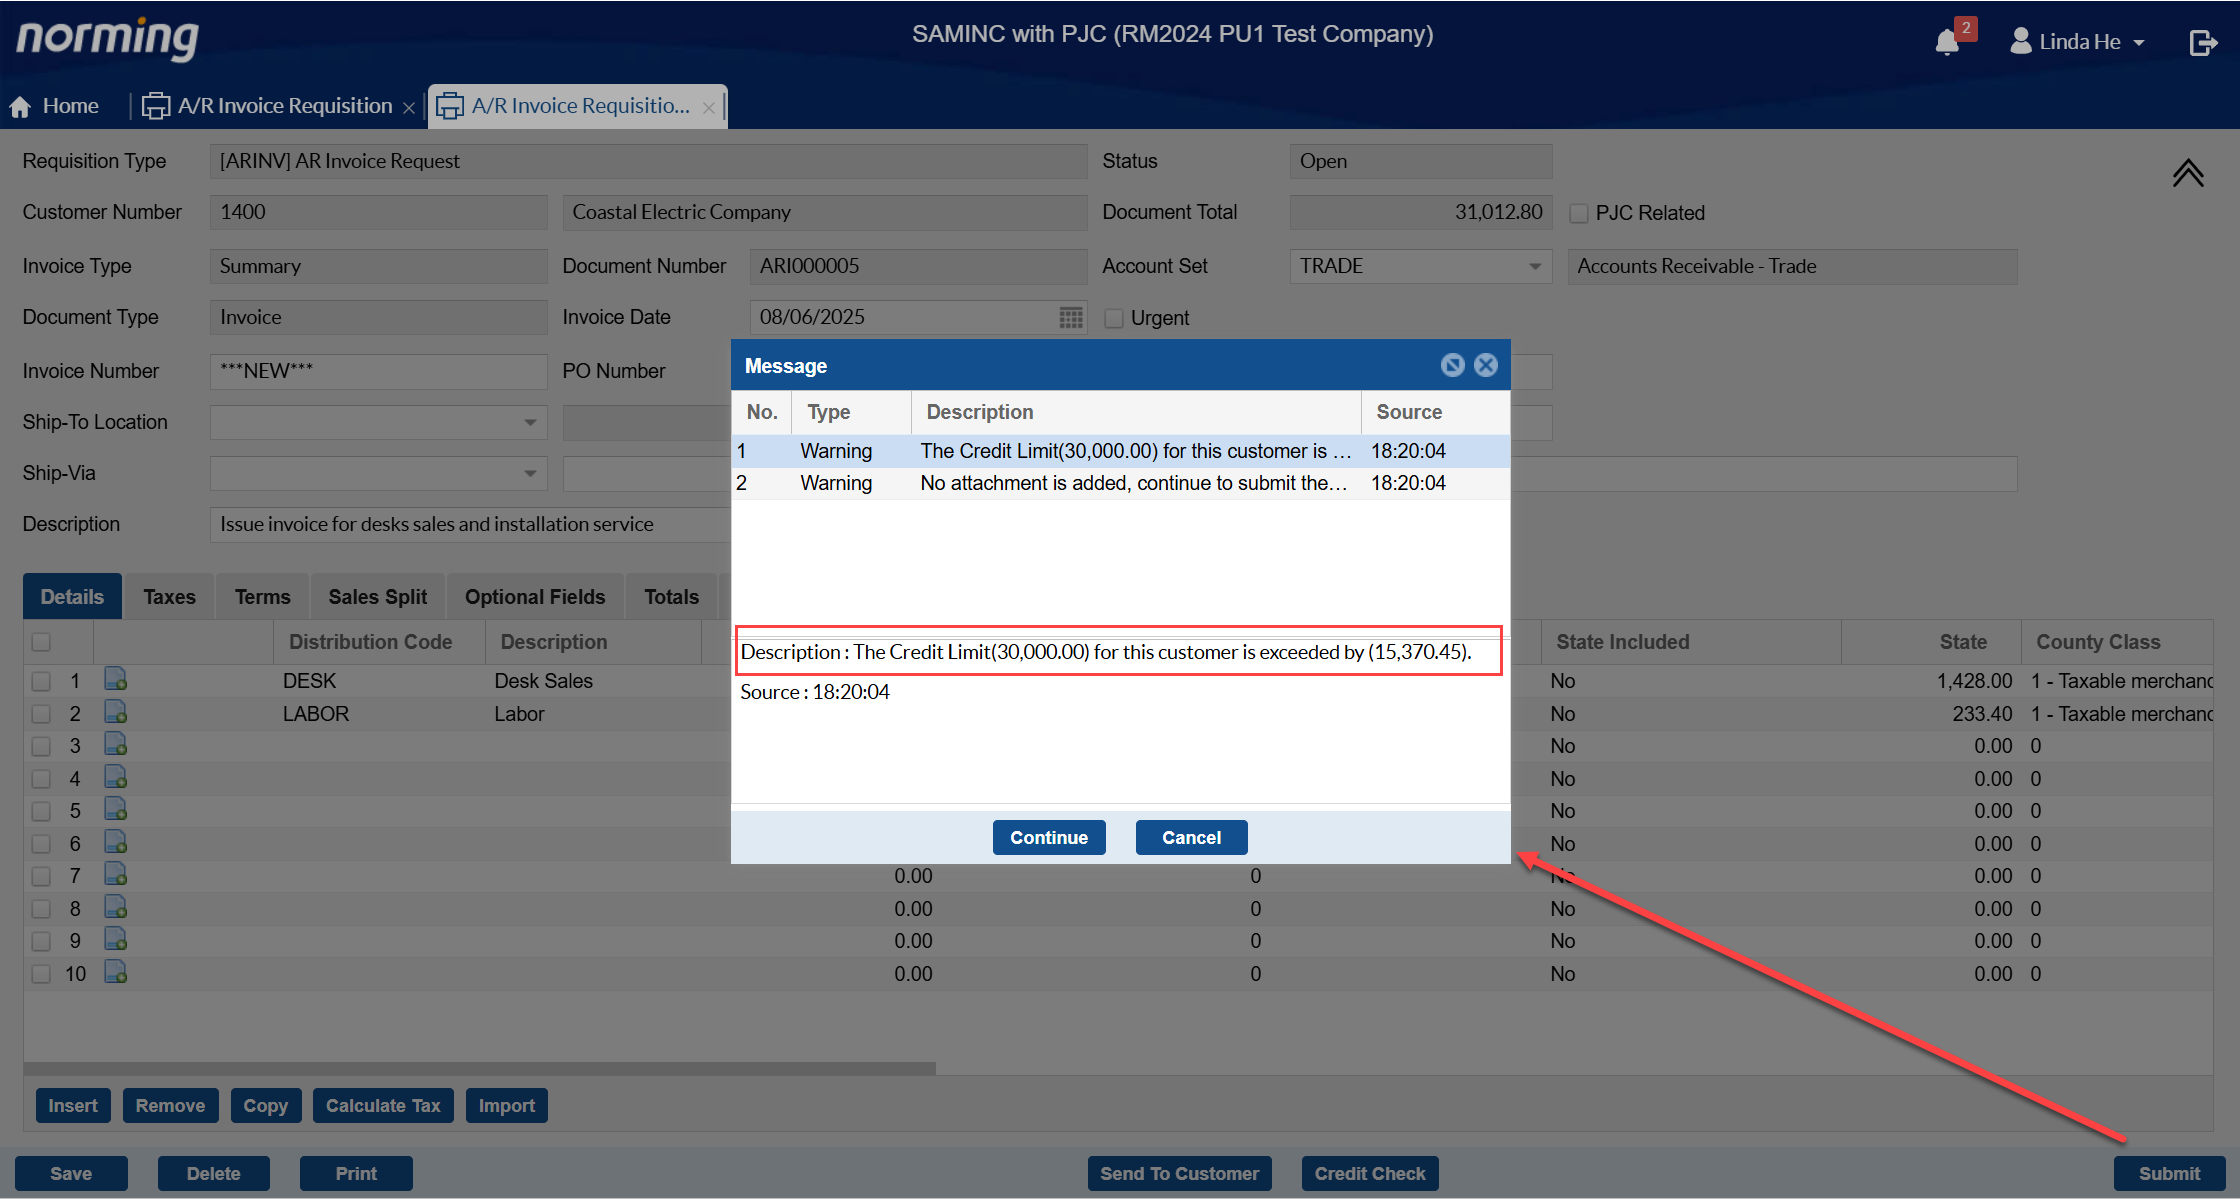
2. Provide checking customer credit limit capability.
To enable credit limit checking capability, you need select either 'Warning' or 'Error' for the 'Over Credit Limit Checking' option.
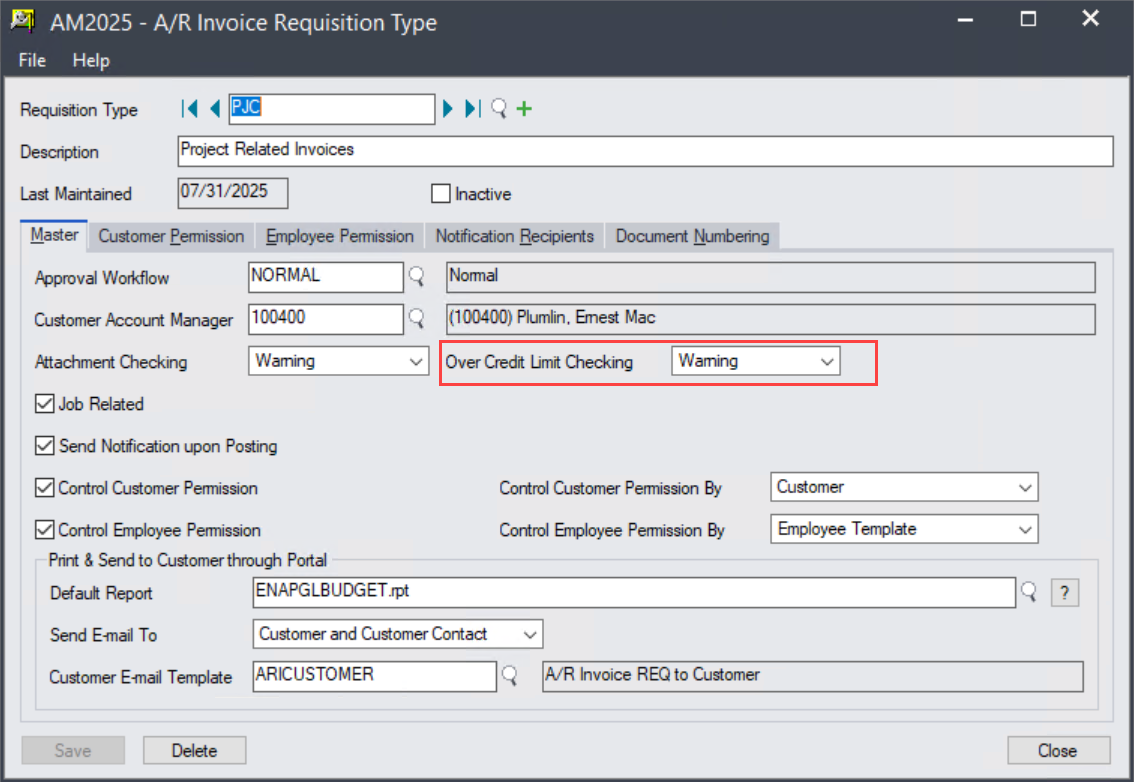
If 'Warning' is selected, a warning message will pop up if customer's credit limit is exceeded when you submit or approve an A/R invoice requisition through Employee Portal, but you can continue the operation.
If 'Error' is selected, an error message will pop up if customer's credit limit is exceeded when you submit or approve an A/R invoice requisition through Employee Portal, and you cannot continue the operation.
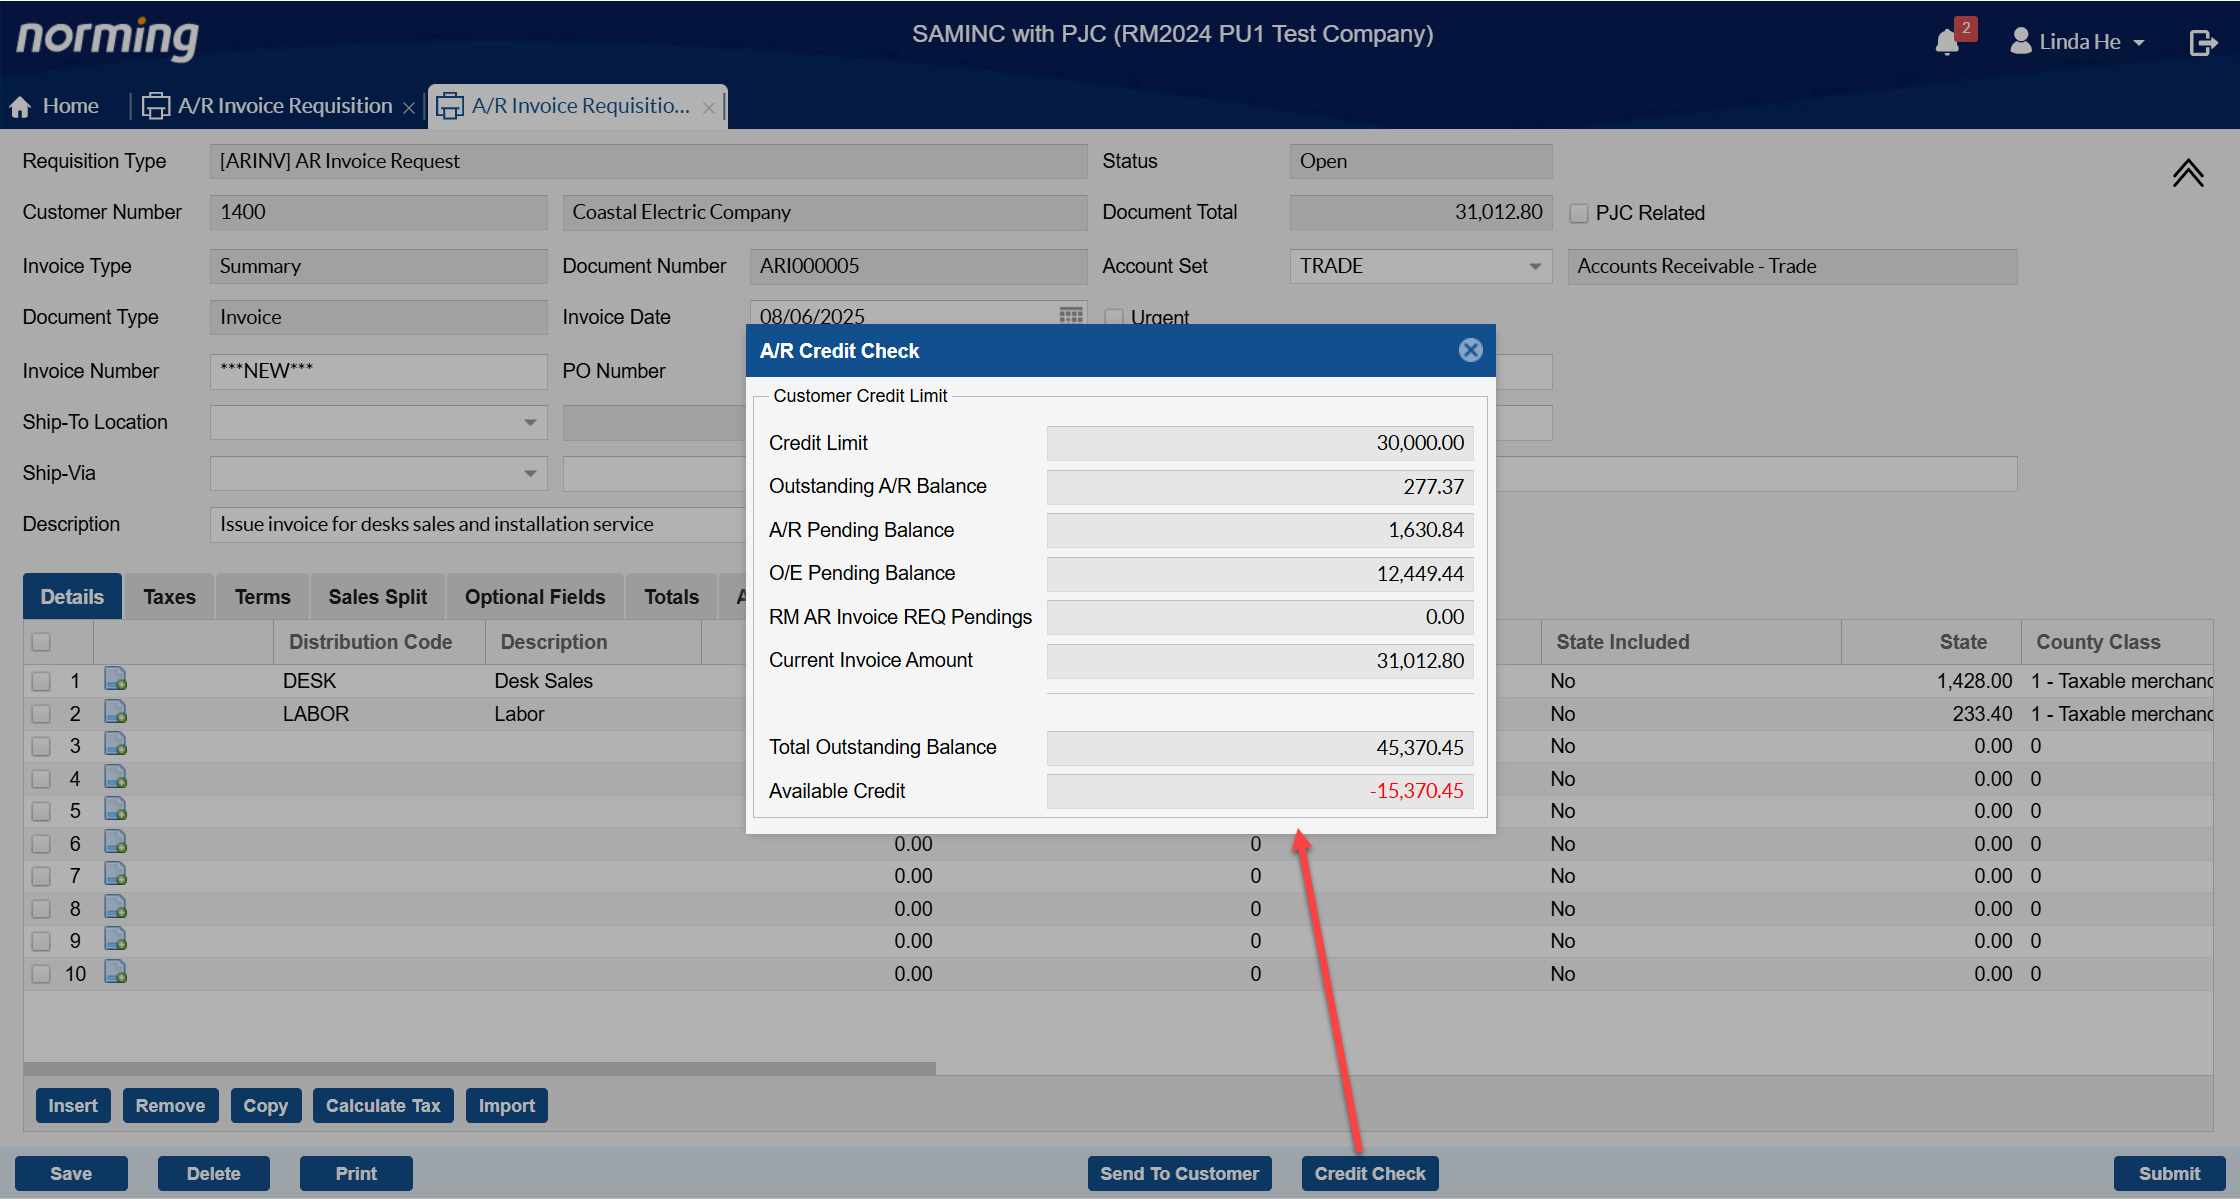
If 'Warning' or 'Error' is selected in the above screen, the 'Credit Check' button appears in the A/R Invoice Requisition screen. Click it to view customer’s credit related information. If credit limit is exceeded, the available credit will be highlighted in red.
Workflow
This release makes some significant enhancements to approval workflow function.
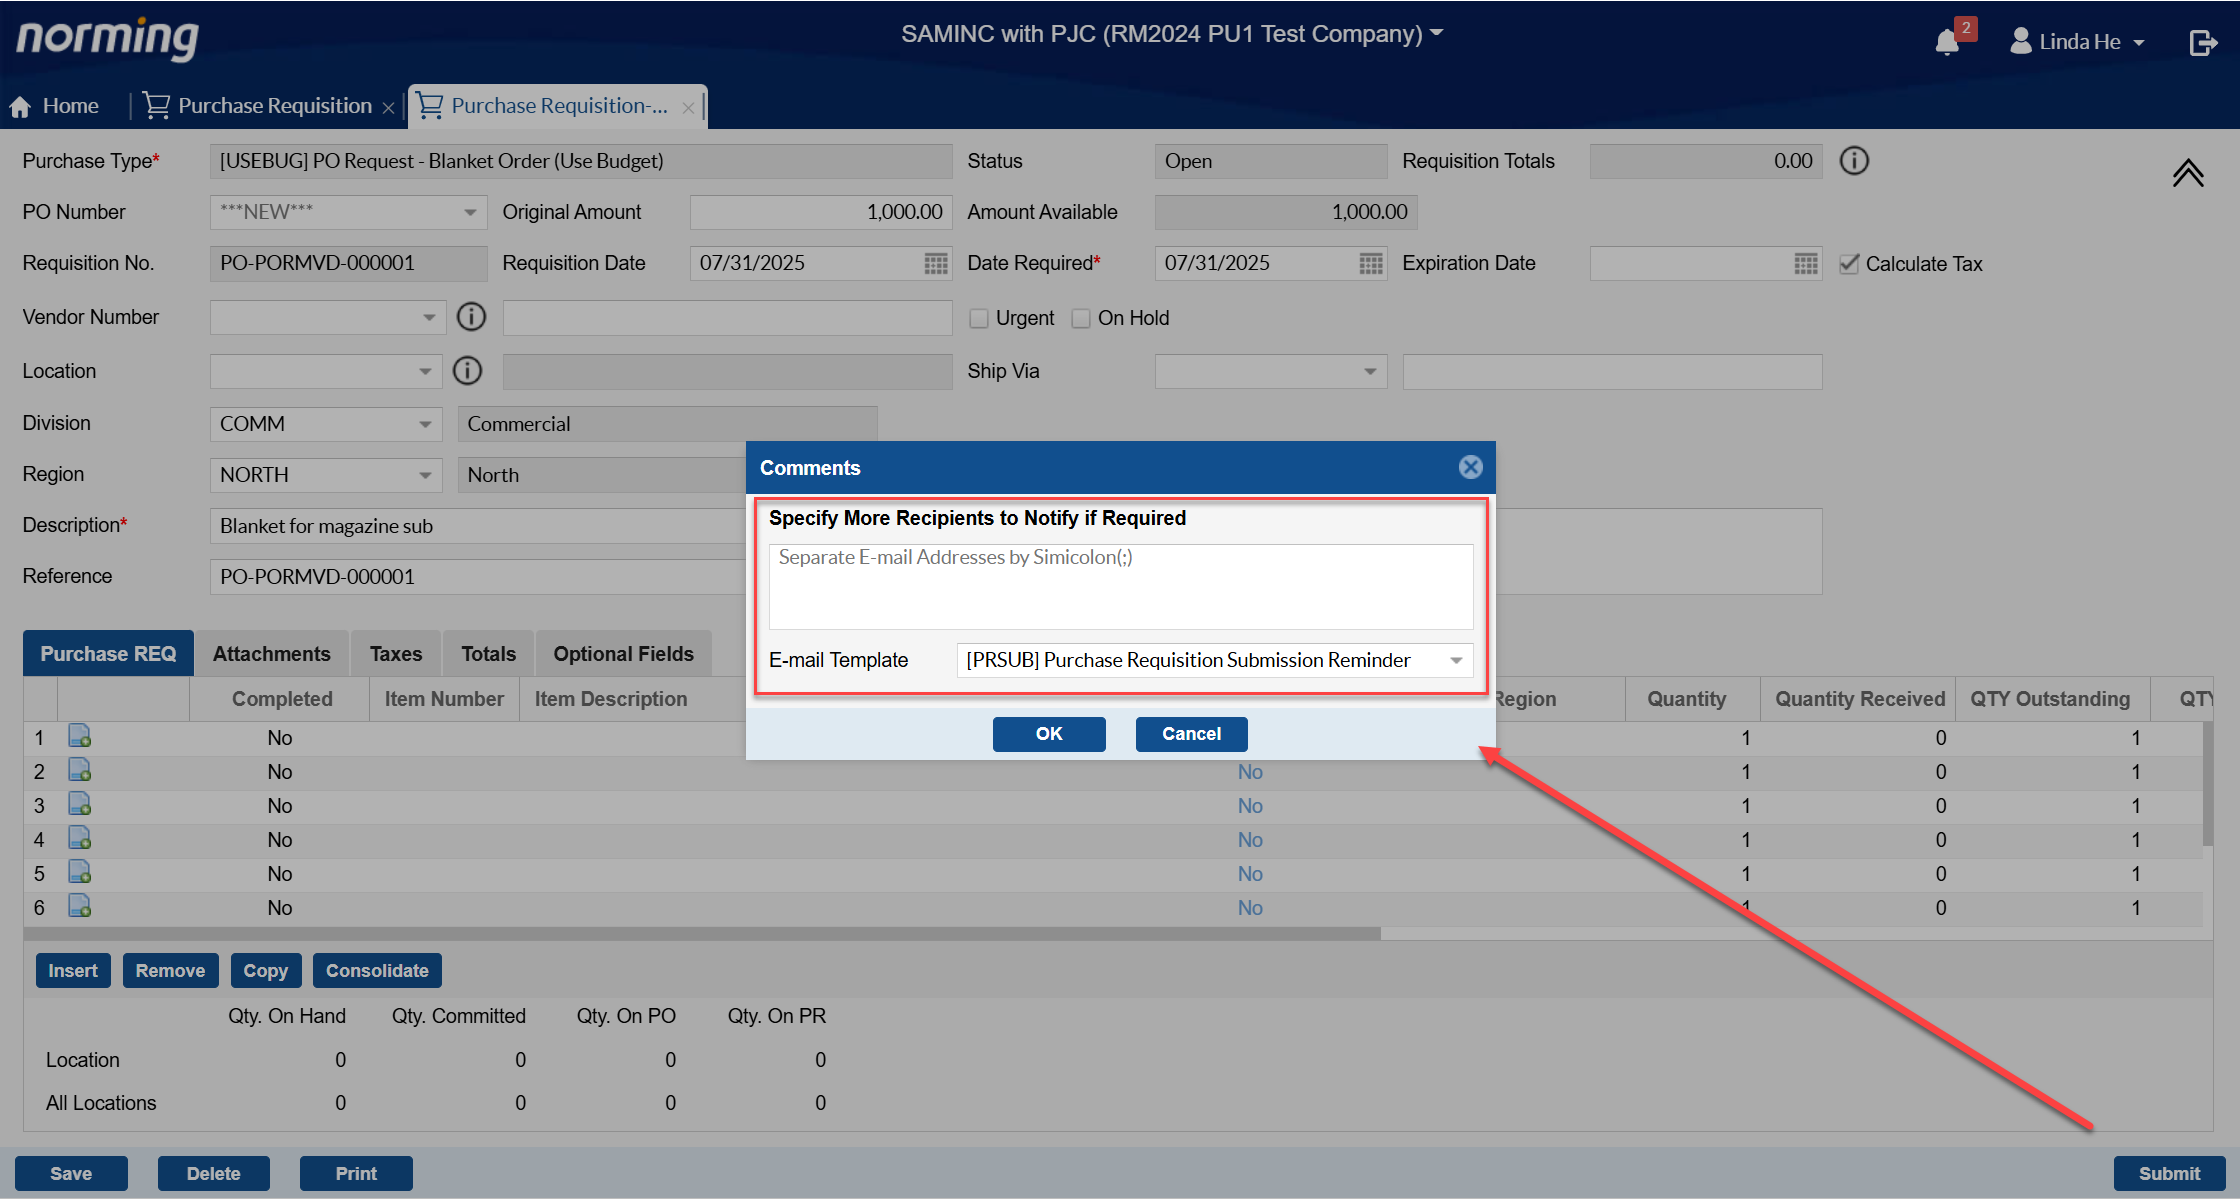
1. Allow to specify additional recipients during approval process.
Previously, only the recipients(approvers) pre-defined in approval workflow can be notified. However, for some cases, if you want to notify someone outside of the approval process at certain steps, you have to send email to them manually.
With this enhancement, you can include anyone at each workflow stage to notify.
To use this feature, select the below option in Resource Manager Back End > Global Options:
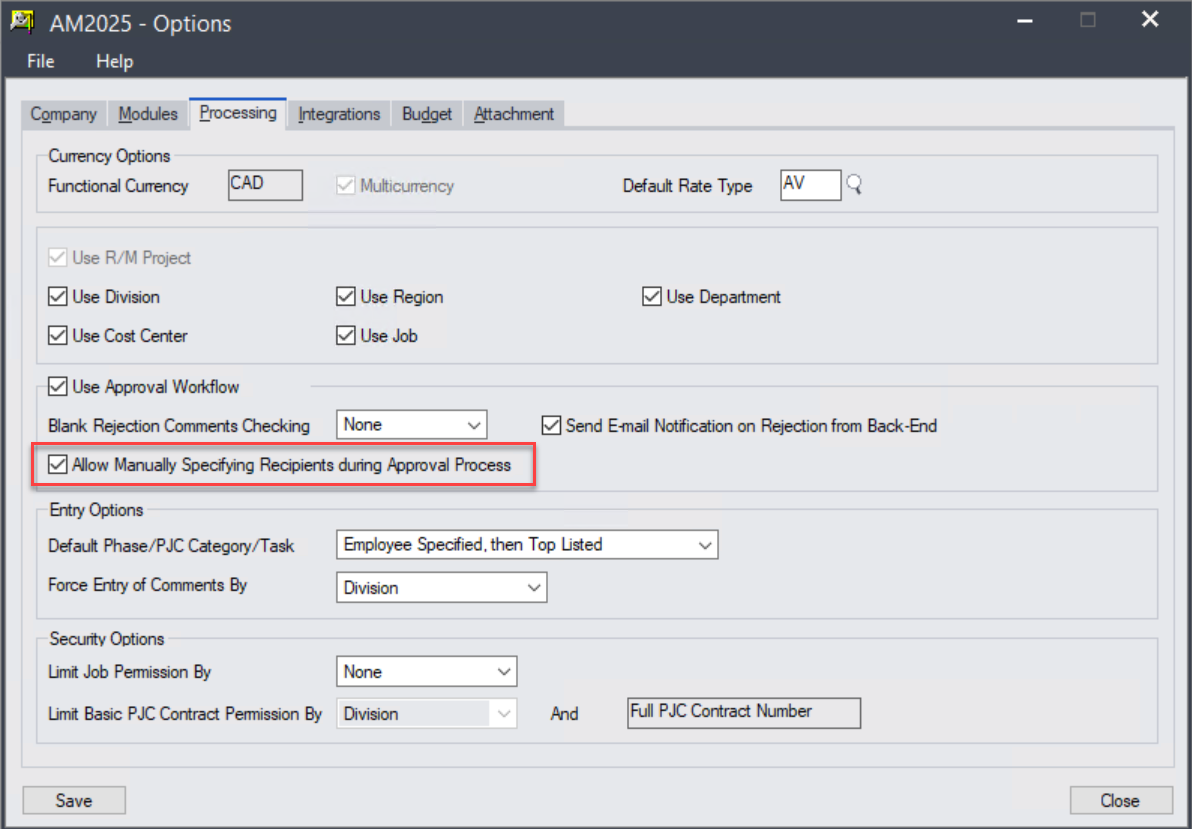
If the above option is on, upon Submission, Approval, Rejection, Transfer or Endorsement, you're able to specify additional recipients to notify.
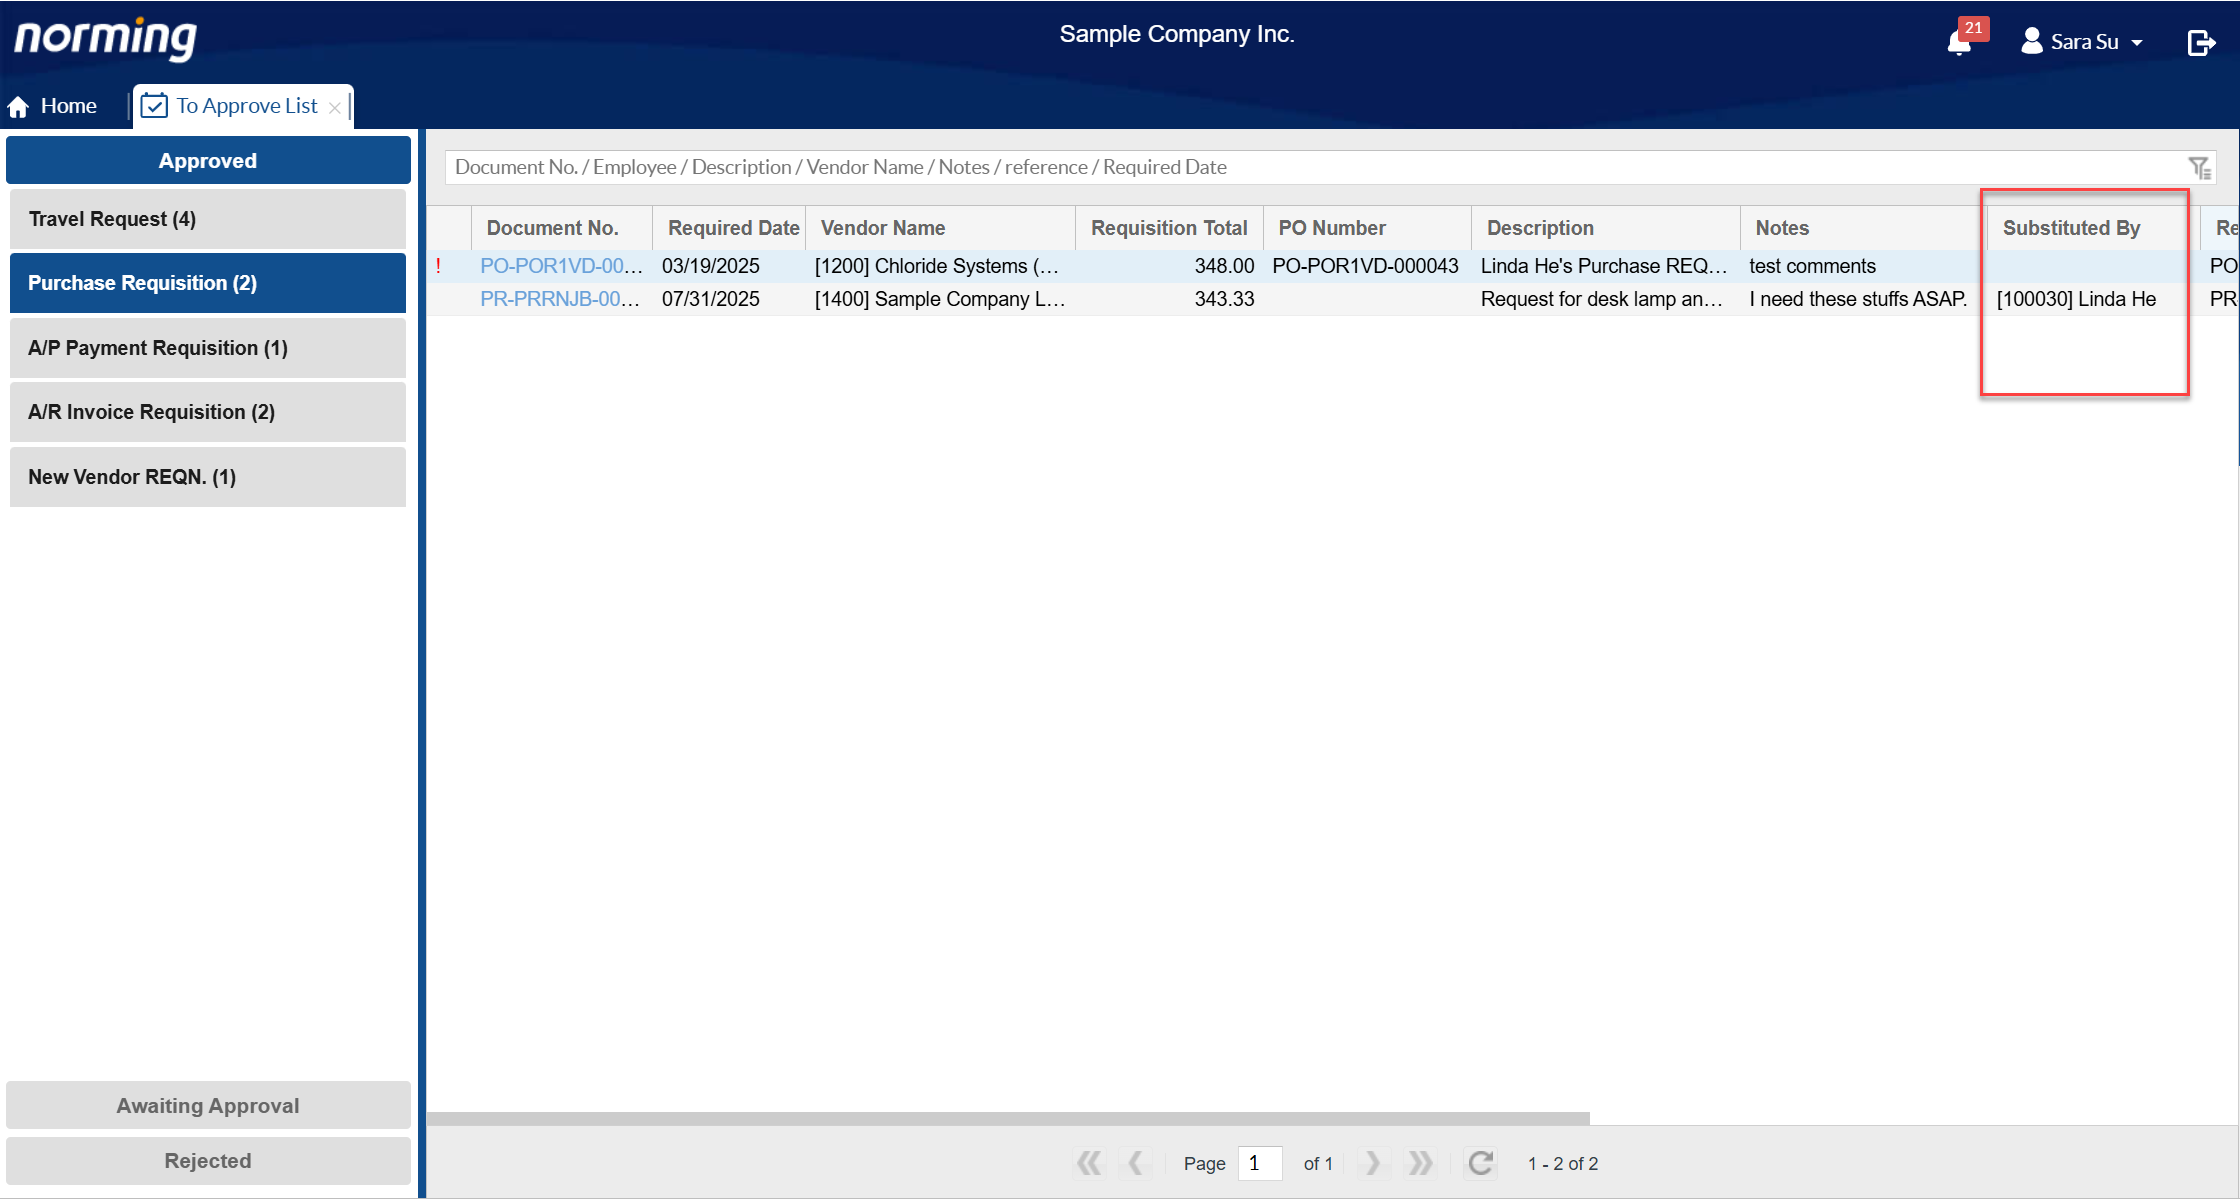
2. Add the 'Substituted by' column for Approved and Rejected List in the 'To Approve List' screen.
3. Re-organize the workflow definition related screens by adding a function suite layer.
In current version, there are about 30 modules available in Resource Manager, it's hard to locate a module/transaction to define workflow related information for if multiple modules are enabled.
To make it easy to locate a module/transaction, this version re-organizes workflow related screens by adding a function suite layer, Travel & Expenses, Time Management, PJC Transactions, Procure to Pay, Sales & AR Requisitions, Inventory Requisitions, Other Requisitions and Other.
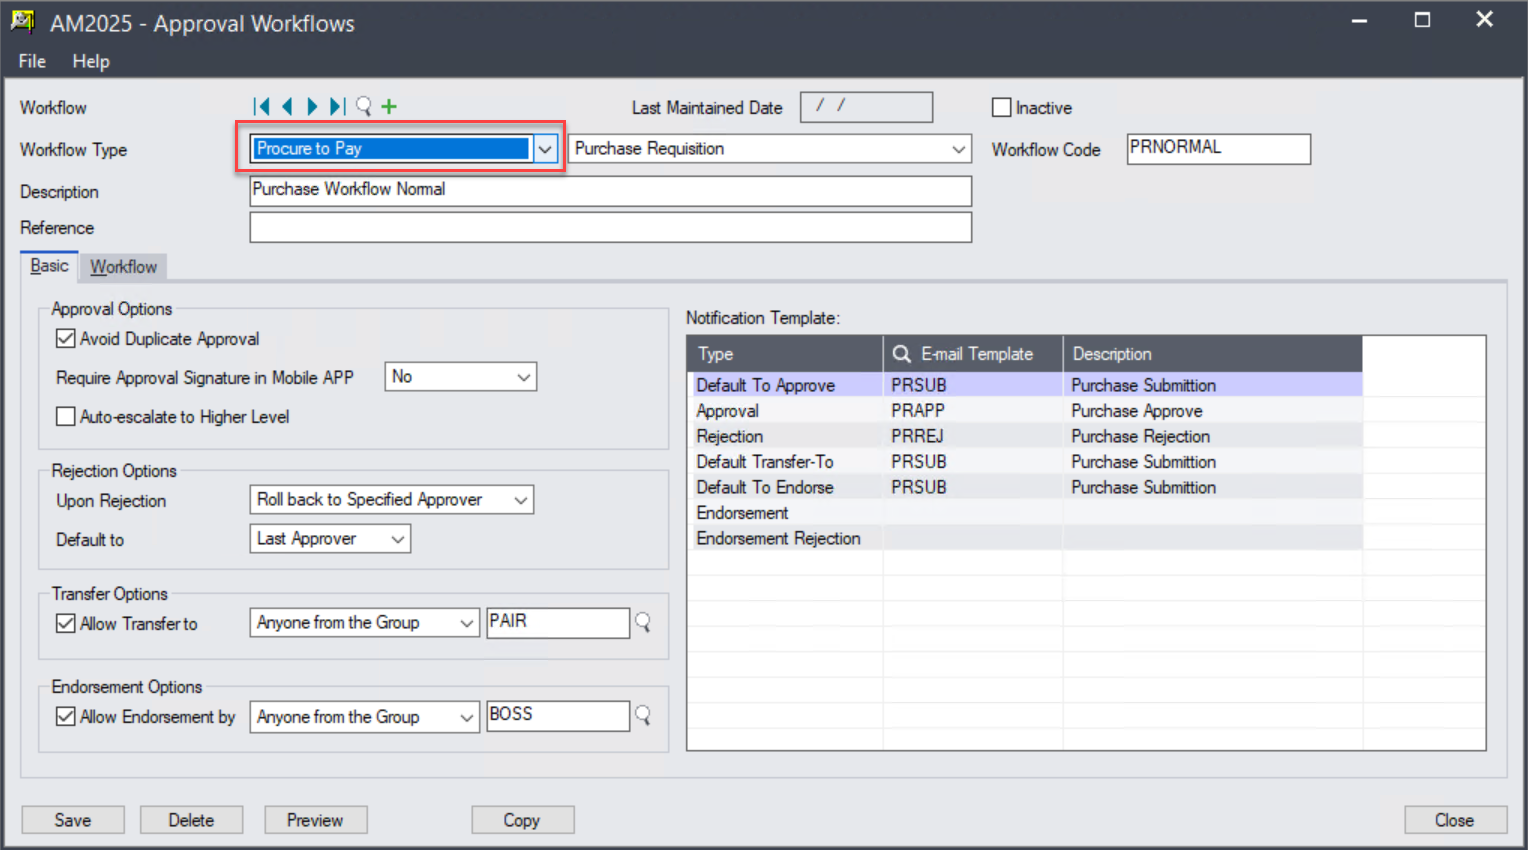
The above changes are made to the following screens:
● E-mail Templates
● Custom Role/Variable
● Approval Workflow
● E-mail Logs
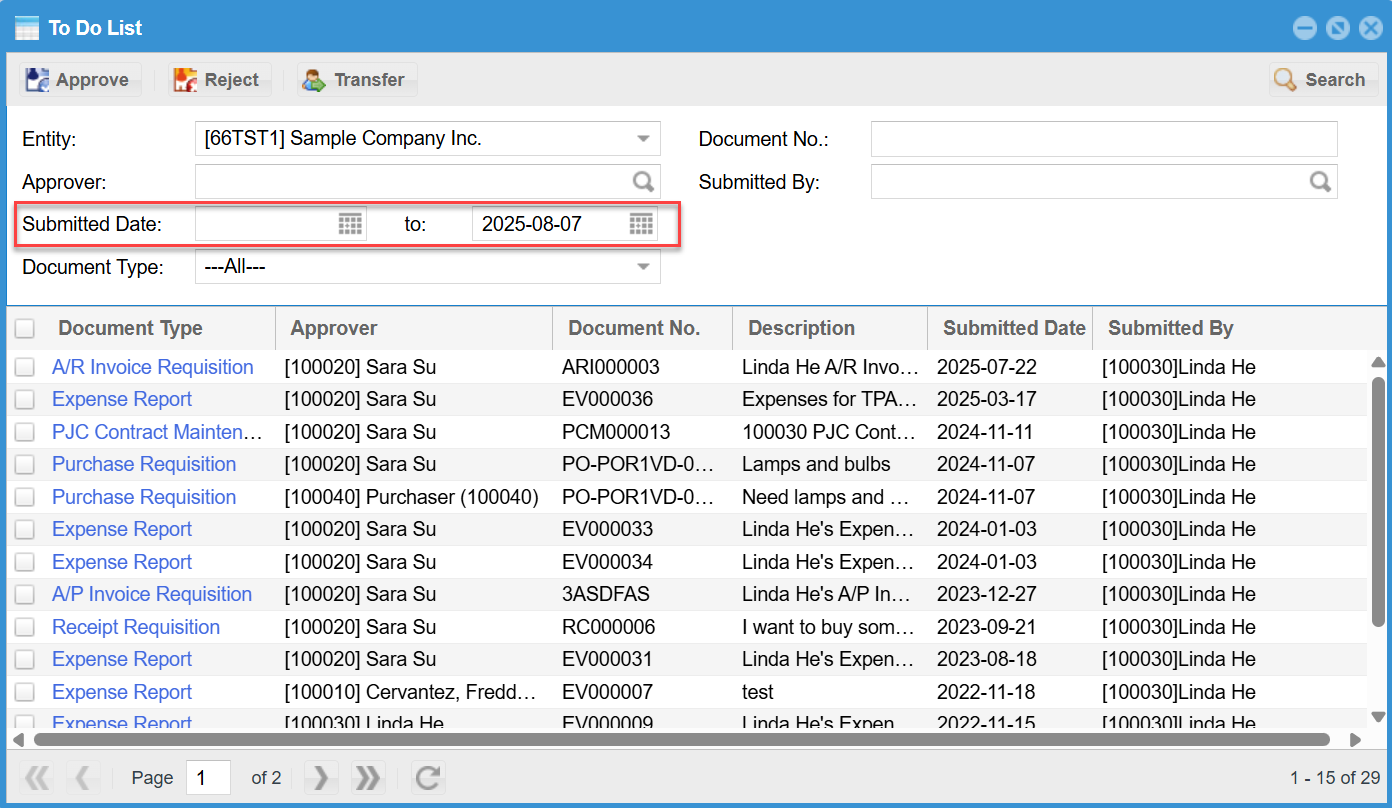
4. Add one more filter to the 'To Do List' in Admin Portal.
The 'To Do List' functionality in Admin Portal is designed for administrators to monitor the status of pending requests. If any requests are stuck in workflow due to some reasons, an administrator is able to take action(transfer, reject or approve) to make them back on track.
With this new feature, you can filter pending requests by Submitted Date range.
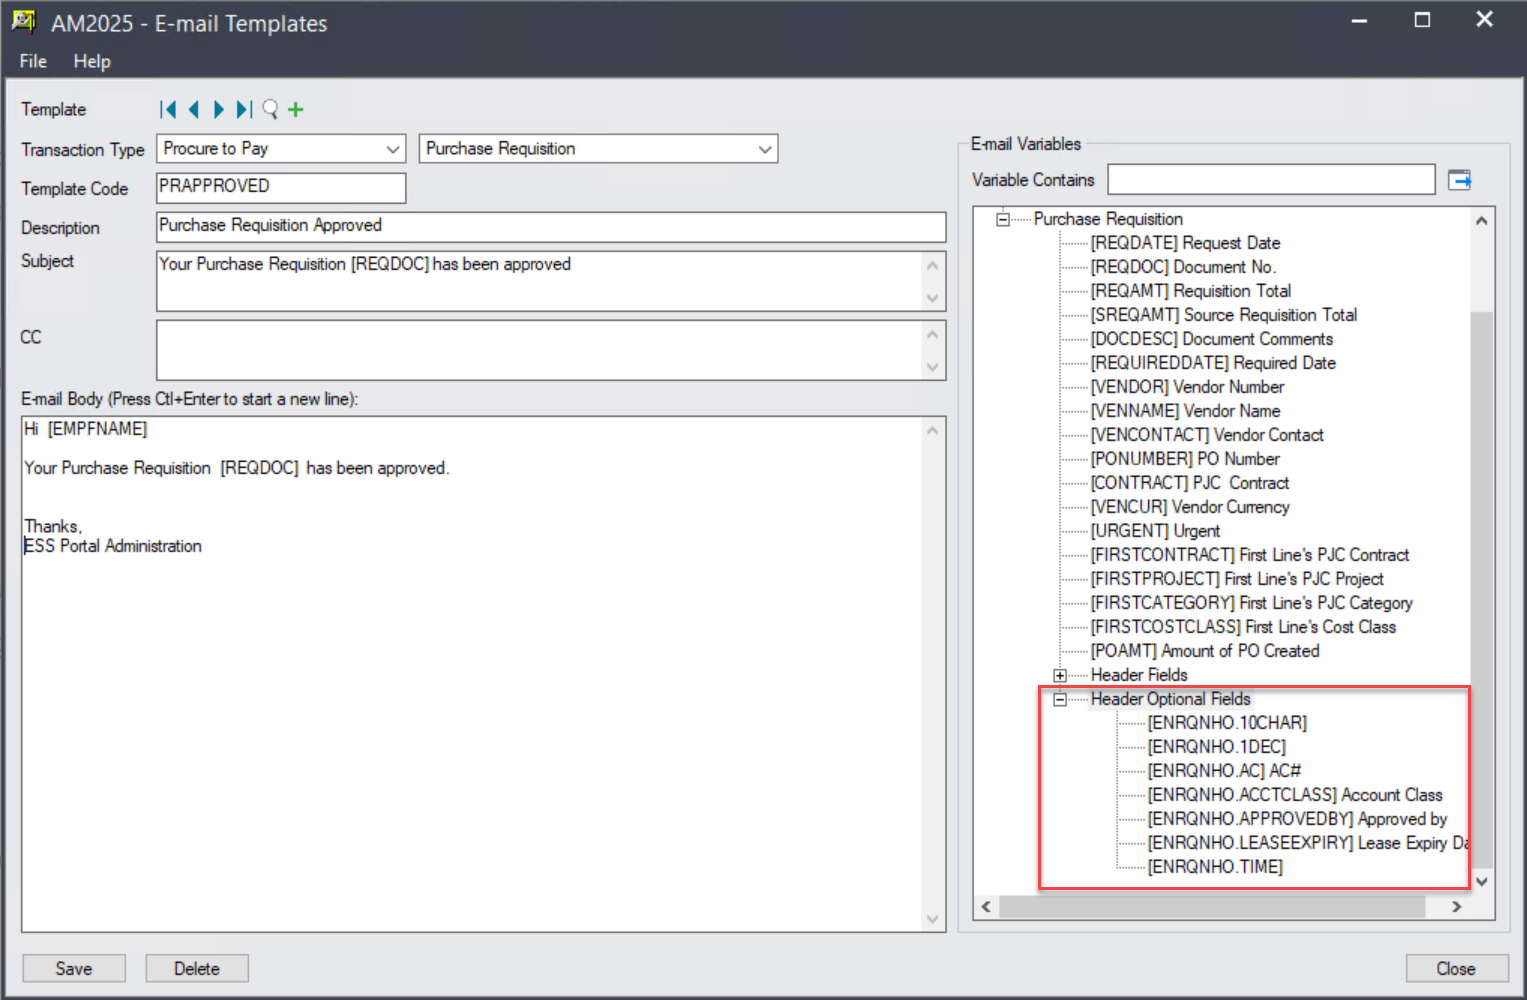
5. Optional fields at request level can be used in E-mail notification.
Optional fields at request level can be used in Subject and Body of E-mail notifications, this feature helps to send more informative notifications to relative recipients.
Serials/Lot Number
This release supports Serials/Lots for the following three transactions:
● Item Usage Requisition
● P/O Receipt Requisition
● I/C Transfer Requisition
To enable this feature, you need go to Admin Portal > ESS Group or ESS User to define permission. By default, the Serial/Lot Number buttons are hidden.
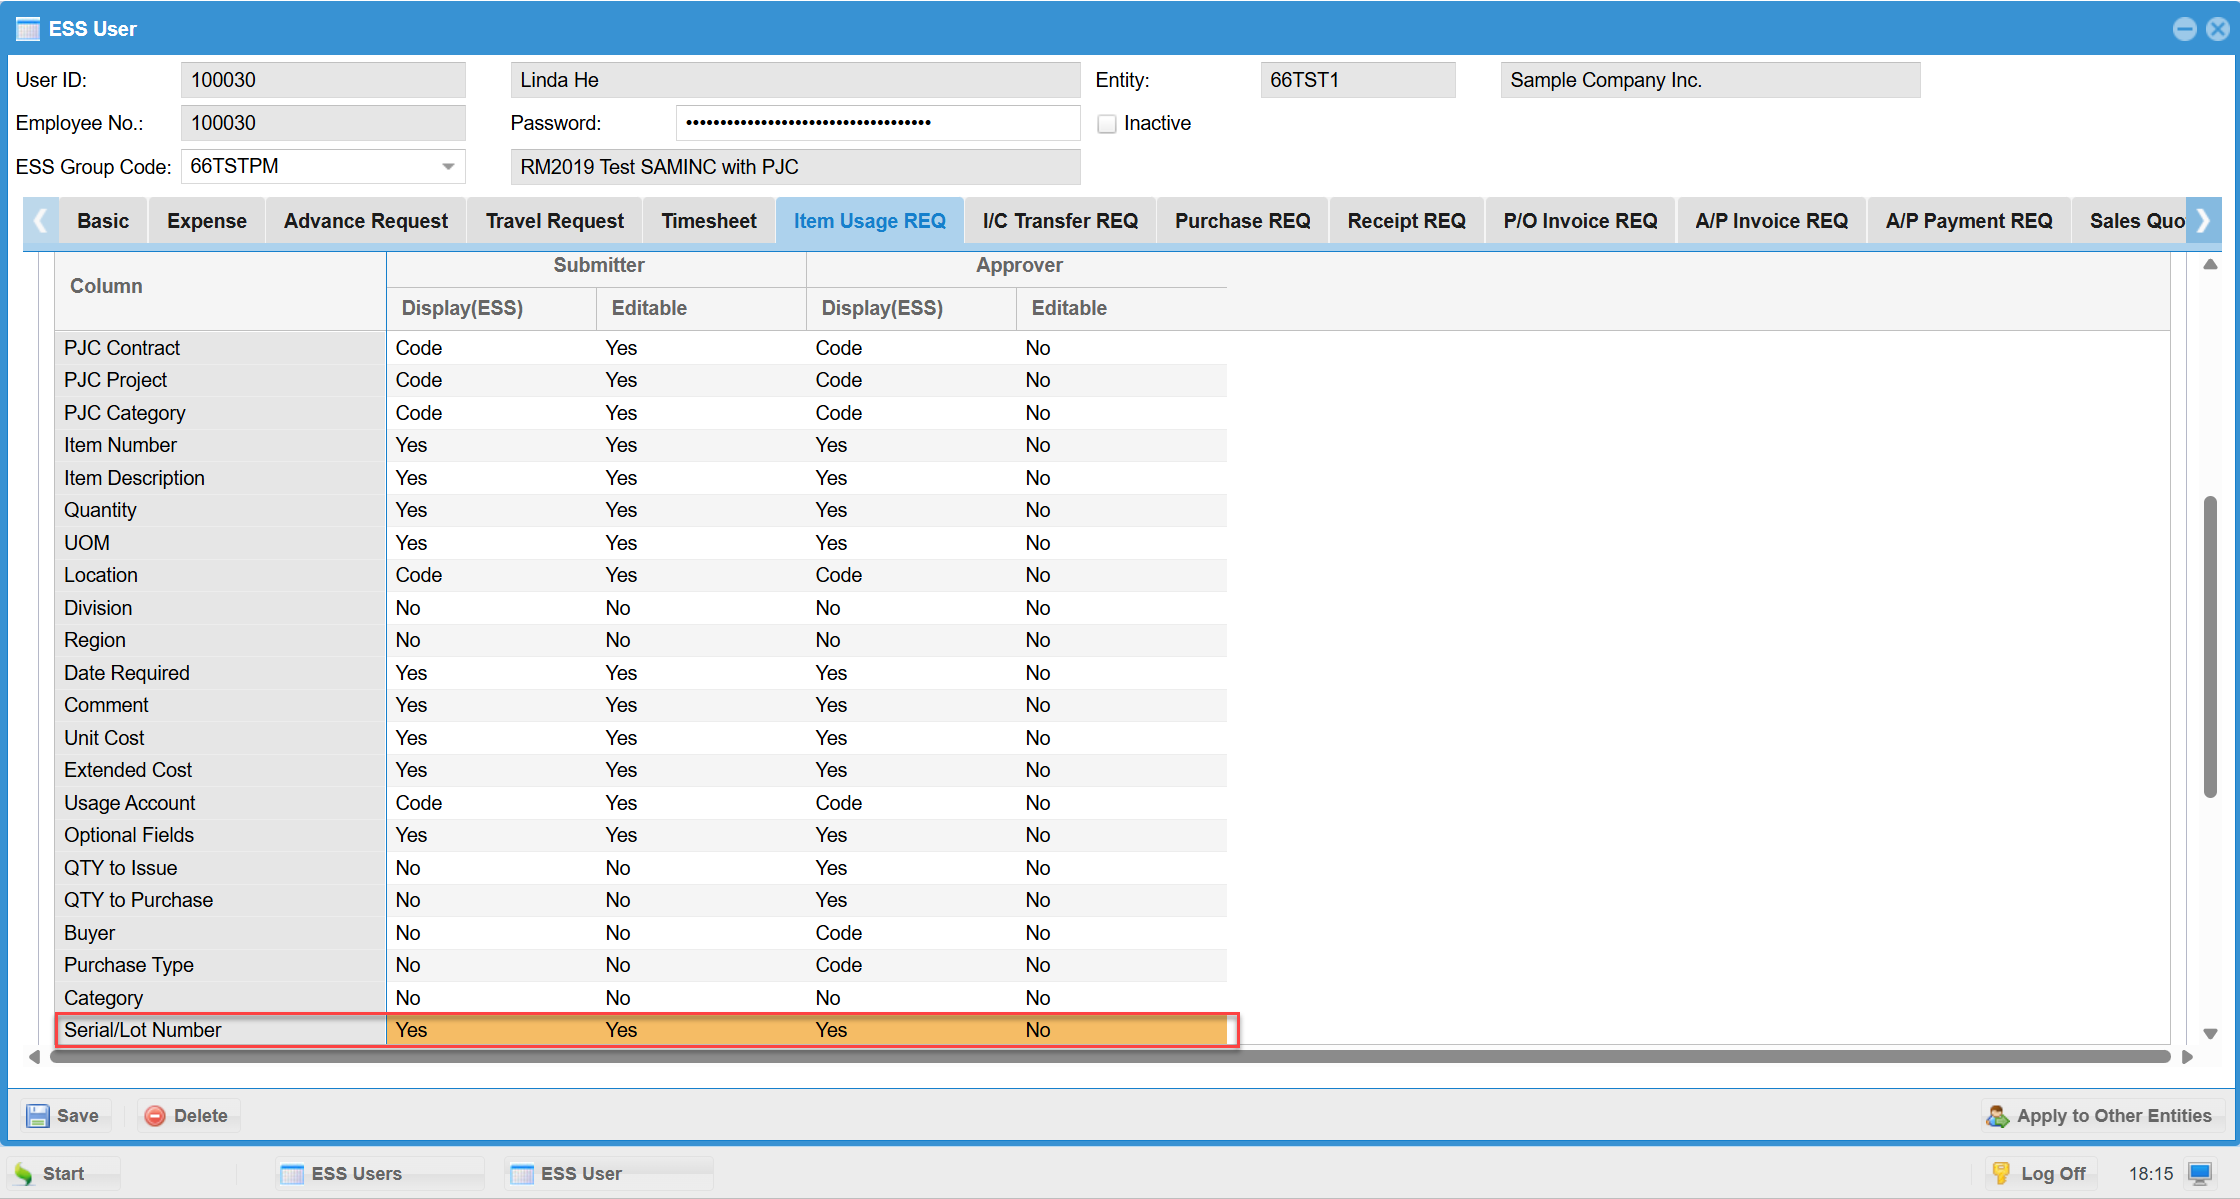
If the Serial/Lot Number feature is on, you‘re able to see the following two buttons:
One is in the 'QTY to Issue' column for items with Serial/Lot Number feature enabled, another is under the detail table.
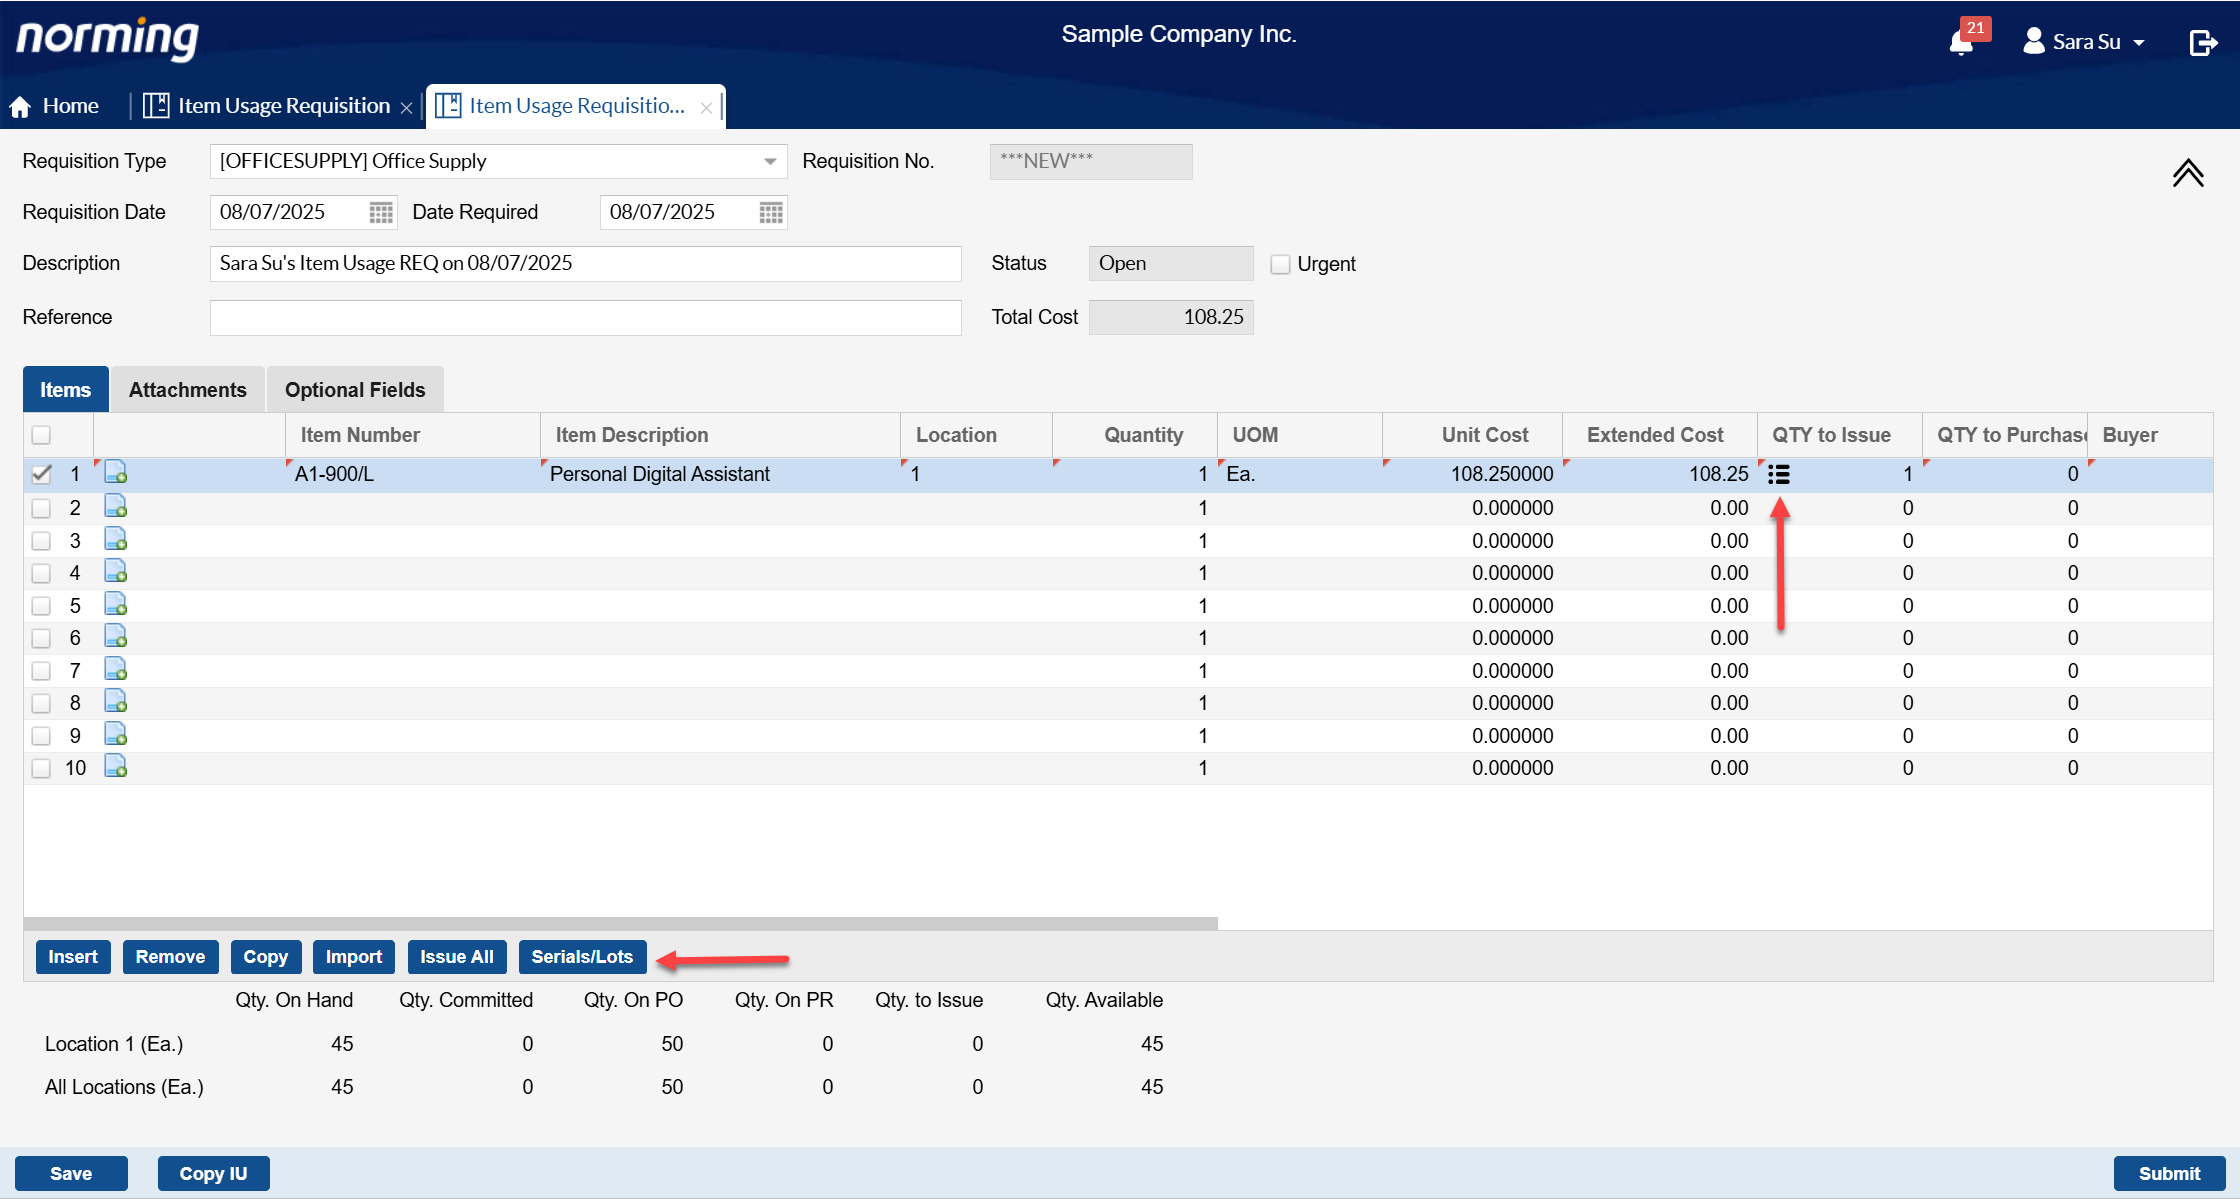
Click the Serials/Lots button to load the Serial/Lot Number Allocation screen:

Serial/Lot Number Allocation works just like the function in Sage 300 - you can let the system auto-allocate Serial/Lot number, or you can manually enter Serial/Lot number.
System will check whether the quantity entered for items is fully allocated, if not, warning/error message might pop up per the setting you defined in Sage 300 I/C Options.
Custom Requisition
Two improvements are made to Custom Requisition:
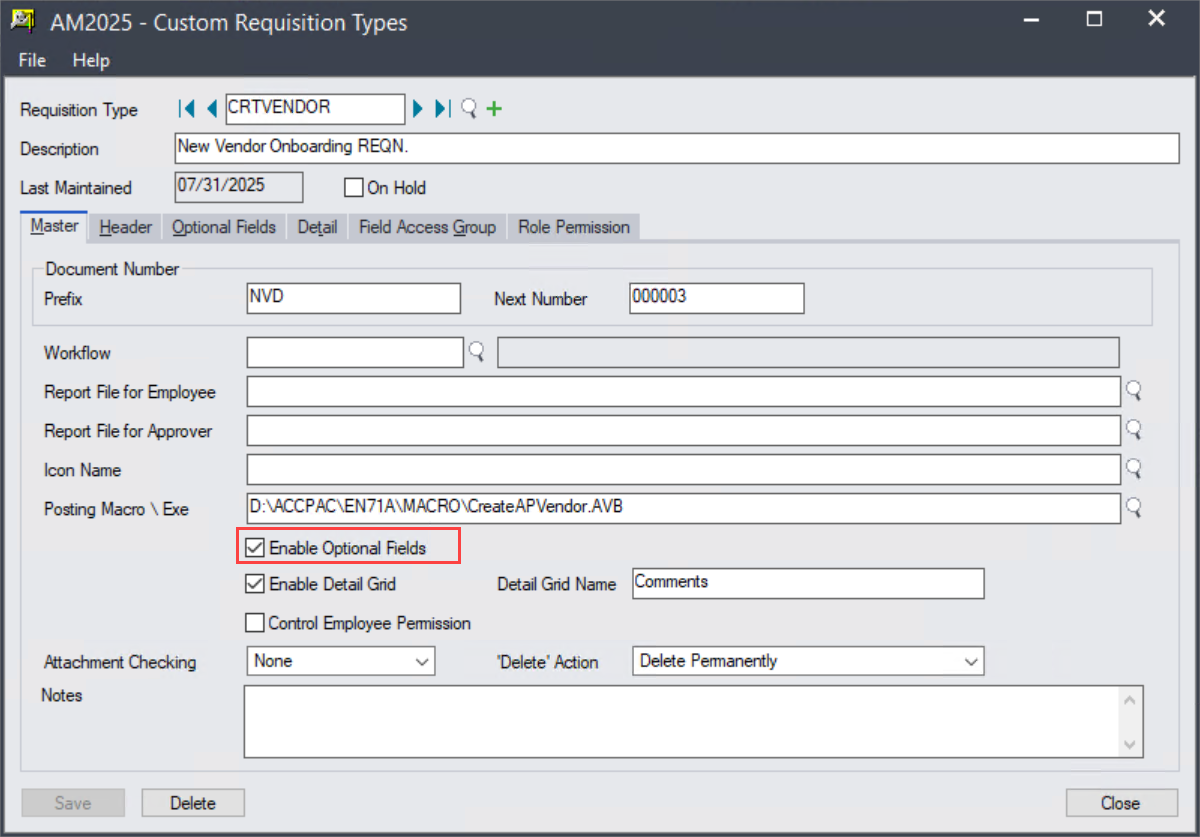
1. Support optional fields.
To use optional fields for a custom requisition, select the below option in Custom Requisition Types.
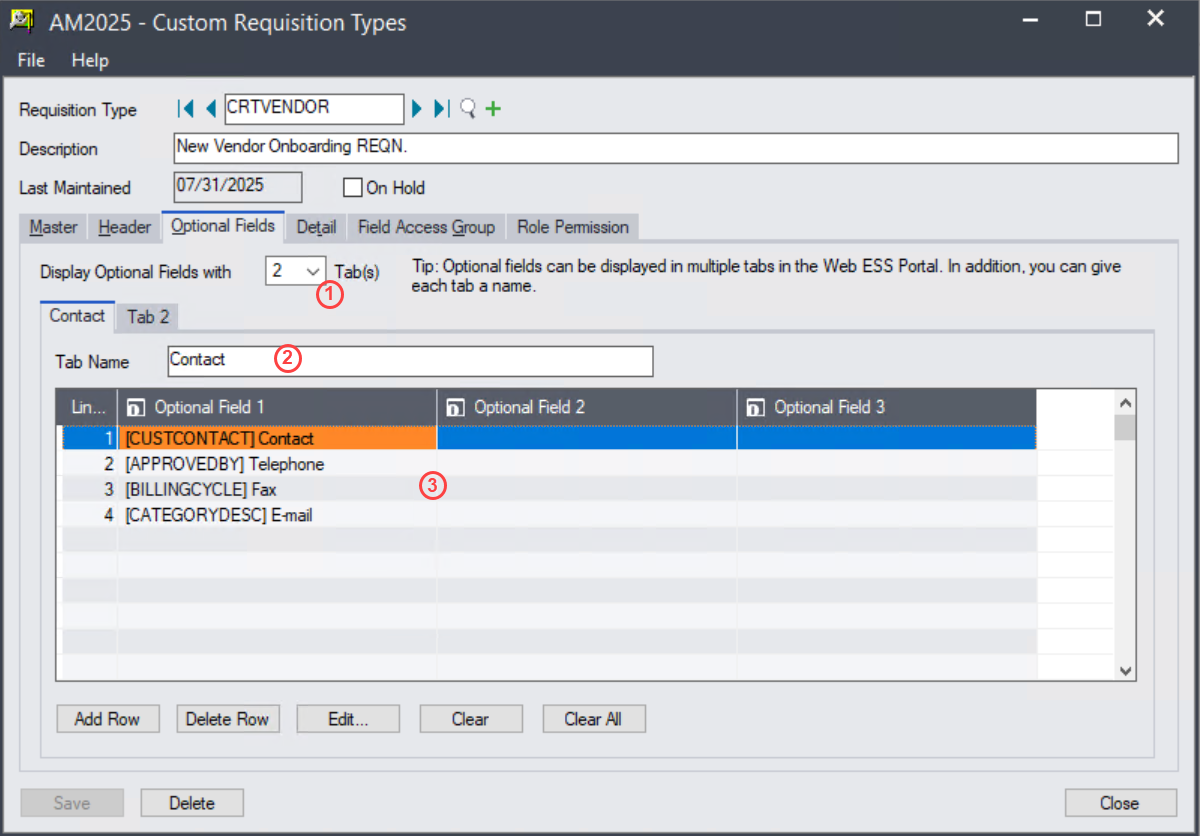
Then go to Optional Fields tab to define which optional fields you want to use, and how you want to display them.
Step 1 - Decide how to display the new optional fields, in one tab or multiple tabs.
Step 2 - You can give each tab a meaningful name, or leave them with the default names.
Step 3 - Add optional fields to each Optional Fields tab, just like you do for Header/Detail tab.
The below example is to add two tabs for optional fields to a custom requisition type named 'New Vendor Onboarding'.
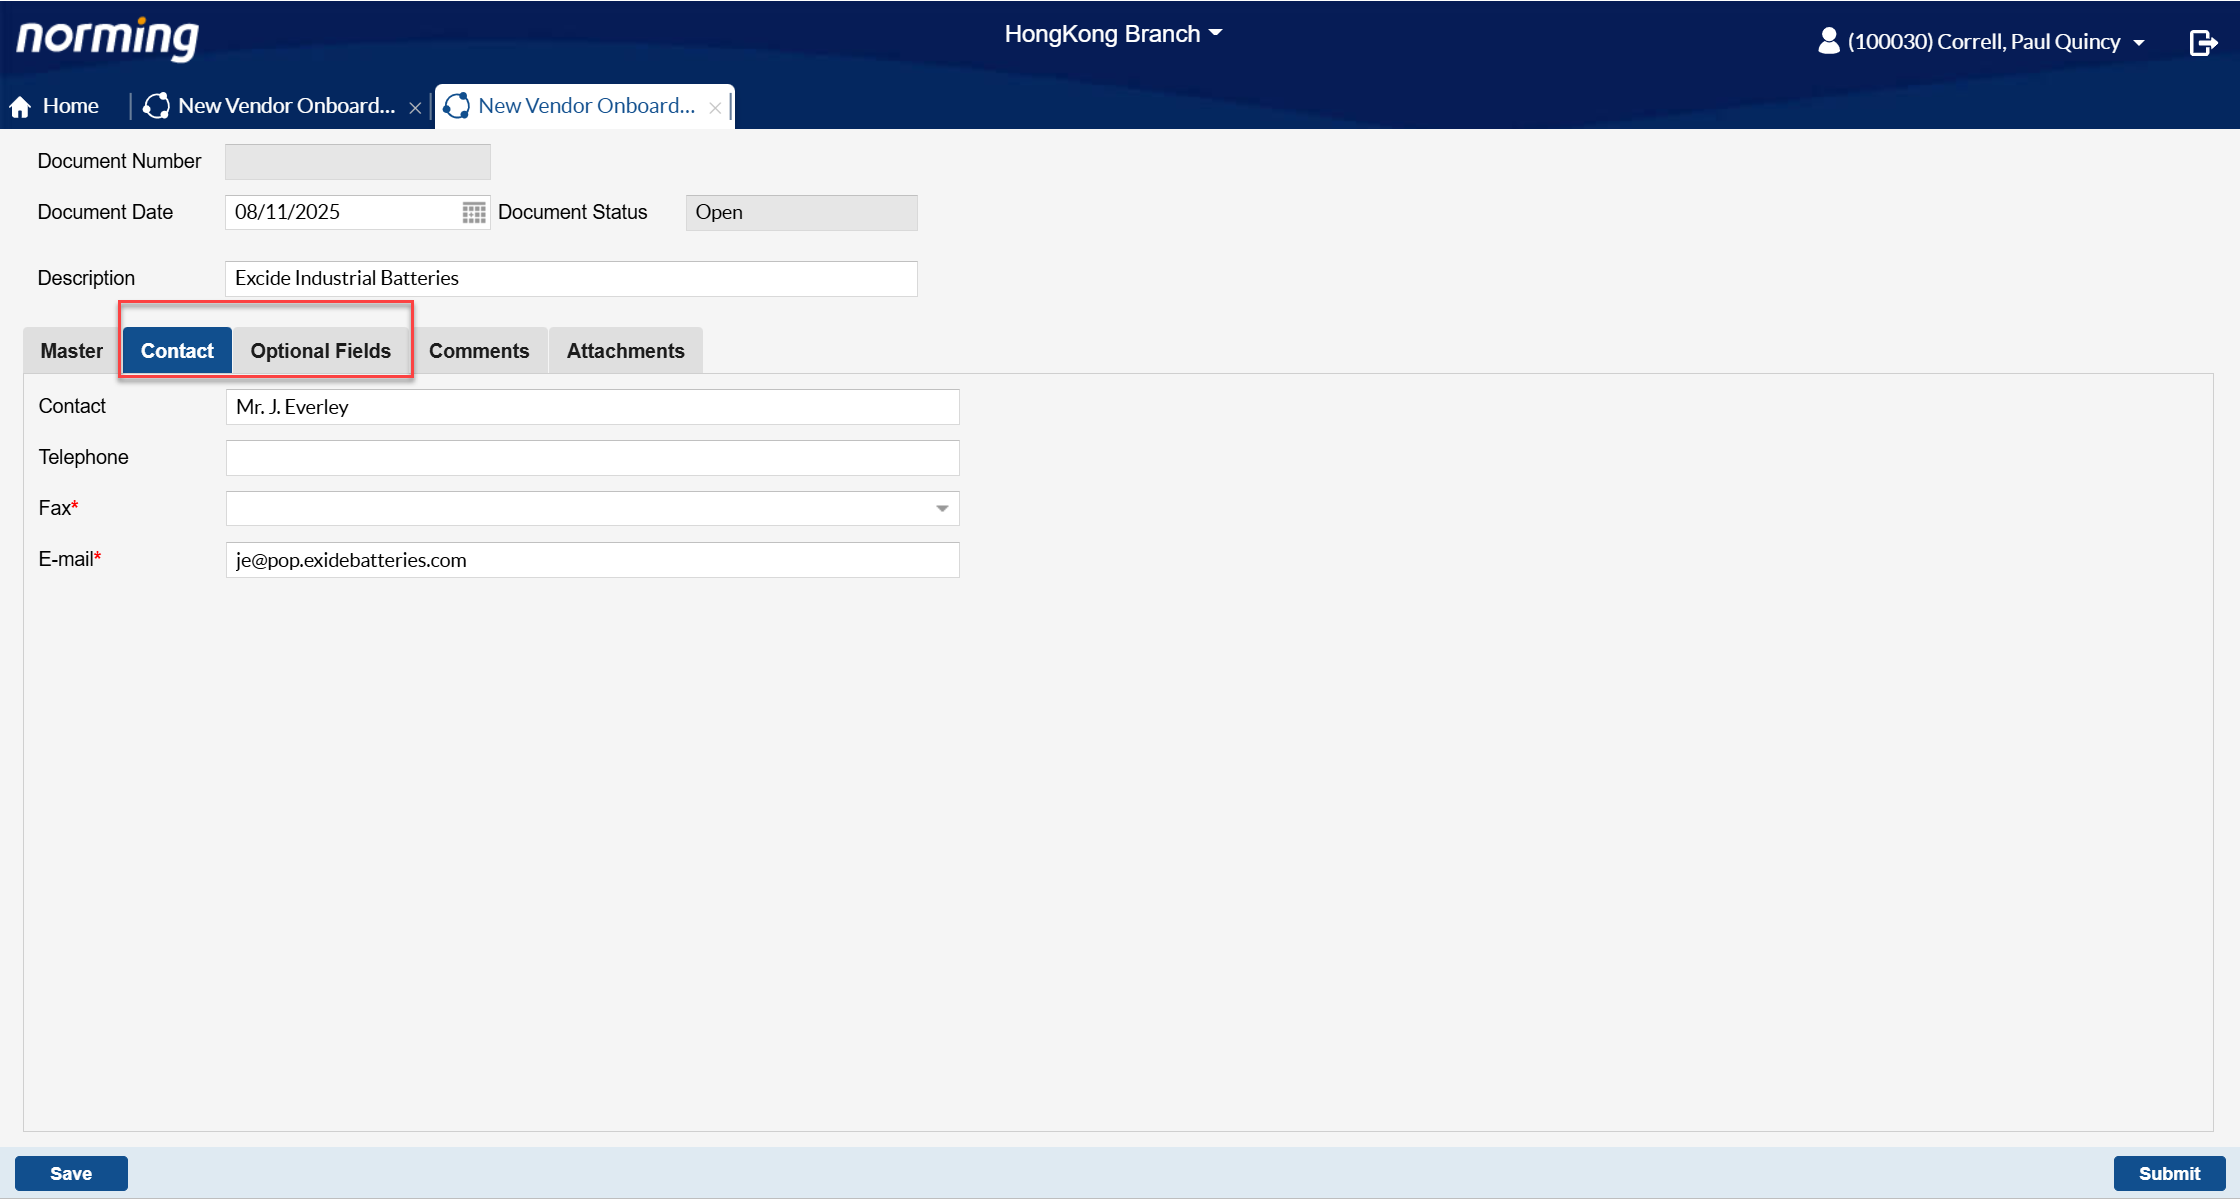
Add optional fields to the 1st tab, which is named 'Contact':
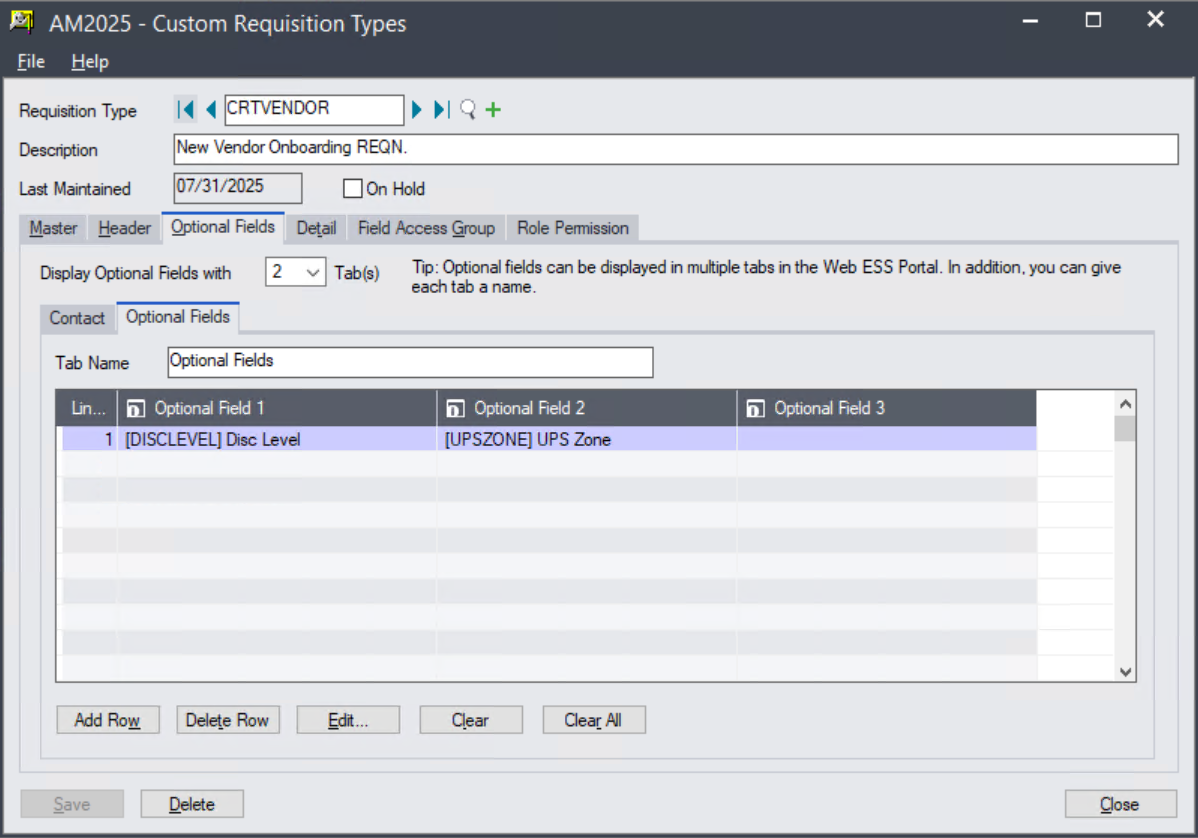
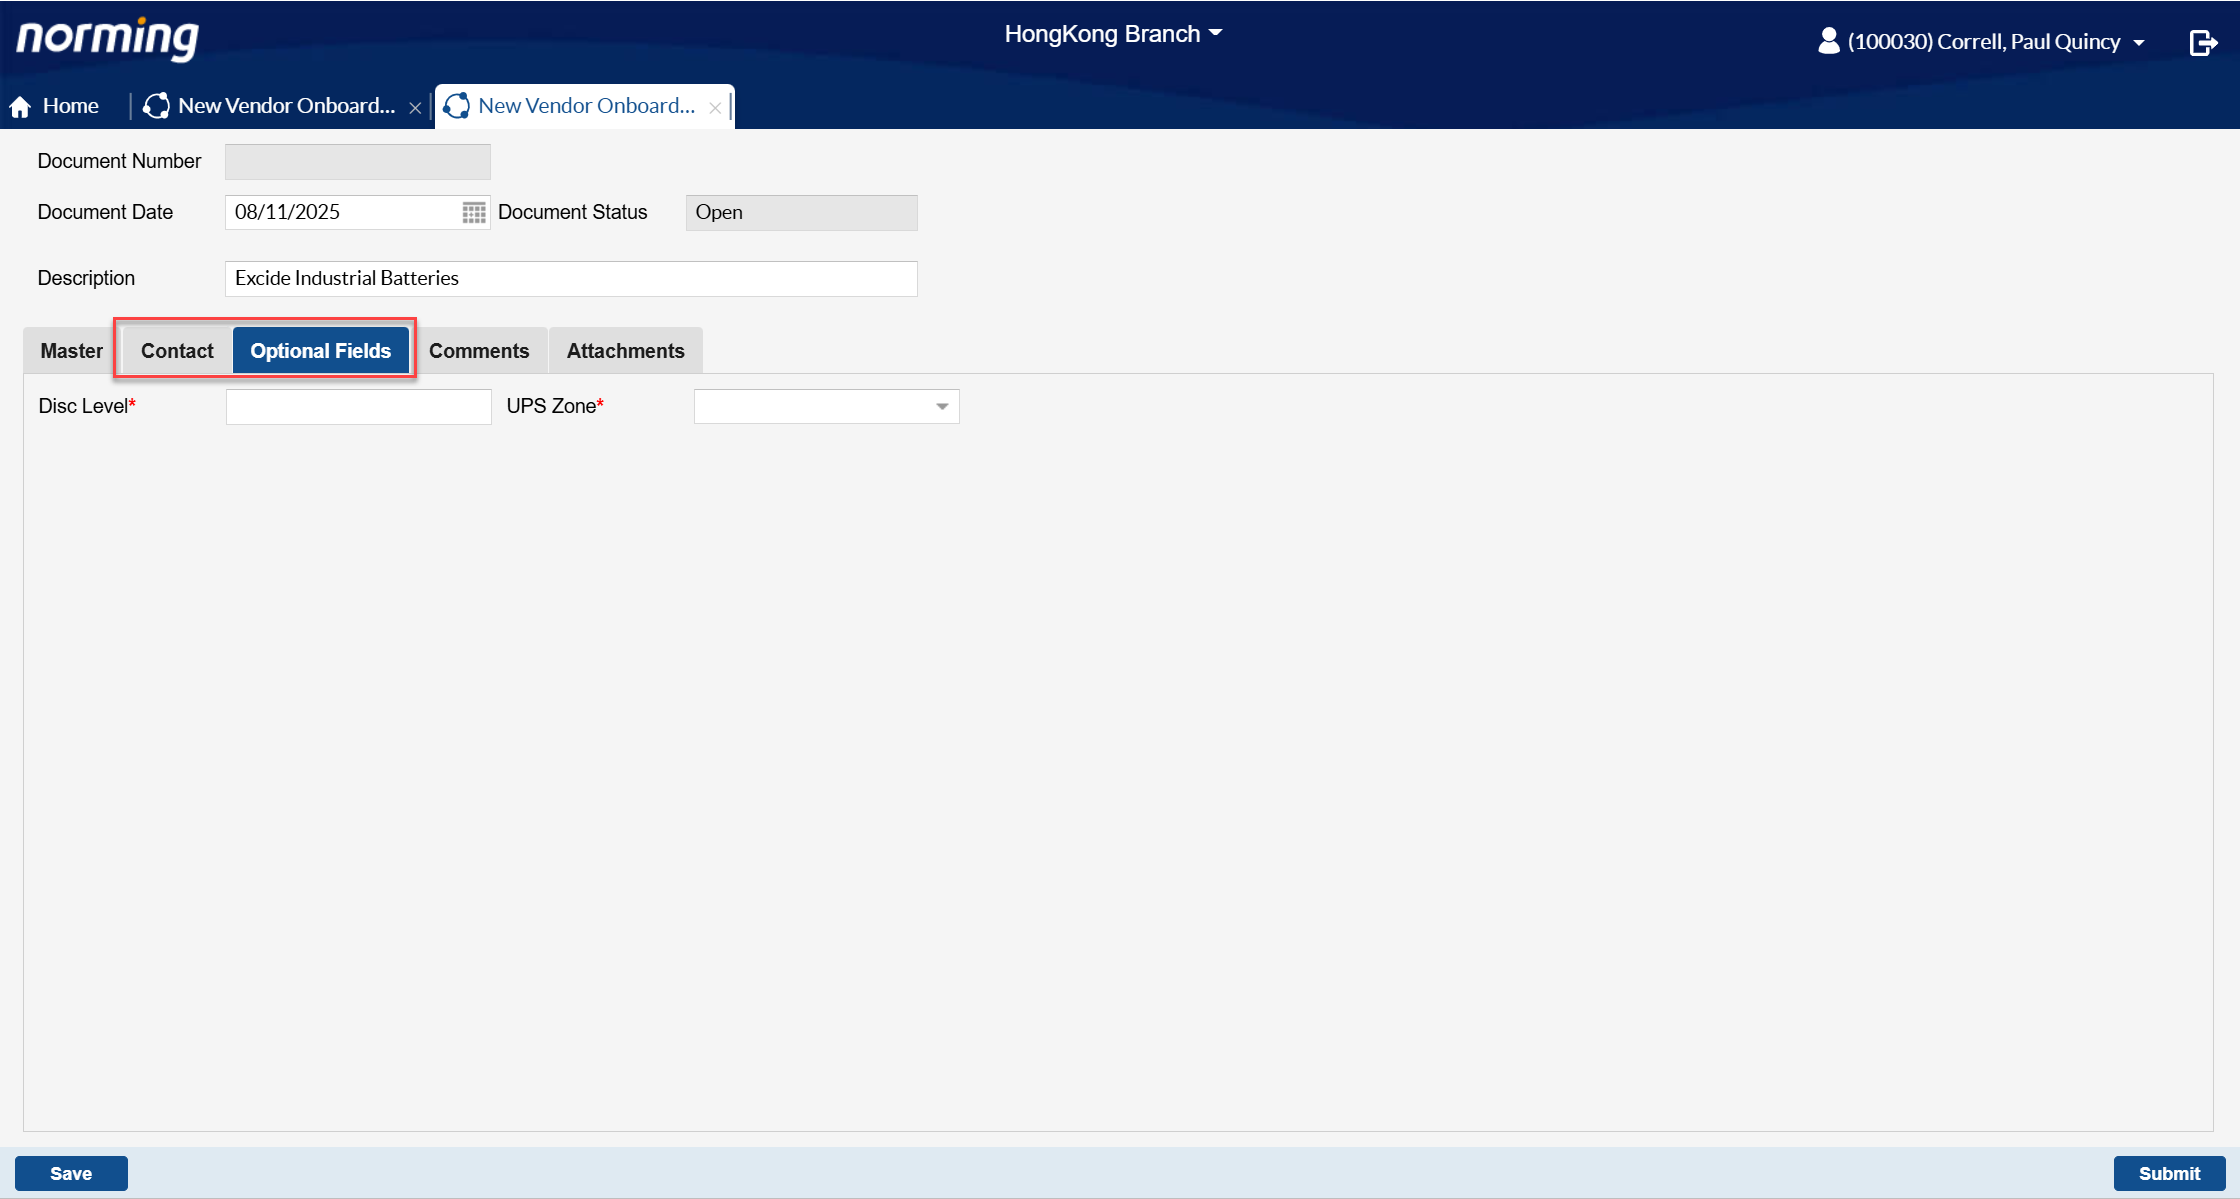
Add optional fields to the second tab, which is named 'Optional Fields':
The below two screens are the optional fields that added to 'New Vendor Onboarding REQN' Custom Requisition, here you can see how they look like:
Below is the how above defined second Optional Fields tab looks like in the Web Custom Requisition:
2. Default access permission can be assigned to new added fields.
Norming Custom Requisition allows you to define access permission for each single field on role basis, i.e. you can define whether to display a field and make it read-only or editable for a specific role (requestor or approvers).
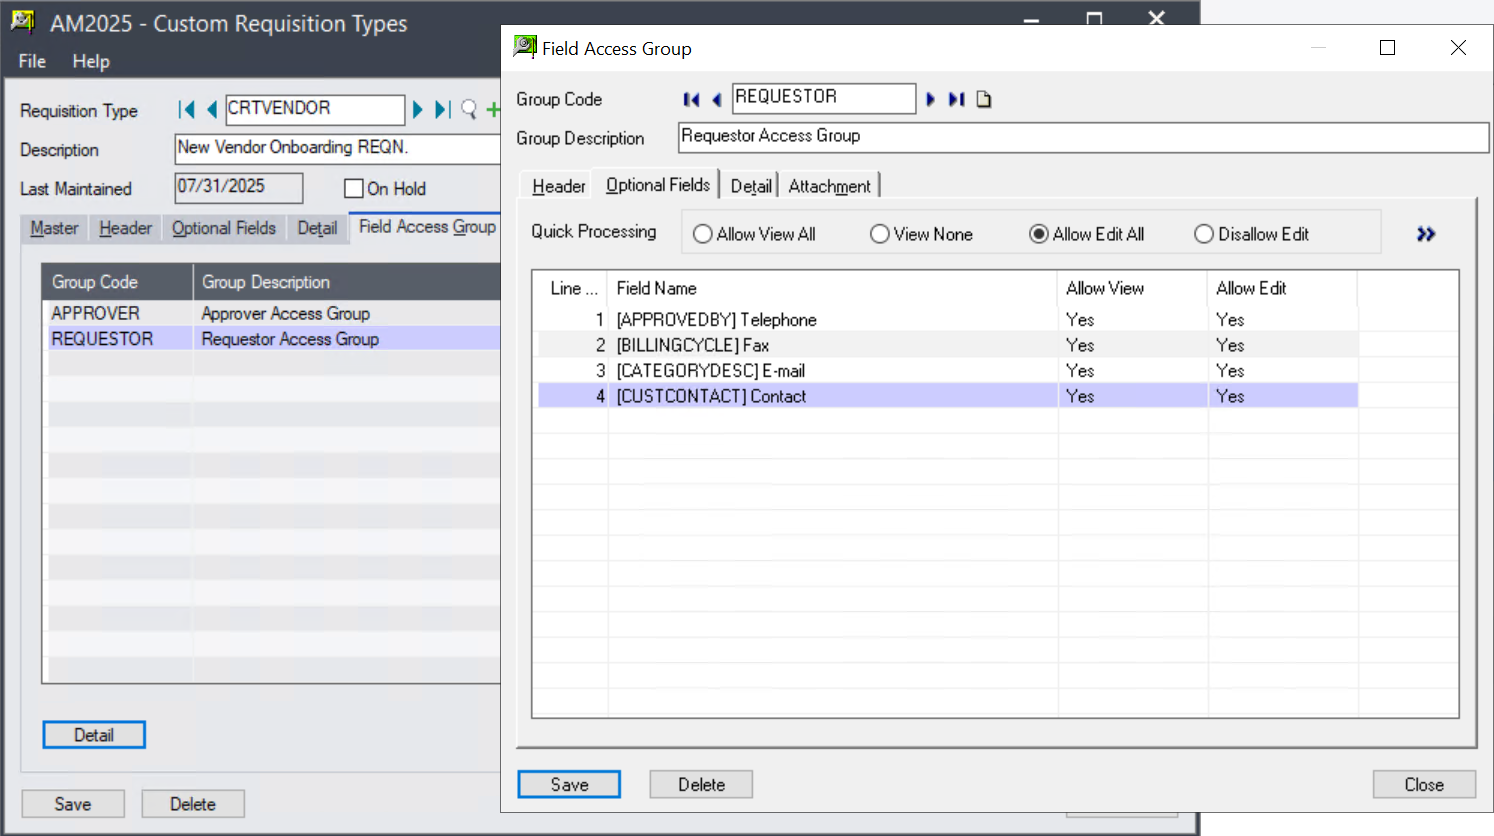
Previously, after adding any fields, you will have to go to 'Field Access Group' to define access permission for all the new added fields. Now with the improvement, default access permission can be maintained automatically.
The default access permission rules are as follows:
● For Requestor - all the new added fields are visible and editable.
● For Approver(s) - all the new added fields are visible and read-only.
If the default permission settings do not meet your business management needs, you can go to 'Field Access Group' for modification.
Custom Report
Custom Report allows you to publish any crystal reports onto Resource Manager Employee Portal. As we know, in Sage 300 standard reports, all the parameters are designed in 'Text' format, also including 'Date' and 'Yes/No' Checkbox parameters. Even more, the values of 'Yes/No' checkbox parameters being passed to Sage 300 reports vary in different cases, sometime 'Y' stands for 'Yes', and 'N' stands for 'No', while for some cases, '1' stands for 'Yes', and '0' stands for 'No'.
To make it easier to publish Sage 300 standard crystal reports in the Employee Portal, two improvements are made to 'Text' type parameters.
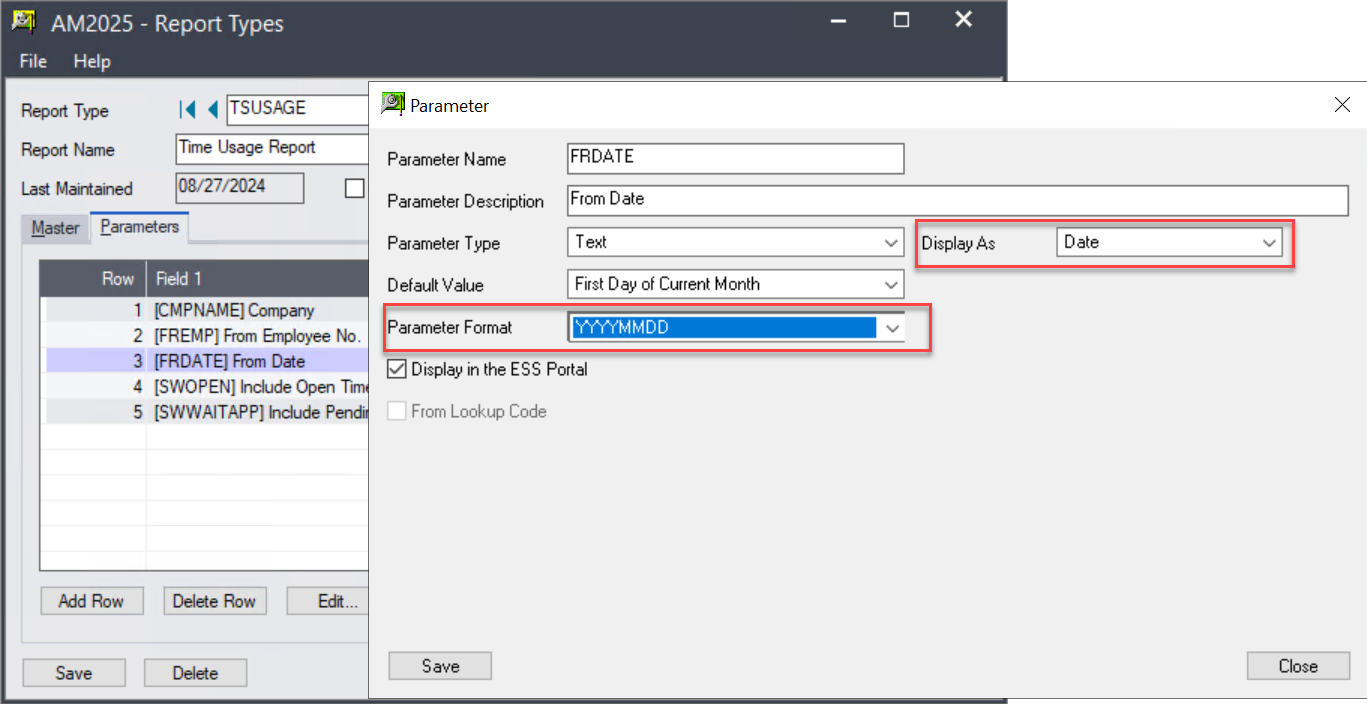
Improvement 1 - allow to display a 'Text' parameter as a Date format in Employee Portal.
In addition, you can define a default value and the format (of the value passing to report) for such parameter:
Improvement 2 - allow to display a 'Text' parameter as a checkbox in Employee Portal.
In addition, you can define whether to default it as selected or not, and define which value passing to crystal report for select/deselect cases.
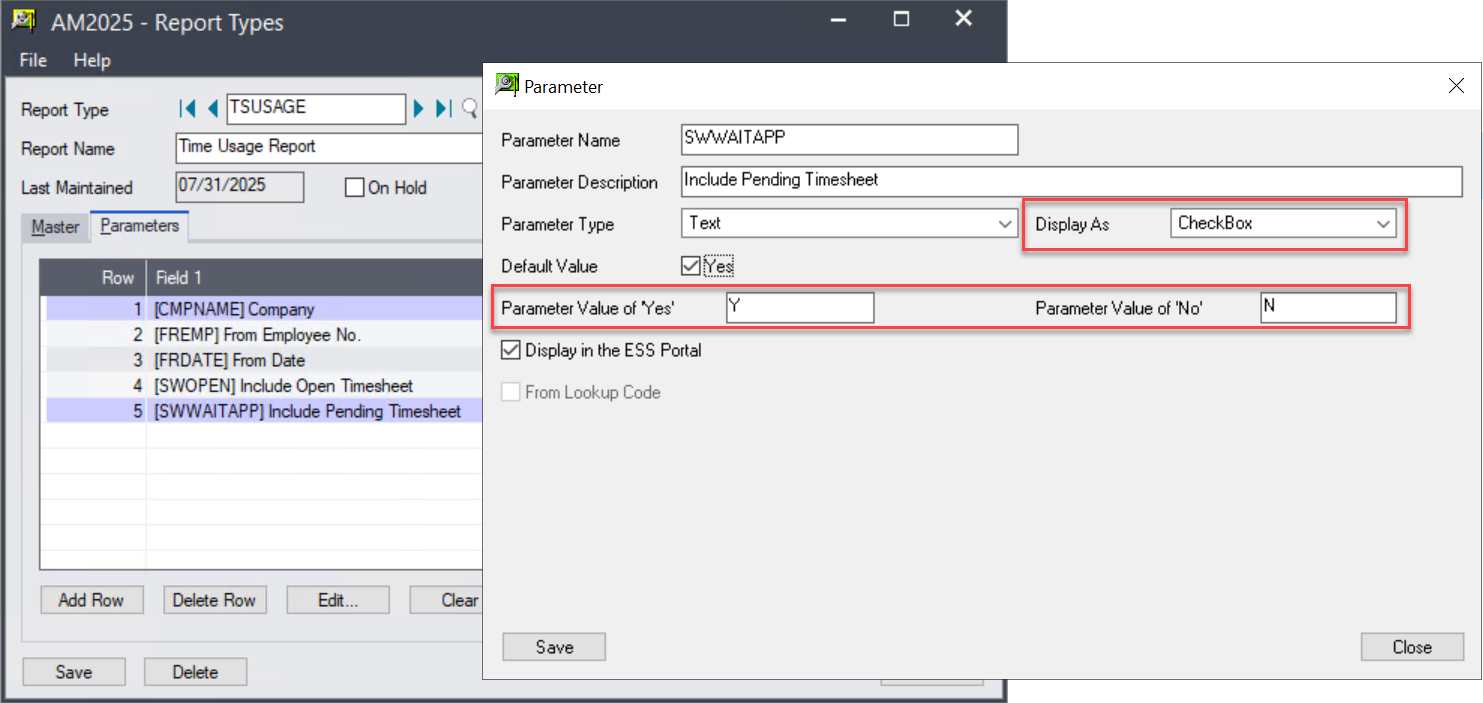
With the two improvement, less work is required to publish a Sage 300 standard report onto Employee Portal.
OCR Usage Reminder
If clients are running Resource Manager OCR solution (AP Automation or PO Invoice Automation), they must want to be reminded if usage of the subscribed package reaches a specific volume.
This feature is ready in this release. Below are the steps to set up OCR Usage Reminder:
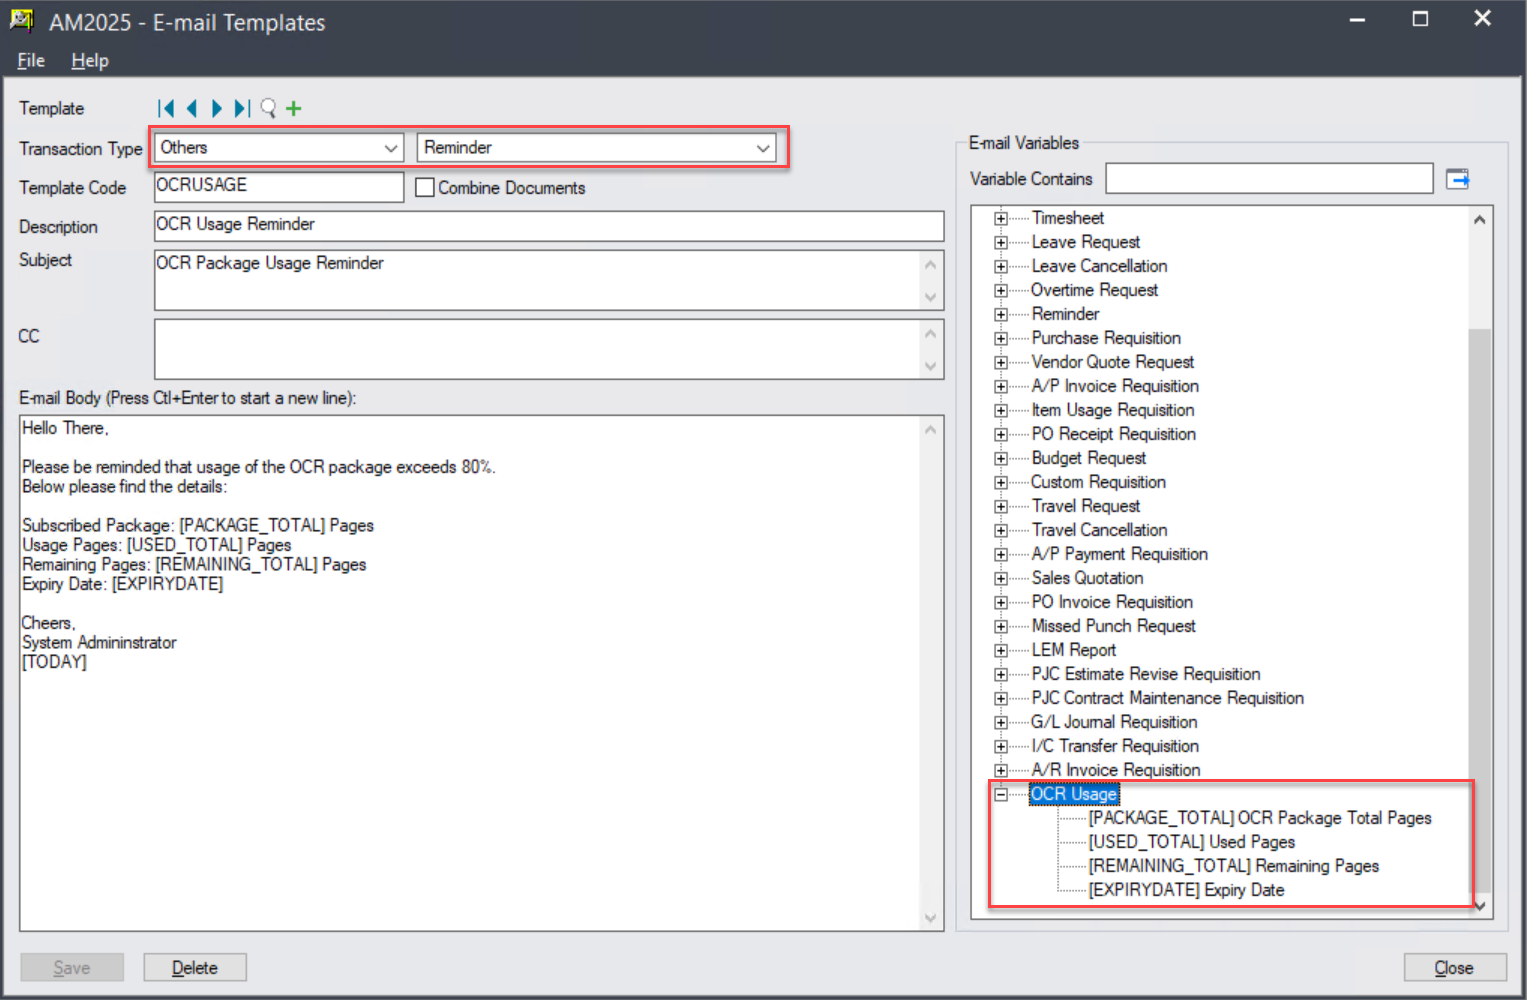
Step 1 - go to Resource Manager Back End Application > Approval Workflows > E-mail Templates, to define an E-mail template for OCR usage reminder.
Step 2 - go to Resource Manager Admin Portal > Administrative Services > ESS Portal Options to define the reminder.
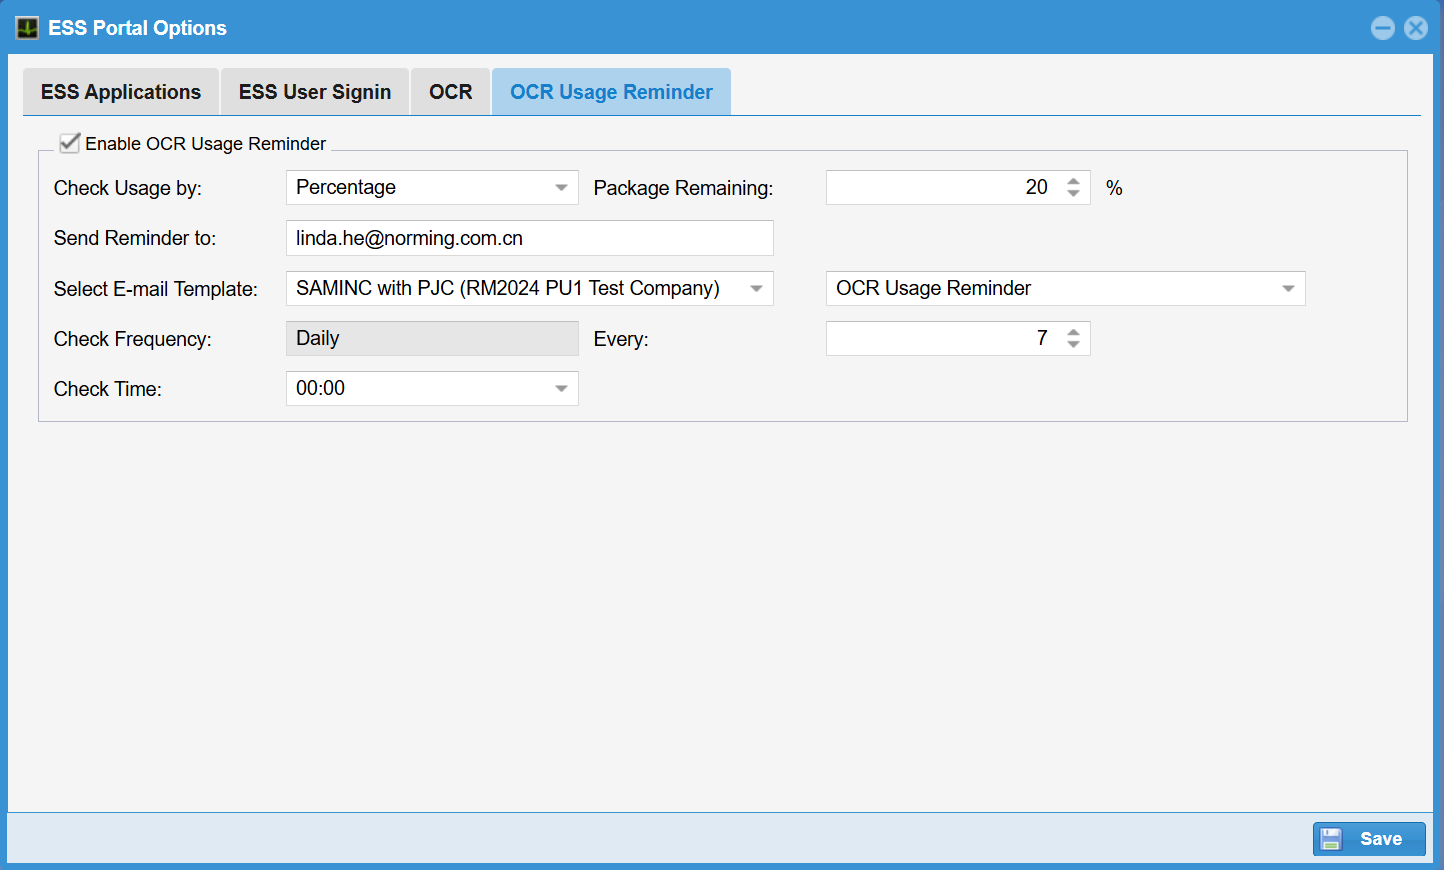
Step 3 - select the 'Enable OCR Usage Reminder' option.
Step 4 - decide how to check usage, by remaining percentage or remaining pages.
Step 5 - specify under what condition to trigger the reminder. In my above example, if the remaining package is equal to or less than 20%, reminder will be triggered.
Step 6 - specify who to send reminder to, and which E-mail template will be used.
Step 7 - specify the frequency to send reminder.
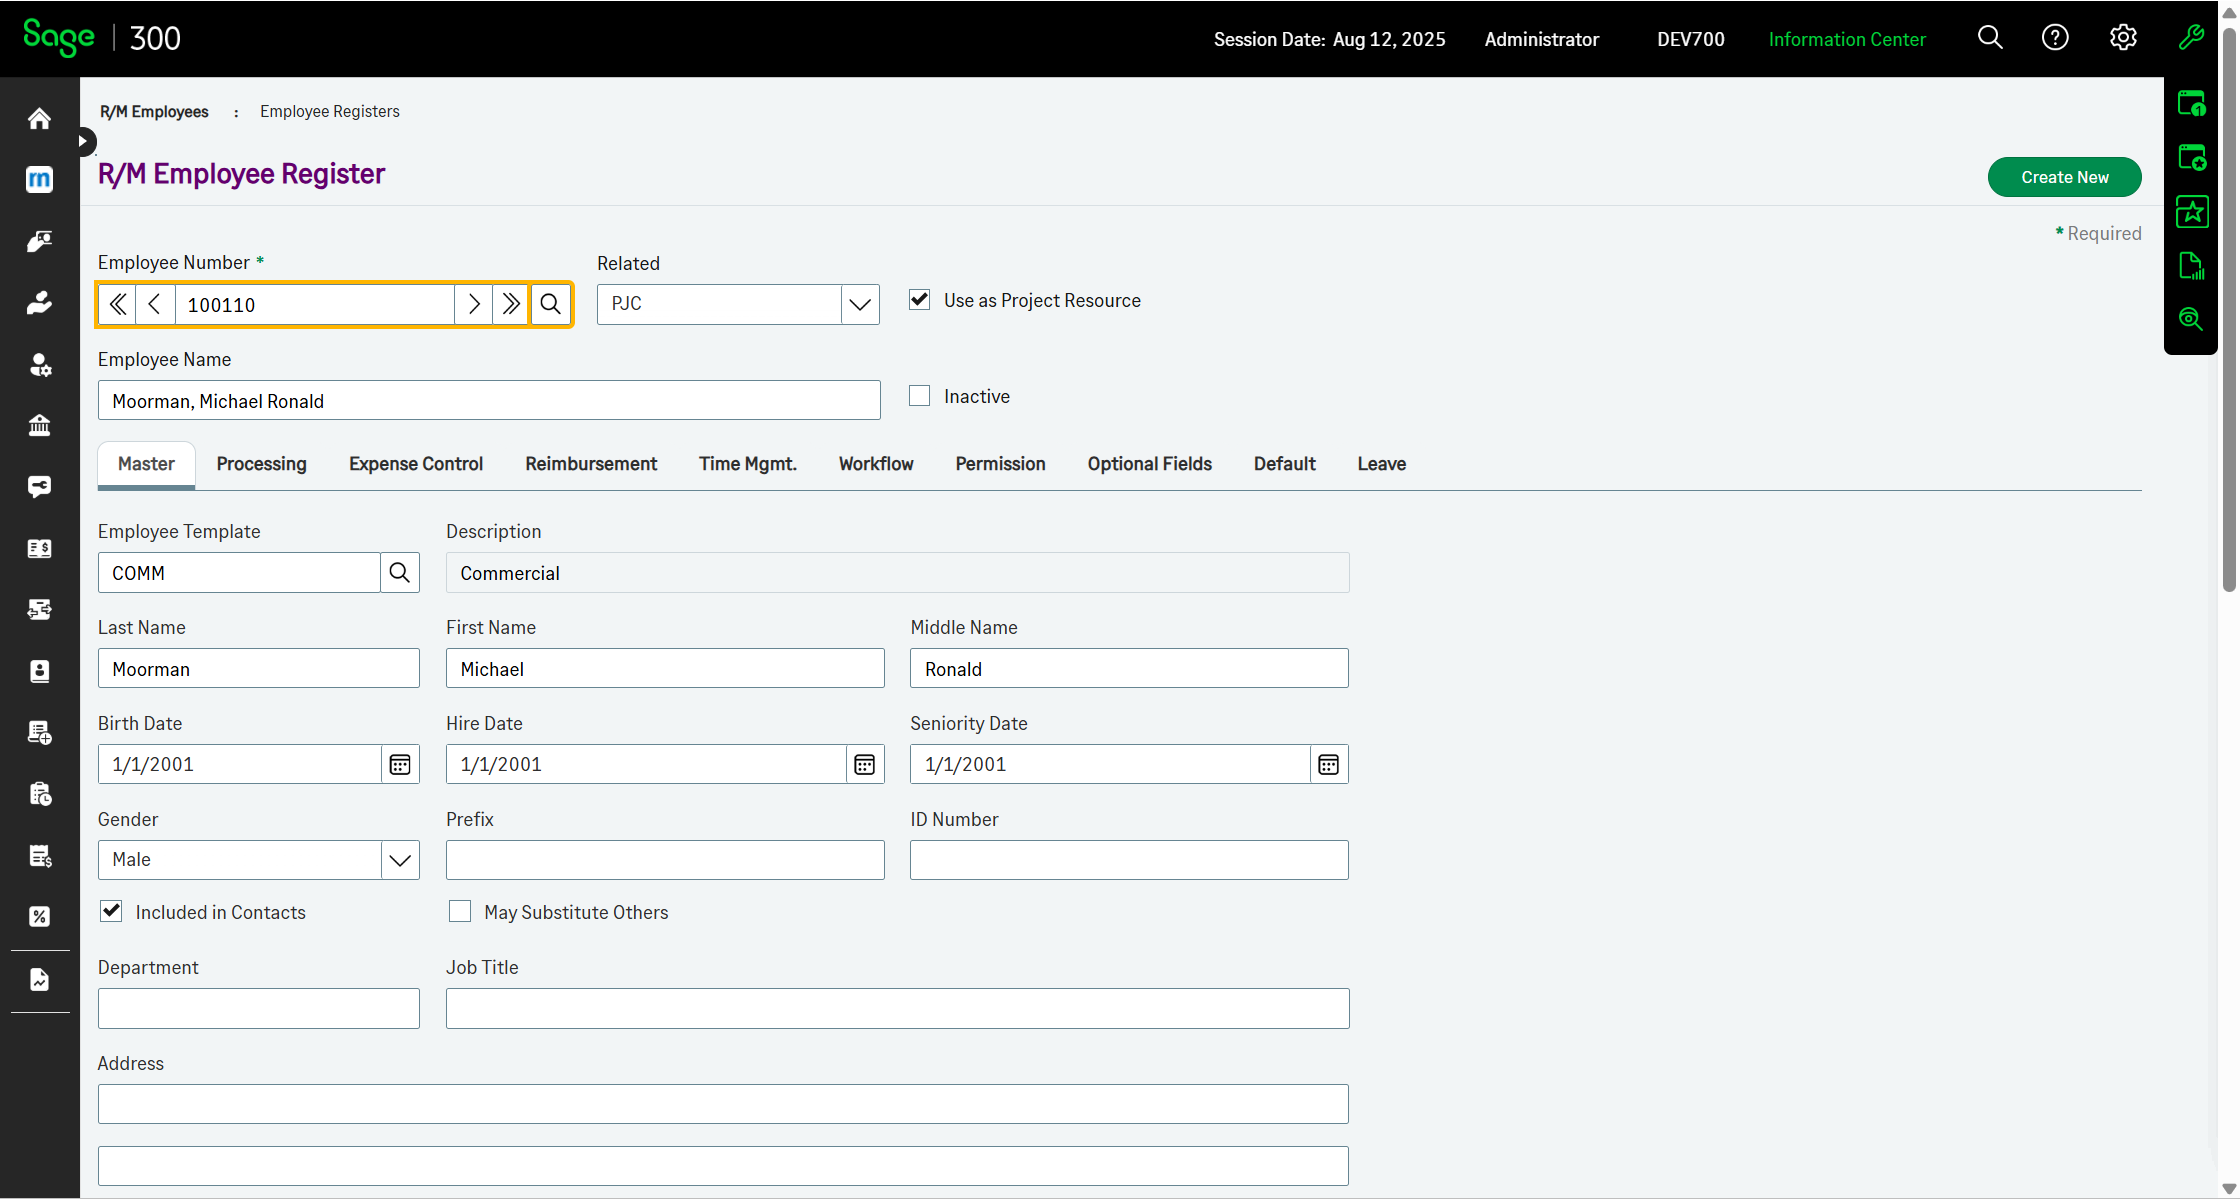
Web Screen
Employee Register functionality is now available in the Web Screen.
Sage 300 Integration
Resource Manager 2025 PU1 integrates with the following Sage 300 versions:
● Version 6.0 ● Version 2012 ● Version 2014
● Version 2016 ● Version 2017 ● Version 2018
● Version 2019 ● Version 2020 ● Version 2021
● Version 2022 ● Version 2023 ● Version 2024
● Version 2025